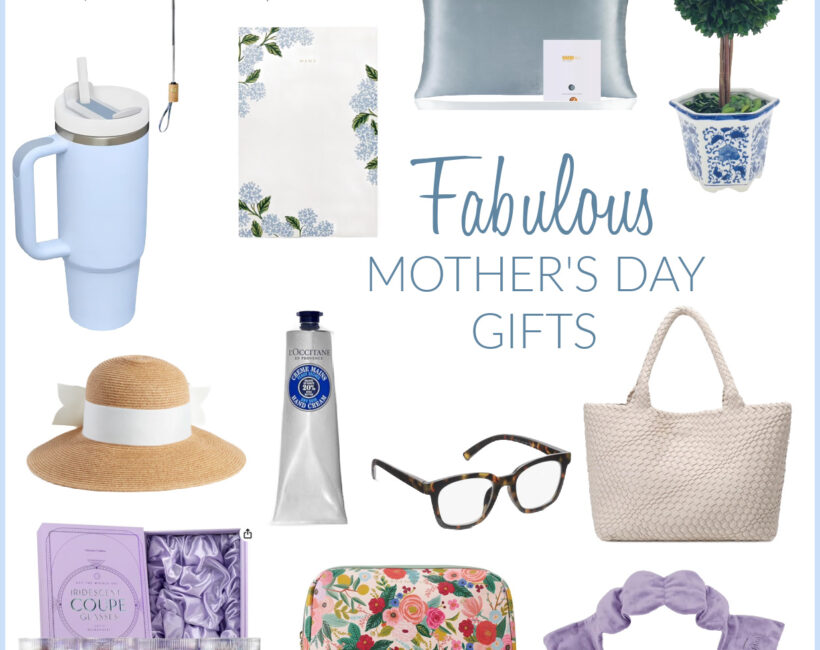
The story of 11 Magnolia Lane

Today we are sharing the story of 11 Magnolia Lane.

framed couch marked

I have been thinking about writing a post on the “story” behind our little blog for awhile now. I figured at some point our readers have wondered our connection or maybe the meaning behind the “11 Magnolia Lane’ title and the backstory on how we started all this. Honestly, many days when I turn on my computer and see the sweet comments and the facebook posts I marvel at how we got here too.

Super Cute-- laughing

So, here is the “longer” version of the “About Us” tab. I started a {different} blog as part of my paper (wedding invitations, party design etc.) business in 2009. Whenever I did a project for a wedding or event, I posted it on my little blogspot blog. Most of my followers were my supportive friends. I met Terry during that time as our sons were in preschool together and since she was an event planner there was an instant connection. We started working on weddings and events with our respective businesses, quickly becoming close friends as well. We soon needed to create a website/blog to promote the wedding and charitable event work we were doing together. As we tried to think of a name for the site, we both decided we liked the southern motif and were kicking around using “Magnolia” in the name of the event business.

Terry STep

{Terry}

At the same time, I was reading “party/event” blogs for my business which quickly led to reading home blogs {there were fewer at that time} and I was instantly hooked, after all I love to work on my house as much as I love to entertain. It occurred to me at the time how segmented the blogs were—there wasn’t much crossover {at that time} between the party/event blogs and home décor/DIY blogs and the idea hit me to recruit some talented friends to create a magazine type blog covering all those things like-minded people want to read about. And, as I mentioned in this post on our causes, through our event work, Terry and I were hoping to launch a fun but charitable fundraising event, and we figured a blog would be a great way to spread the word down the road. And, 11 Magnolia Lane was born.

11 Magnolia Lane button

Enter Christy…I have known Christy since my first day of college when– thankfully –the computer assigned us a roommates. We couldn’t be better matched as far as our tastes {y’all probably notice similarities in our decorating, and we tend to reconvene after separating while shopping to find the exact same items in our baskets!} and have stayed close friends in the years since our college days though we haven’t lived near each other since that time. My visits to see her were always the highlight of the summer and it was easy to see how talented she was at decorating her home and entertaining her house guests.

Christy Bright Yellow head Shot

{Christy}

As luck would have it, about the time this type of magazine type blog idea was kicking around in my head, Christy and family had just moved into this stunning home in North Carolina. Each time I visited her I felt like the world needed to see how lovely not just the home was, but the creative ideas she used to decorate and keep her family organized. Before too long, I roped her into joining up with Terry and I to start this little blog. Her pretty house became our initial “brand” and we used a {made up} address of 11 Magnolia Lane, liking the concept of the house and our readers being our welcomed guests.

nc house

We were pretty haphazard when we started, we posted whatever we were up to, and the holidays were upon us so we had plenty of stuff to write about. WordPress picked up Christy’s chalkboard post for “Freshly Pressed” and we suddenly started getting tons of comments on it and before we knew it we were off and running. We sort of played at blogging our first few months, just posting when we felt like it, making a few connections in the blog world and having fun with it. Most of our friends and families probably didn’t even know we were doing it, but it was fun for us.

Garden Shot-1

Things suddenly changed for me when my husband was unexpected transferred across the state shortly after we got the blog rolling. This admittedly threw my life into upheaval with having to close my design business, halt the event work Terry and I were doing, unexpectedly sell our house, find a new house and start completely over in a new area. Terry was working on a major event about the same time and Christy was also moving, {since she is military she rolls with it better then I did!} so we all pulled away from the blog in the summer of 2011, not really thinking or knowing if we’d continue working on it. {Note: that summer was the time Christy remade her new kitchen which eventually got published in Better Homes & Gardens Kitchen & Bath Makeovers, lest you think grass grows under her feet!}.

BH&G Kitchen + Bath Makeovers--Christy's kitchen

photo courtesy Kitchen + Bath Makeovers

I suppose after awhile we all missed blogging, after all, we’re pretty type A girls so we constantly have projects going and a blog provides great motivation to keep going, going going! By fall of 2011, we got back to posting again, I had plenty to share about the house we’d just finished having built, Christy was quickly completing makeovers on her new home and Terry started the work on her “In the Kitchen series” of cooking/healthy meal plans—which I was happy to hear she is going to be bringing back soon—and pretty soon we were back in the swing of it all.

couch shot

In the spring of 2012 we planned a weekend to meet up in person to get better organized and get some photography of the three of us done. {FYI for new bloggers, of all the things we’ve done, I think giving the blog the polished look with the new professional photography helped us the most.} We had a great time that weekend, and came back with renewed energy and suddenly 11 Magnolia Lane became not just a hobby but a business.

amy photographed

While we’re on that slightly touchy subject, after all we all just want to read blogs and see beautiful room makeovers and mouth-watering recipes, not advertisements right? Well, that spring we were accepted into the BlogHer network which has been a great relationship for us. They provide occasional sponsored opportunities which help us offset the costs of running a blog, not to mention the personal costs of craft supplies, décor supplies and even sometimes the childcare we need to actually write our posts. We are very, very careful about which opportunites we participate in, trying only to take ones that match our subject/content areas and things we actually endorse, and we appreciate our readers understanding about them.

So we’re now entering a new stage at 11 Magnolia Lane. Terry is still spending time with her gorgeous new baby boy, but she’s got a ton of ideas about healthy eating and menu planning coming up soon. Christy is getting ready for her next move and will have a new house to start making gorgeous—probably a rental home this time which will give a new perspective since many of our readers are renting as well. I am in a new home too, we were fortunate enough to be able to move back to where we lived when we started the blog {just blocks from Terry!}. We don’t know yet if we’ll be able to buy the home we’re in—we hope the owners will sell it to us—so I am also in a quasi-rental situation as well. Christy and I both think this is a great opportunity to show new projects that don’t involve major construction :) . We have some great new things coming up, such as offering decorating/ organizing services in our respective areas and possibly offering some of our favorite home décor items for sale via 11 Magnolia Lane. Christy and I are heading to Haven {anyone else going? We’d love to meet you!} this summer to network with other DIY bloggers. All in all, we think the future is looking bright!

street shot

Thanks to all of you who read us, and especially take time to interact with us via comments, email or on Facebook. As a blogger we all have many, many days where we think—“What am I doing posting my pantry on the internet??? This is totally nuts!” But we enjoy the relationships that we’ve built online and it’s been fun to be a part of this ‘blog-o-sphere’ as it grows.

Did I answer anything you might be wondering? If not, please leave questions in the comments. As always, thanks for stopping by!

XO,

{Amy}

Amy Step{We are sharing this post at Savvy Southern Style}

Pin It

Posted in General & About Us | Tagged , , , , , , , | 14 Comments

Hulu Plus Giveaway and a new way to enjoy the classic “Soaps”


allmychildren_onelifetolive_02x3-135x135

So, does anyone out there have a secret (or not so secret?) love of Soap Operas? I admit that after years spending my days in an office or home office, daytime television slipped away as an indulgence in my life. However, I remember the days before reality TV was dominated by feuding housewives and before HGTV was available ALL DAY LONG, when my college roommates and I convened by the TV after our classes to decompress with a few hours of diet cokes and the soaps in the afternoons. Ahh…those were such carefree days!

Nowadays, changing TV tastes and the abundance of TV channels available have to led some Soap Operas ending their shows. Iconic soap characters lived for decades with twists of greed, catfights, love triangles and more then one come-back-to-life-after-being-killed-off story lines.

While I haven’t tuned in to soaps for awhile,  I am sure I am not the only one who remembers the characters like Viki Lord played by Ericka Slezak, the central heroine of One Life to Live (who began the role in March 1971[4] and played the character continuously for the rest of the show’s run) and Erica Kane played by Susan Lucci, one of the most iconic female soap opera stars EVER? Who are your favorite characters? I know I am not the only one who knows exactly who “Luke & Laura” are? Right? Or am I showing my age! :)

Personally, I think its great to see classic shows return to air. When you can instantly pick-up what is going on with a story line because you remember the characters from years ago its easy to get hooked right back in. And, I think that watching via HULU is a great way to to decompress after my kids are in bed at night so as not to detract from the millions of things that unfailingly must get done each day.

So, we’re spreading the news that two of TV’s most beloved soap operas in history are back with brand new episodes weekdays on Hulu starting on April  29th with an exciting giveaway (scroll down). Many original cast members are back as well as a “hot new group” of cast members.  These new shows being reintroduced via HULU are 3o minutes long and are proclaimed to be ‘edgier, sexier and hotter’ then ever. And now thanks to streaming TV via HULU, you can follow a NEW One Life to Live and NEW All my Children on your schedule and at your convenience. {with no VCR timers to set! :) }

Here is a bit about each “story”…

One Life to Live: Follows the complicated lives of three main families: the wealthy Lords, the powerful Buchanans and the strong-willed Cramers. The quiet simplicity of small town living is often interrupted by the drama between them yet despite the struggles, strong family bonds keep them united. Click HERE for more information about the new One Life to Live. All My Children: Revolves around the lives of the  residents of fictional Pine Valley. For nearly forty years, this town has seen the trials and tribulations of its dynamic families. Now your favorite stories are back, and more dramatic than ever! Click HERE for more information about the new All My Children. SO…now you can watch your favorite episodes on-the-go AND have full access to the Hulu library which includes complete series episodes of top TV hits.

To begin a free week trial, just click HERE.

If you aren’t familiar with Hulu and Hulu Plus here is a bit about how they work.  

hulu   

Hulu.com is a free option for users who want to watch TV shows on their computers. Hulu is limited to the PC environment.

The Hulu Plus subscription service is the first and only internet video  subscription service to stream full current seasons and a deep library  of back seasons of hit TV shows from ABC, BET, Comedy Central FOX, NBC, MTV, VH-1 and more, in HD, to computers, internet-connected TVs and Blu-ray players, set-top boxes, mobile phones, and tablets, all for  $7.99 per month with limited advertising. 

AND, now for the GIVEAWAY!!!

One winner will win a free year of HULU Plus! Simply leave a comment on this post (below) telling us your favorite soap opera character (any soap). One winner will be chosen at random from the comments left before 5/26 and one grand prize winner will win a Roku streaming player!

Good Luck!

XO,

Amyamy name graphic


Sweepstakes Rules:

No duplicate comments.

You may receive (2) total entries by selecting from the following entry methods:

a. Leave a comment in response to the sweepstakes prompt on this post
b:Tweet (public message) about this promotion; including exactly the following unique term in your tweet message: “#SweepstakesEntry”; and leave the URL to that tweet in a comment on this post

c: Blog about this promotion, including a disclosure that you are receiving a sweepstakes entry in exchange for writing the blog post, and leave the URL to that post in a comment on this post

d: For those with no Twitter or blog, read the official rules to learn about an alternate form of entry.

This giveaway is open to US Residents age 18 or older. Winners will be selected via random draw, and will be notified by e-mail. You have 72 hours to get back to me, otherwise a new winner will be selected.

The Official Rules are available here.

This sweepstakes runs from 4/29/2013-5/26/2013

Be sure to visit the sponsor’s brand page on BlogHer.com where you can read other bloggers reviews and find more chances to win!

Pin It
Posted in giveaways | Tagged , | 46 Comments

From the Archives–Mother’s Day Printable

I wanted to share another one of our “oldies but goodies,” from the archives here at 11 Magnolia Lane.  Mother’s Day is on May 12th this year, so it’s time to get your acts together!  This printable quote that Amy designed would look gorgeous in a thrift store frame, and would be perfect for your mom!  Thanks for stopping by–Christy

Helen Keller Quote

Mother’s Day always seems to sneak up on me, its always SO busy the first week of May. I thought I would offer a little help to all of you in the same position. I have loved this small sign my Mother has had in her house for years. I decided to re-create it and post it as a quick printable. So, all you need to do is just print it (I use light colored scrapbook paper) and slide into a pretty frame.

Helen Keller free printable quote

To me, this quote exemplifies the true meaning of “Motherhood.”

Click here {helen keller quote} for a printable. (This is sized for a 5×7″ frame)

Enjoy!

XO,

Follow Me on Pinterest

Posted in Projects & Printables | Tagged , , , | Leave a comment

Makeovers & Margaritas Girls’ Night


Makeovers Margaritas MarkedI was thinking back the other day about this really fun party I hosted several years ago. It was pre-11 Magnolia Lane so I shared it on my event design blog but never here. Since I had some pictures from it and thought I would run a quick recap for nostalgia’s sake if nothing else.

And since we featured Margaritas {my husband’s very famous margaritas…stay tuned for recipe!} I thought the timing was perfect timing with Cinco De Mayo just around the corner.

margarita

I have been to many, many “direct sales” home parties–you know, like Mary Kay, Thirty-One, Pampered Chef–and even hosted a few. Since I sometimes (but really not always, I promise) like to make things a little fancier then my guests would expect, I decided to jazz things up a bit when I hosted this Arbonne make-up party for my girlfriends.

tablescapeWe had so much fun playing with the make-up…check out this awesome display. By the end of the night we were all smoky-eyed and red-lipped beauties!

make upAt the time, part of my business were the paper products–the labels etc. so I featured them prominently at this party.  I own up to having had a habit of making my events a bit of a personal showcase for my design business :)

I made little drink stirrers along with some take home favors for the guests.

drink stirrersfavors

tablescape 1And, you may even recognize the letters on the “You Are Beautiful” banner from my Vintage Sign Tutorial last week {click to see how I repurposed them}.

bannerThis night was so much fun, I may have to do it again. Last year I hosted a Girls’ Night Out for Thirty-One Gifts along the same line, maybe I need to get another Girls’ Night in the plan again soon!?!

 If you want more information, click HERE to learn more about Arbonne’s products {they are just the best in my opinion!} and for contact information.

On to the FUN part! My husband’s Margaritas are simply the best drinks around {well along with his Martini’s {they are also HERE}}. I persuaded him to share his recipe–its very simple, no pre-packaged mix and these are so fresh and tasty. Having been a bartender, he describes things in “counts” for how long he pours–and warning: He is HEAVY HANDED!–so just change the portions/ratios according to how many you are making.

******************

Margaritas

4 counts good, gold Tequila {vary by how strong you want the drink}

4 counts sour mix {we use Poe’s—do NOT use “sweet &” sour mix!}

2 counts good Triple Sec

3 counts Rose’s Lime Juice

Tons of fresh squeezed Lime juice.

We do the cold glasses rimmed with salt, because of course he’s a “professional” {in his former life LOL} but serve however you like.

margarita

And now you’re ready for Cinco De Mayo!

XO,

Follow Me on Pinterest

Pin It
Posted in Entertaining, Events, Girls Night Out, Shopping, Spring, Weddings & Events | Tagged , , , | 1 Comment

Antlers as Home Decor

I’ve been a little bit obsessed with deer antlers lately.  I think Terry started it when she found that amazing wooden stag/deer head for her baby’s nursery {here}.

new baby

That little baby is pretty, sweet, too!

I looked on Craigslist and mostly found stuffed deer heads.  I’m not quite sure I’m ready to take that plunge yet, although I come from a family of hunters.  Mostly I remember being scared. to. death of the stuffed deer head at my grandmother’s house when I was little.

I did find one box of antlers, but they wanted $50 for them!  Then I remembered that, as mentioned above, I come from a family of hunters.  I’m smart like that.  I called my uncle, who lives in Michigan, and who just happened to be coming for a visit.  He brought me four antlers, or “sheds” as they call them (because the deer shed them and they find them in the woods).  I think one set–the four-pointers–were from one of my cousin’s deer, but they separated them for me.

Here’s what I did with two of them:

Deer antlers in home decor

It isn’t rocket science; I just incorporated them into the decor on our shelves.

Deer antler

They’re mostly white, but the bases are knobby and rough.  I just used them as-is.

Deer antlers I had to move them higher on the shelves because the dogs went crazy over them and I’m sure would have chewed them to bits by now if I had let them.  I guess that makes sense.

I’ve seen the antler chandeliers, but I’m not a huge fan of those.  I think I like this look better…it adds a little interest but doesn’t overwhelm the style of the room.  By the way, remember that white duck that started out bright blue?  I like him much better this way!

What are you favorite natural decor pieces?  Turtle shells?  Coral?  Or are you an antler fan, too?

Thanks for stopping by.

christy name pic

Follow Me on Pinterest

facebook button 2

Pin It
Posted in Home Inspiration | Tagged , , , , | 1 Comment

DIY Vintage Sign

full sign done

I have wanted a vintage “Groceries” sign to hang over my pantry just like Christy had over her wall calendar but haven’t been able to find one. So, I decided to make one. This actually was a part of the chalkboard paint projects we recently posted about on Tatertots and Jello, but I never actually included it in that post so the project debuts here today!

sign side view done

This is a very easy way to make a sign, I know there are lots of other ways–stencils, vinyl etc. but this is a way I came up with since I don’t have a vinyl machine nor did I have the right size stencil.

I used this exact same technique to make this “Easter” sign last year for my mantel.

easter mantel 2

My technique is SO simple. First, I used either a ready made plaque (from Michael’s) or just a scrap board (from Home Depot) and painted it. The black paint on the groceries sign is actually black chalkboard paint, my daughter painted this scrap piece of wood while I painted the board for my DIY Huge Giant Chalkboard last summer as her keep-her-occupied “project” so it just needed lettering.

 I used these simple paper die-cut letters, I got these at Michael’s several years ago and have used them for tons of projects and they are the perfect size for a 3 to 4″ board. You just place them on the board, spacing as equally as you can.

all lettersThen just trace around each letter with a pencil.

letterAfter that, I just painted the letters using a small paint brush. Even though I used chalkboard paint, I used regular white craft paint to fill in the letters on the “groceries” sign. I did two coats of paint for this one because the white looked a little thin.

painting lettersIt doesn’t have to be perfect, if you go slowly its not too difficult to stay in the lines. As you can see, I used a very fancy paintbrush–I think this one came out of my daughter’s $1 watercolor set?

sign painting lettersI would like to finish this sign off to make it look more “vintage”, maybe with some light stain or some dark wax to tone down the white letters a bit, but that won’t happen until  the boxes with those items are unearthed. If I do, I will be sure to update and let you all know if it worked.

In the meantime, this little sign is now just hanging there over my pantry. Easy!sign close done

Is anyone doing anything fun this weekend? I have more painting to do in our new home but can’t seem to motivate!

XO,

Follow Me on Pinterest


  Sharing this at Serenity Now.

Pin It
Posted in Crafts, DIY, Projects & Printables | Tagged , , , , , , | 2 Comments

Simple Strawberry Freezer Jam

 ***Don’t forget to enter our current giveaway {here} for a copy of 31 Days to a Heart of Hospitality, by Edie at Life{in}grace.  I just finished it the other night, and it’s really wonderful!  Hurry, because the giveaway ends on Thursday, April 18th!  ***

Strawberry freezer jamStrawberries are in season, and they are beautiful, sweet, and inexpensive right now.  When I was little, we used to have a strawberry patch in our backyard.  We’d pick a few quarts, then my parents would make jam, and we’d have strawberry shortcake for dinner. Well, now I buy my berries at Publix, but the tradition continues!

Freezer jam is SO easy.  If you’ve never made jam or jelly before, then start with freezer jam.  There’s no cooking, and I think the results taste WAY better than the cooked jams and jellies.  It’s also prettier–a bright red instead of a brown-red.  The trade-off is that you have to freeze the jam until you’re ready to open and use it, and then it needs to be stored in the refrigerator.  It will last up to a year in the freezer, though, so if you plan ahead and make enough, you’ll never be without!

Start by buying a package of fruit pectin and some jars.  I like the small jars for jam (about 1/2 c.) because they’re nice for gift-giving.  If I have extras, I just fill them with my Aunt Diane’s hot mustard recipe {here}.

I’ve seen two kind of fruit pectin in stores.  I’ve always used Sure-Jell in the past (it comes in a box like Jell-O), but this year I tried Ball’s version.  The package looked like this, and was right next to the canning jars and supplies at the store:

Ball fruit pectin

The jam recipe is on the back of the package.  If you use Sure-Jell, then there’s an insert inside with ALL kinds of jam recipes.  These tell you how much fresh fruit to buy and how much sugar you need.  Strawberry jam only requires strawberries, sugar, and pectin.  One pound of fresh strawberries will yield about 2 cups of crushed berries for jam, so buy accordingly.

I made a double batch of jam, so I started with four pounds of berries.  I washed them, hulled them, and cut them in half.  To mash them, you can use a food processor, blender (I used my Vitamix), or a potato masher.  I like my jam to have only small chunks of fruit, so I process the berries a bit longer.

Chopping strawberries for jam


Using the exact amounts of crushed berries and sugar is so important to having your jam jell.  If they say 2 cups of crushed berries, then don’t skimp.  Buy an extra pound of berries just in case and plan to have strawberry shortcake or fruit salad for dinner!

Strawberry jam

The Ball pectin required a little less sugar than the Sure-Jell recipe; however, it also didn’t thicken quite as much.  Sure-Jell requires you to boil water and add the pectin; Ball pectin just gets mixed in with the sugar and fruit.  My husband likes the Ball recipe better but I like the Sure-Jell recipe better (they also have a sugar-free version for diabetics), so we are a split-decision household.

Mix the pectin, sugar and fruit together according to your package instructions:

Strawberry jam


And then pour into the prepared jars (I wash mine in the dishwasher to sterilize them):

Strawberry jam in jars


The jars usually sit at room temperature on the counter for up to 24 hours while they set; then you pop them in the freezer or send them down the street to the neighbors.

Plan ahead and bake bread the same day you’re making jam–we had homemade sourdough bread with ours and it was slap-your-momma good!  We also had strawberry shortcake with the leftover puree, or at least, angel food cake with strawberries (I guess that’s not technically shortcake).  My kids were in heaven, and my husband accused me of thwarting his diet, yet again!

Strawberry shortcakeSpeaking of kids, freezer jam is a great recipe to make with them.  It’s hard to mess it up, there’s no huge pot of boiling water and hot fruit on the stove, and the results are pretty much immediate.

Later in the summer, I highly recommend peach jam–it is amazing–and I always make hot pepper jelly, too, although that uses the traditional cooking and water bath and is a bit more difficult.  This is a great place to start with Jam Making 101!

I dressed a few jars up with jute twine to send to the neighbors:

Strawberry jam with jute twineSo easy!  Now, go forth and whip up a batch!

Thanks for stopping by.

christy name pic

Follow Me on Pinterest

facebook button 2

Pin It
Posted in Cooking/Recipes | Tagged , , , | Leave a comment

How to {sort of} Disguise a Dog Crate With a Slipcover

 ***Don’t forget to enter our current giveaway {here} for a copy of 31 Days to a Heart of Hospitality, by Edie at Life{in}grace.  I just finished it last night, and it’s really wonderful!  Hurry, because the giveaway ends on Thursday, April 18th!  ***

Dog Crate Slipcover by 11 Magnolia Lane

If you’ve been hanging out with us for any length of time, you know that I live in a zoo, with two kids, two rescued golden retrievers, a senile cat, a hamster, and two tadpoles (soon to be frogs).  Notice that I did not mention my long-suffering husband, because he is a fellow zookeeper rather than an inmate!

Not too long ago, I built a doggie gate out of old window shutters.  I loved how that turned out, and even mentioned at the end of that post how I needed to come up with an idea to hide the super-huge wire crate that Harley likes to sleep in.  Sunny doesn’t have one–some dogs love them and some could care less, and he’s a could-care-less kind of guy, which is great because two dogs crates would take up half of my bedroom!

I didn’t take a before picture of the dog crate.  You know what they look like!

First, I measured and jotted down all the dimensions:

Step 1: Measure


I decided that the front panel of the crate (that covers the door) would only be attached at the top, so it could roll up for Harley to look out, or down to hide the crate when he wasn’t in it.  I used my old standby–canvas painter’s dropcloths from Home Depot, both because I already had one draped over the top of his crate, and because that’s an easy way to get big yardage of fabric inexpensively.

I am a terrible seamstress, so please forgive me for not going into great detail here.  I cut rectangles of fabric for each of the four sides and the top of the crate, leaving an inch or two extra for seam allowance.  I also used the already-finished seams on the dropcloths for the fronts of the two sides and the sides of the front roll-up piece.

The cutting took awhile, because some members of the family, who shall remain nameless, thought that I was rolling out a blanket for them to lounge on and derailed the entire process:

Cut the fabric to size

(By the way, if you’ve been following Sunny-the-train-wreck’s surgery and recovery, we are going to the vet this week for follow up X-rays and a weigh-in.  His last weight was 110 lbs, down from 140, and he wants you to know that he has not had a single piece of fried chicken since he came to live with us in December!  He would really like someone to smuggle some in to him, though…)

I pinned all the wrong sides together on the crate (so the slipcover was inside-out) and then sewed the seams.  See the already-finished edges on the front?

Pin wrong sides together

Here’s a close-up:

Close up of dog crate slipcover

I decided to add cording and a little knife pleat to the bottom, because Harley is confident in his masculinity (despite being neutered).  I figure that she who buys the kibble gets to make the decorating decisions!  Miss Mustard Seed does a great video series on sewing slipcovers (for chairs, not dog crates) and the one where she talks about making piping/ cording is here.

I used the already-hemmed edge of the slipcovers again when I made the knife pleat.  I don’t use a ruler or any sort of system when I fold pleats, because I am a slacker.  The last step was to sew ribbons on the front and sides so that when the front door is rolled down, everything looks neat.  Here it is rolled up, complete with dog:

Completed dog crate slipcover
And here it is when we’re trying to disguise it to make it look like an enormous side table. :)

Slipcover for dog crate


Here’s a side shot…the front door is bent out a little from an attempted jailbreak, so that’s why there’s a bit of a gap:

Side view of dog crate slipcover

Although this dog crate is the size of a small house, if you actually have a normal-sized dog and crate, this would really work to camouflage it.  The best we can hope for is to make it look less big, black, and wiry!  I’m pleased with how it turned out, and Harley couldn’t care less, as long as there’s something on the sides to keep him hidden from the world while he sleeps.

Has anyone tried anything else to disguise a crate?

Thanks for stopping by!

christy name pic

Follow Me on Pinterest

facebook button 2

Pin It
Posted in Before and After, Pets | Tagged , , | 6 Comments

A new baby and a new house!

**Our newest giveaway is up and running over on our Current Giveaways page.  We’re giving away two copies of 31 Days to a Heart of Hospitality, an ebook by our friend Edie over at Life{in}Grace.**

Here is a bit of what’s been going on with the other two of us while Christy’s been covering 11 Magnolia Lane over the last two weeks! She did a great job of course :) She is now in the midst of preparing to move, and winding up the school year, so I told her I would jump back in and give everyone all the news.

First of all, we are SO proud to share our newest resident at Magnolia Lane. Last week Terry and her family welcomed this sweet bundle of joy to their family. I have been lucky enough to spend time with him and can attest he will just melt your heart!

atlas2

Gorgeous photo by Courtney Anderson Photography. He is in his beautiful nursery, see the whole room HERE.

And we’ve completed our move! Well, at least as far as we are able to reside in our home, but we still have boxes everywhere. We really jumped back in our new area with kids’ activities, school events, sporting events and of course, that new baby pictured above to visit  :) so unpacking has taken a backseat.

Our new home is very different from our former lakefront home near the beach. We traded the water view for space, space and more space. Just having a basement for storage the kids to play in is so nice, not to mention all this closet space :) I will be sure to show off more of the house once I get it more presentable but for now here is a bit of a sneak peak via my phone.

dining room

{the dining room}

While we waited for our belongings to arrive, I had a few days in the empty house to make some adaptions so it would match our current cooler, light color scheme. Much of this home is decorated in warmer tones like yellow, mustard, moss green and burgundy.

family room

{the family room}

We discovered the other day that the stripes on the fireplace wall are not what they seem–wallpaper–but actually painted on the wall. I need to find out the scoop on that from the owner, it’s just amazing to me someone could paint perfect stripes on a two-story wall.

front hall

{the front hall}

screen porch

{the screened porch–I have BIG plans for this space!}

I did have a few projects right at the top of my list. First off, my oldest son is moving into the room that was a former office. I tackled removing the flowered wallpaper border, as it is not really my son’s taste. I’ll do a post on that shortly, I learned a lot of what to do and not do removing wallpaper. Here is the room previously, it was an easy fix and after the border came down, the beige walls work perfectly for a preteen boy.

declan room

I also painted the master bedroom. It was formerly dark minty green, and our bedding and accessories didn’t really match. I have been obsessed with the Sherwin Williams color ‘Blue Diamond’ since I saw it in my brother in law’s beach condo last winter. Its the perfect palest blue, with just hints of gray, and couldn’t wait to use it in my bedroom. Had I not just painted my old master bedroom, I would have redone it immediately to that color after our visit.

bedroom after

Unfortunately things didn’t go as planned with the color, it came out WAY more blue then I expected. Here is the repainted room, and while I like it, its obviously not the ‘palest’ blue out there. I am not sure if its the dark green behind {but I used paint with primer?} or perhaps I incorrectly remembered the color and got something else similar instead, or maybe the color was off from being mixed at Home Depot? {Thoughts?} Anyway, lesson learned but I will just live with it–or repaint the room again down the road!

I am off to go unpack, but thanks for stopping by!

XO,

Follow Me on Pinterest

Pin It
Posted in Before and After, General & About Us, Home Inspiration, Home Tours, Real Spaces | Tagged , , , , , , , | 4 Comments

Things I Would Do to My Kitchen (if I could do it all over again)

As most of you know, we’re pulling up stakes and moving in just a few months, and so it’s time to look back at what I’ve accomplished around the house in the almost-tw-years that we’ve been in Nashville.  All in all, I’m pretty proud of what we’ve done with this house.

The kitchen was by far my biggest job, and all of that hard work definitely paid off:

BH&G Kitchen + Bath Makeovers--Christy's kitchen{all credit and thanks for this photo goes to Alise O’Brien, photographer, and Bonnie Broten, field editor and stylist, from Better Homes & Gardens Kitchens + Bath Makeovers magazine}

BUT, if I had a little bit more time, there are some things I’d add to the mix.  And if I could go back again, there are a few things I’d do differently.

Here’s what I’d add:

1) Get rid of the flat ceramic cooktop and put in a gas cooktop.  The wall that the stove is on is an exterior wall, and there’s already a gas line to the house for the hot water heater and the heat, so it shouldn’t be too hard to have that done, right?  Everyone knows that gas, with its quick ability to raise and lower temperature quickly, is what real chefs want. And I, although by no means a “real” chef, have always loved cooking with gas.

photo credit:  Alise O'Brien

photo credit: Alise O’Brien

2) Get rid of that recirculating exhaust hood (what’s the point of that?!) and vent a big old hood to the outside.  Preferable white and custom built, but that’s just me.  I know I could build a gorgeous one!

3)  Add some open shelving and/or glass-paneled cabinet doors to make pretty displays of all of my white dishes.  Like Amy did here:

4) Add under-cabinet lighting.  This makes such a big difference, but it’s hard to appreciate until you’ve had it in one of your kitchens.  Then it’s hard to ever go back.

5) I’d also find a wine fridge that fits into the island, and pop off one of the cabinet doors to make room for it.  Wine deserves its own fridge in our house!

Here’s what I’d do differently:

1) I’d find someone to spray my cabinet doors and drawers, or else I’d probably pay to buy new ones–at least the doors–no need to replace the boxes.  The painting was a pain in the rear and it seemed like it took forever.  I love how much money I saved, but sometimes money spent is well worth it for time saved.

2) I might even change the color of the cabinets from white to–gasp–pale gray or light blue.  Now, that is a change that is best made when one intends to stay in the house for years, because not all buyers want kitchen cabinets that are such a decisive color, but wouldn’t that be fun?  Maybe with nice crystal knobs?

3) I would adore marble countertops, like Amy’s, even though I’m not sure she’d do it all over again {more about that HERE}.  They are so pretty, though!  How about marble on the countertops that go around the wall, and butcher block on the island?  LOVE!

The good news is that I’ll have another house to decorate in a few months.  I’m always drawn to kitchens that have already been remodeled, but doesn’t that take some of the fun out of it?  Maybe I should start looking at horrible oak cabinets, 80′s wallpaper (there is still plenty of that around!), and brass fixtures.  I love a challenge, after all!

If you could wave your magic wand and fix your kitchen up, what would you do first?

Believe it or not, this post is sponsored by BlogHer and Home Depot, but the opinions (and the plan for my kitchen) are entirely my own!

Thanks for stopping by!

christy name pic
 
Follow Me on Pinterest

facebook button 2

Posted in Before and After, Kitchens | Tagged , , | 9 Comments

© 2012-2013 All Rights Reserved -- Copyright notice by Blog Copyright