• Skip to primary navigation
  • Skip to main content
  • Skip to primary sidebar
  • Skip to footer
  • MEET CHRISTY & AMY
    • IF YOU’RE NEW HERE…
    • WORK WITH US
    • 11 MAGNOLIA LANE 101
    • DISCLOSURE + PRIVACY (the fine print)
    • BEST OF 11 MAGNOLIA LANE
  • TOUR OUR HOMES
    • TOUR OUR HOMES
    • CHRISTY’S MAGNOLIA COTTAGE
    • CHRISTY’S MCC HOUSE
    • Christy’s Stuttgart Flat
    • Amy’s Virginia Craftsman Home Tour
    • AMY’S VIRGINIA CRAFTSMAN Building Process
    • HOLIDAY HOME TOUR SERIES
  • CELEBRATIONS
    • EVENTS + ENTERTAINING
    • GIFTS
    • HOLIDAYS
    • RECIPES
  • HOME
    • CLEANING
    • DECORATING
    • ORGANIZING
    • ROOM BY ROOM
      • BATHROOMS
      • BEDROOMS
      • CLOSETS
      • CRAFT ROOMS + OFFICES
      • DINING ROOMS
      • KIDS’ ROOMS
      • KITCHENS
      • LAUNDRY ROOMS
      • LIVING + GREAT ROOMS
      • OTHER SPACES
      • PANTRIES
      • PLAYROOMS + BONUS ROOMS
      • PORCHES + OUTDOOR SPACES
    • TIPS
  • SHOP
    • SHOP OUR INSTAGRAM
    • SHOP OUR AMAZON STORE
    • FRIDAY FAVORITE FINDS
  • PROJECTS
    • CRAFTS
    • DIY PROJECTS + TUTORIALS
    • FURNITURE
    • PRINTABLES
    • WINDOWS, DOORS, + WALLS
  • LIFE
    • FRIDAY FREE FOR ALL
    • HEALTH
    • SIMPLY ON SUNDAY
  • TRAVEL
  • CONTACT
    • Email
    • Facebook
    • Instagram
    • Pinterest

11 Magnolia Lane

Sharing our easy DIYs, decorating, entertaining and more!

Reupholstery 101: My Thrift Store Loveseat Redo {Part 2–Tutorial}

November 15, 2013 By Christy 80 Comments

This Post Contains Affiliate Links

17378 shares
  • 69

upholstery tutorial how to

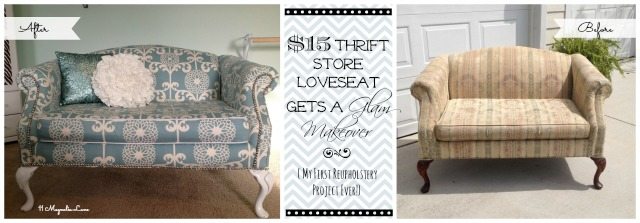
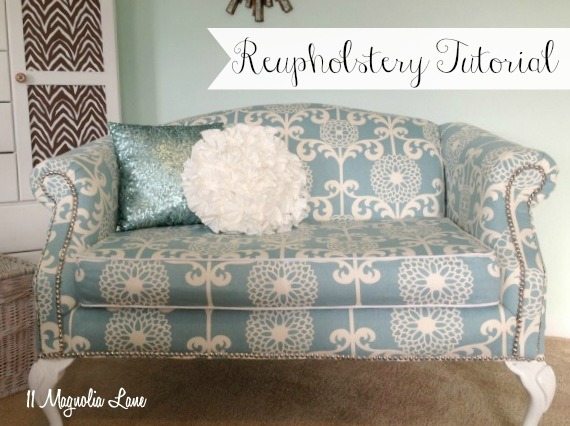
I was kind of surprised (but pleased) at the big response to my $15 loveseat redo.  If you haven’t seen the original blog post yet, with all the “glamour shots” of the finished project, click {here} to read it.

Today I’m going to show you photos of what I did.  Keep in mind that the reason I only spent $15 on the loveseat was because I wasn’t sure I’d be able to complete the project–I’ve never reupholstered before, after all.  I have recovered dining room chairs like these, but that is nowhere near as challenging as a loveseat!  I thought that if I wound up dragging it to the curb, at least I would only be out $15 and a few hours of my time.  Yes, the fabric cost money, too, but I was hoping I’d be able to use that for something else eventually.  Fortunately, it worked out great!
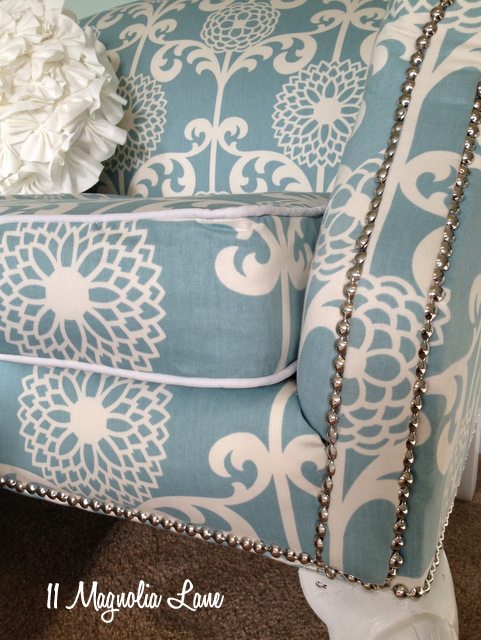
aqua white loveseat white piping

Before we get started, let me answer a few of the most common questions I fielded over on Hometalk:

1.  No, I have never done this before.  I didn’t take a class or even watch a video on YouTube.

2. I am a terrible sewer.  I can sew straight lines and make ruffles.  If I had to do it over again, I’d look for a piece that didn’t have any removable cushions at all.  My next-door neighbor, Kelli, and her super-fancy sewing machine totally bailed me out on the seat cushion.  She showed me how to line up the fabric and set the zipper, and that cushion is gorgeous!  I now owe her several hours of decorating–we bartered. 🙂

3.  The fabric is drapery/upholstery fabric of medium weight.  I didn’t care for any of the heavy weight upholstery fabric I looked at.  I used Waverly’s Fun Floret pattern in Spa and I ordered 8 yards.  I used this graphic that told me a loveseat like mine should take 6 yards, and then I added two for the cushion.  I had plenty, but not too much more than I needed.

4.  I Scotchguarded the fabric when I was done.  This is in a ten-year-old’s room, after all!  Don’t forget, if it gets horribly stained I know how to recover it now, or I can always paint it like my gray chair.

5.  The nailhead trim is the kind that comes on a roll.  I used 1-1/2 rolls and bought mine at JoAnn using a 40% off coupon (although if you need to buy it online, this is the exact product I used).  I also had to purchase cording, white canvas (because I wanted white contrast piping), staples for my pneumatic staple gun, and batting to replace some that was yucky.  My total cost for the entire project was just under $150.

6.  Yes, I know that I picked a tricky fabric for my first attempt, but thanks to everyone who noticed how hard I worked to make sure it lined up correctly.  The take-home point is that you should pick the fabric that you love.  You can line it up correctly, even if it is your first try.  You just have to take your time and think about your pattern before you cut.

7.  I used a pneumatic staple gun that came with my amazing nail gun–the kind that uses a compressor (it’s this one).  While you could do this sort of project with a regular heavy-duty nail gun, I was happy to have the pneumatic gun, because I probably used a thousand staples.  Seriously.

8. My only tip for selecting a piece of furniture to reupholster is to smell it, thoroughly, before you buy it.  You will want to reuse as much of the foam and batting as you can–foam in particular is quite expensive–so you will not be able to rehab a piece that was owned by a smoker, or just a smelly person. 🙂

I’ll also discuss along the way, and as always, you can leave me a comment with anything you want me to clarify.
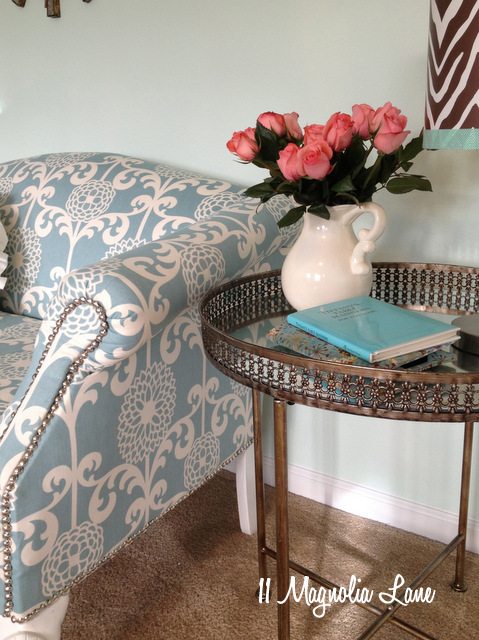
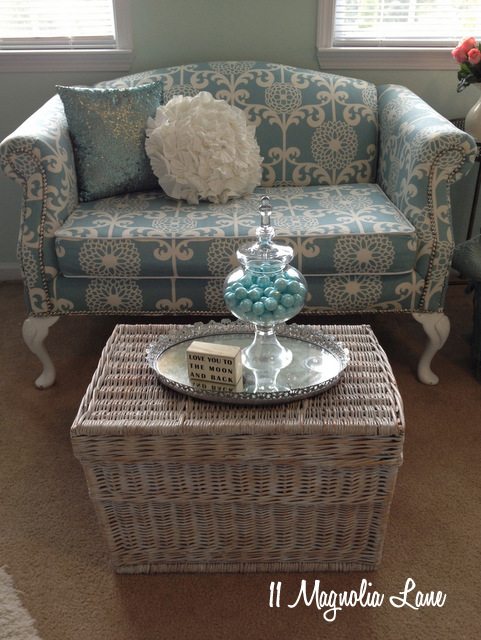
loveseat with table

This is going to be a long post, so bear with me!

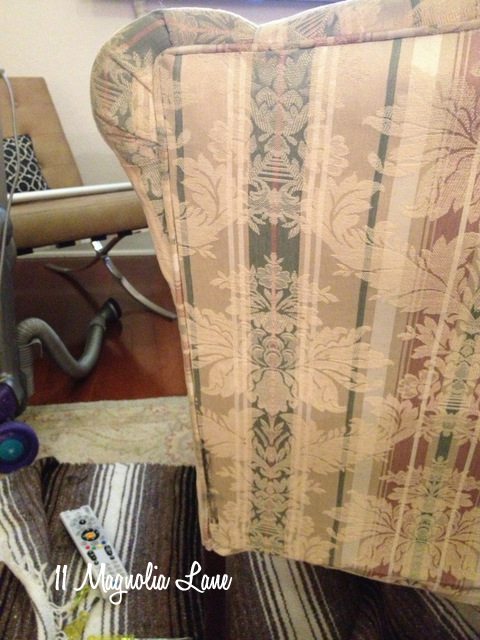
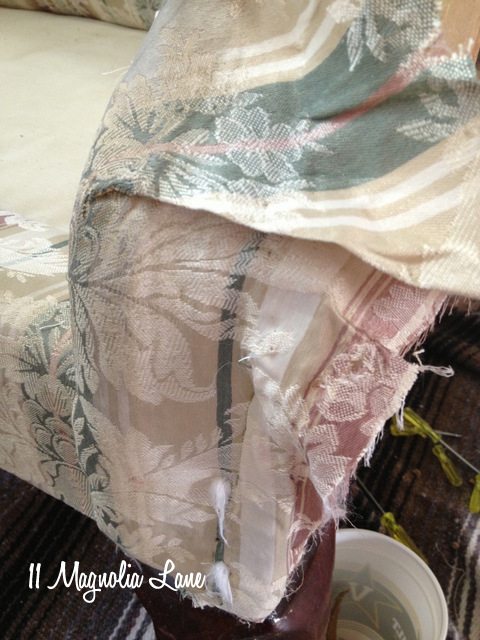
Here’s the loveseat when I brought it home.  There were lots of rips and stains on the fabric, but I thought she had nice bones and lots of potential.
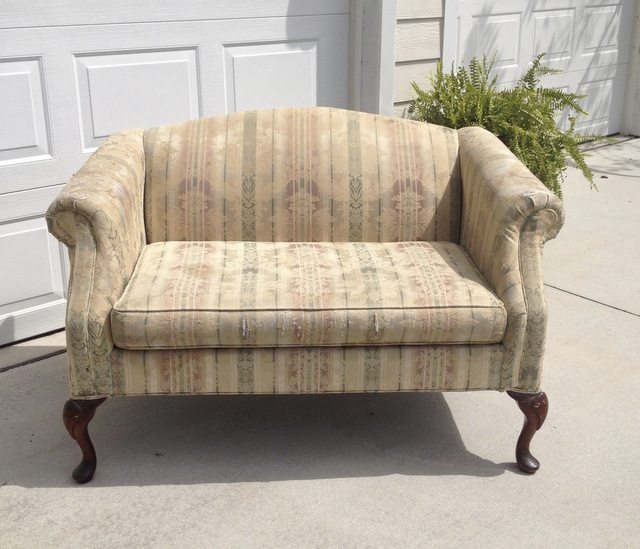
loveseat before reupholstering

My son helped me drag it into the house (my husband was deployed), and I set it up on several dropcloths in the living room.  I removed all the fabric and staples inside (it took forever) and then moved it outside to spray it down with Lysol and do the actual reupholstering.  I set up in the garage since that’s where my air compressor lives.

I removed thousands of staples, using several flat-tip screwdrivers, a staple remover (which succumbed quickly to the heavy duty staples they used), and a pair of needlenose pliers.  Make sure your tetanus shot is up to date before starting this part of the project!  I’m only half-kidding, by the way.

While every piece is different, furniture is put together in layers.  Each layer hides the staples from the layer before.  When you take a piece apart, I highly recommend that you both take pictures and notes (and lots of both) so you can then put your new fabric on in the reverse order.  Try not to rip the fabric as you remove it because you want to use those pieces as patterns to cut the new fabric.

The first piece to come off is usually the bottom.  This is upholstery mesh and it’s a very lightweight polyester that runs about $1 a yard.  It will likely tear when you remove it, so hang onto it so you know how much to buy to replace it (I used a sheet, but I’ll show you that later).
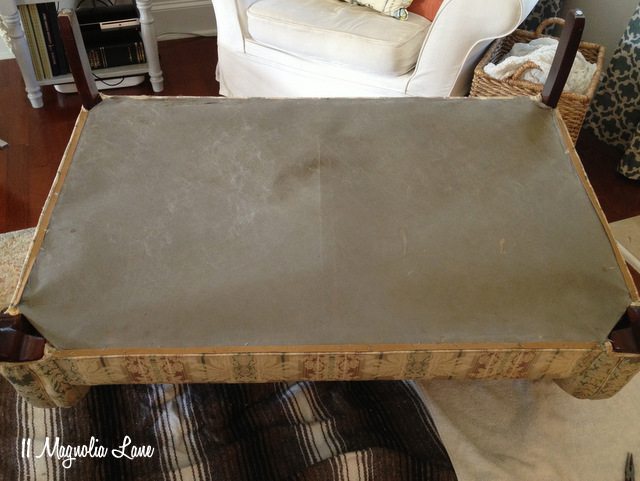
how to reupholster

See those cardboard strips?  Try to save those if possible.  If they tear, you can always cut more from an empty box.
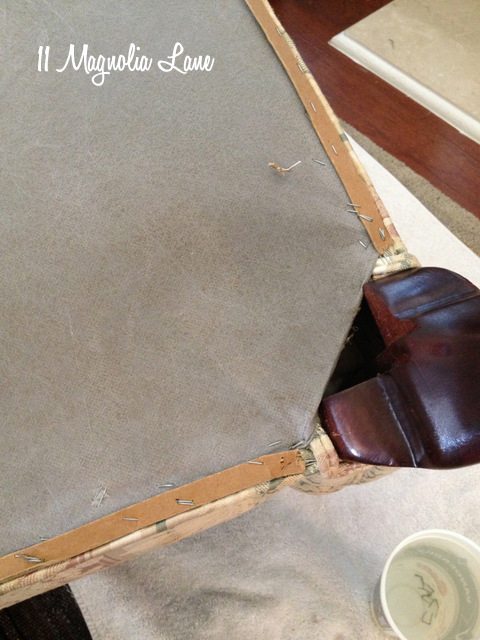
cardboard strips reupholstery

Once the bottom was off, I could tell that the back was the next piece to remove (this is common) because I could see all of the edges.  Check out those springs!
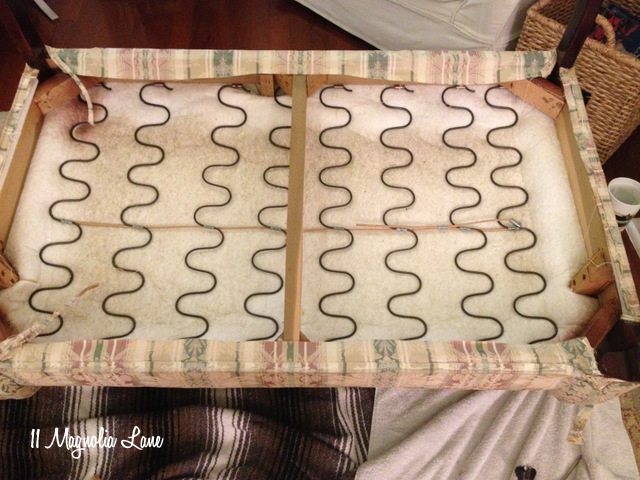
furniture springs

Here’s the back:

remove back upholstery

I inserted a flat tip screwdriver under the piping and gently pried it up.  There are often metal teeth (VERY sharp metal teeth!) on the back section, so be careful.  Try not to bend them as you remove the back as you will need to reuse them.  I forgot to take a picture of them, but it’s a metal strip with sharp triangular teeth on it, and the back fabric is folded around it.

The cording/piping (I use those two terms interchangeably) is usually stapled on separately.  Label the piping as you remove it so you know how much you need for the reupholstery job.
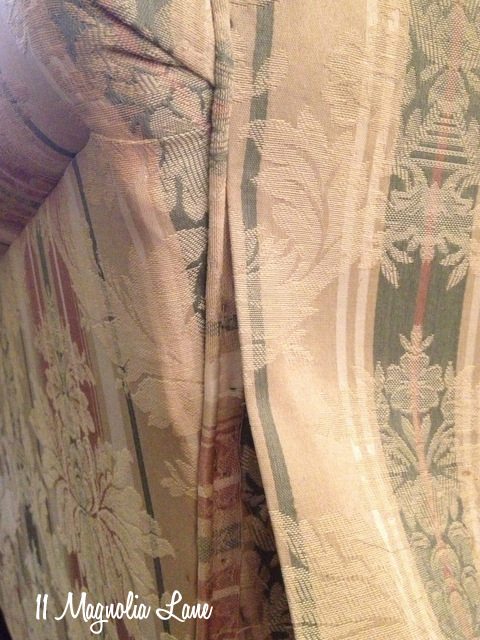
back-removed

I also kept track of where I removed loose batting.  I discarded it (it was yucky!) and replaced it later.
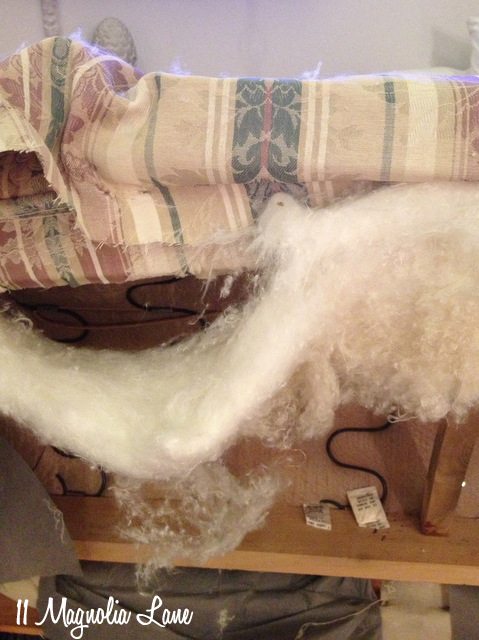
back-removed-001

While we’re on the back, take a look at how the back of the arms is pleated here, because you’ll want to do the same thing when you’re redoing it.  Sometimes it’s so helpful to see where the fabric is folded!
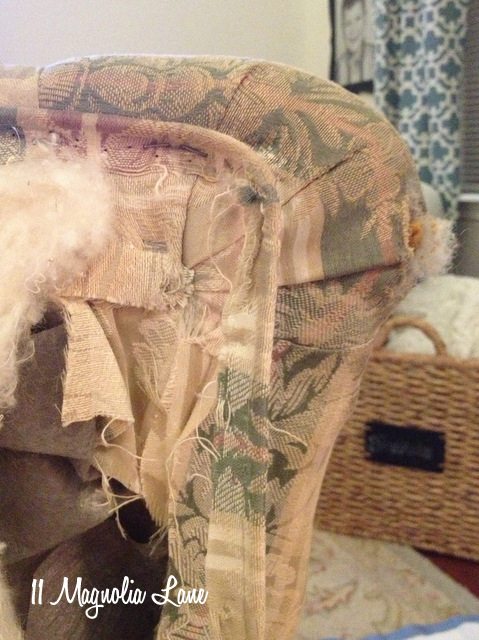
back-of-arm

From this point on, you just remove fabric where you see that raw edges (staples!) are showing.  The next piece I removed was the seat back, but only at the top edge.  See how it’s wrapped over the arm in the photo below?
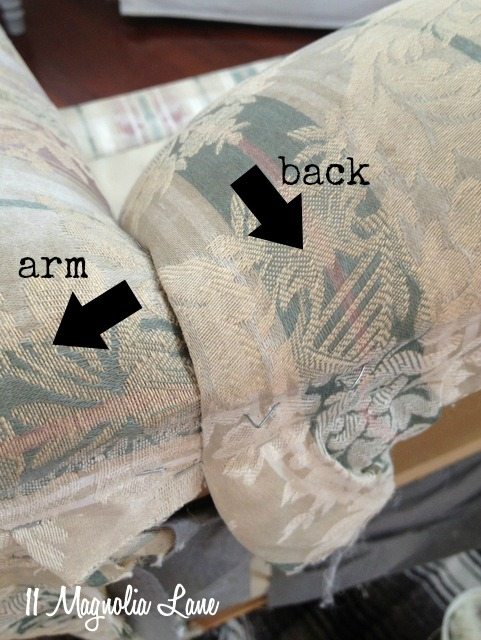
back-and-arm-labeled

Grab a Sharpie and write on your fabric, so you know which piece goes where, and how it’s oriented.  SO helpful!
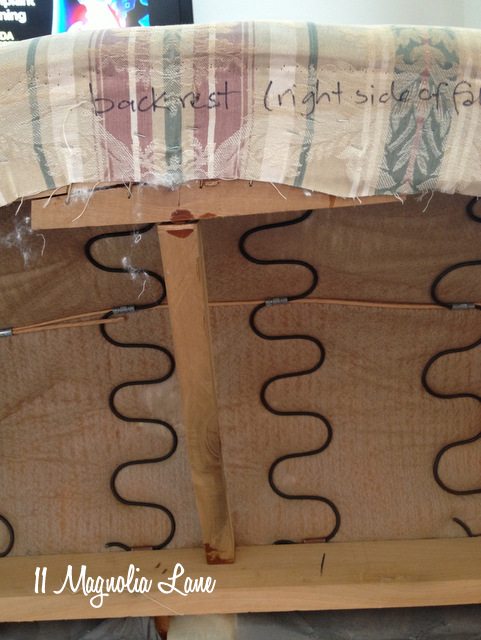
back-labeled

I then moved around to the front and removed the arm pieces.  On this piece, they were secured to the frame by four nails (on each piece) and I simply pried them off with a flat tip screwdriver.
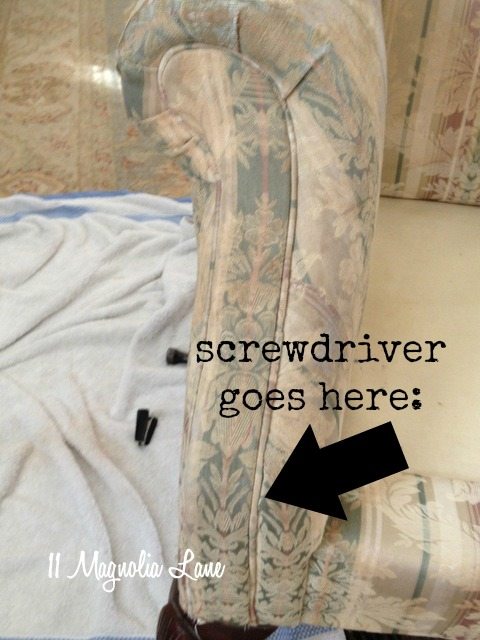
arm-pieces-arrow

Be careful if you have this type of arm since these pieces are usually made of cardboard that’s wrapped in a layer of batting and then fabric.  The cording is stapled around the back edges as in the picture below, and you can reuse the upholstery nails if you remove them carefully.  You’ll also want to reuse the cardboard pieces, recovering them with batting and your new fabric.  And yes, I have no fingernails.  The price I pay for being a DIY’er!
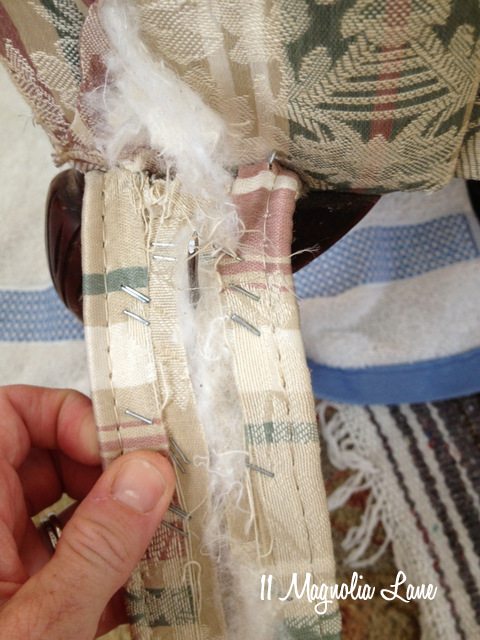
arms

I had an “Ewww!” moment when I saw how incredibly dirty the fabric was, because it was a completely different color under the arm piece!  But then I got over it and paid attention to how the fabric was pleated on the front of the arm roll (kind of like the back was, right?!) and attached on the front of the arm–raw edges that the front piece would cover.  Layer upon layer upon layer…
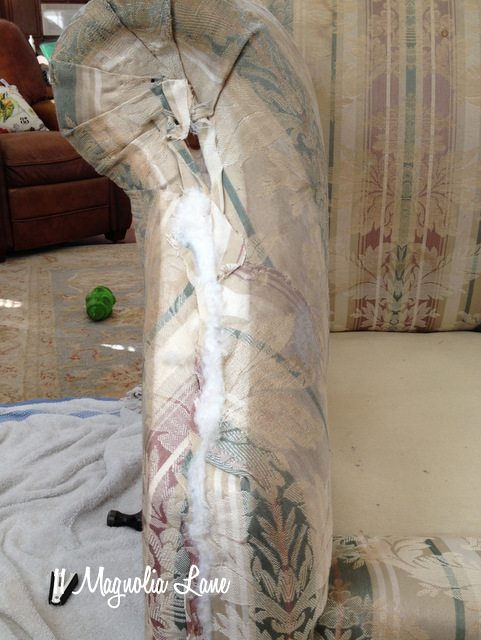
arm-front-removed

You’re seeing about one photo out of every six or seven I took–lots of close-ups, lots of notes.  It made it a snap when the time came to reverse the process!
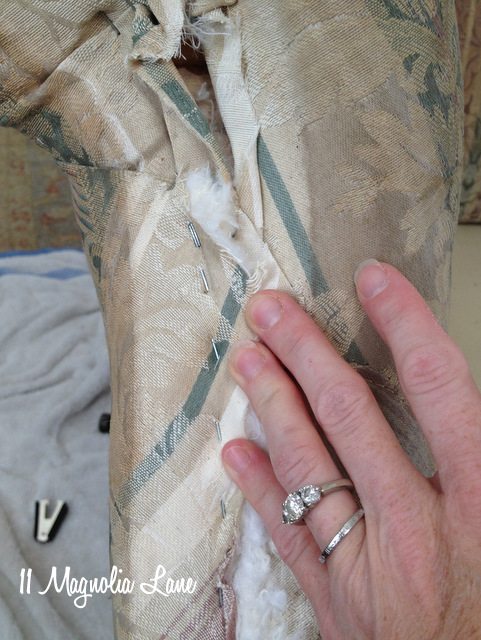
arm-close

Like I said before, each piece is different, but the next thing I did was remove the fabric from the sides:
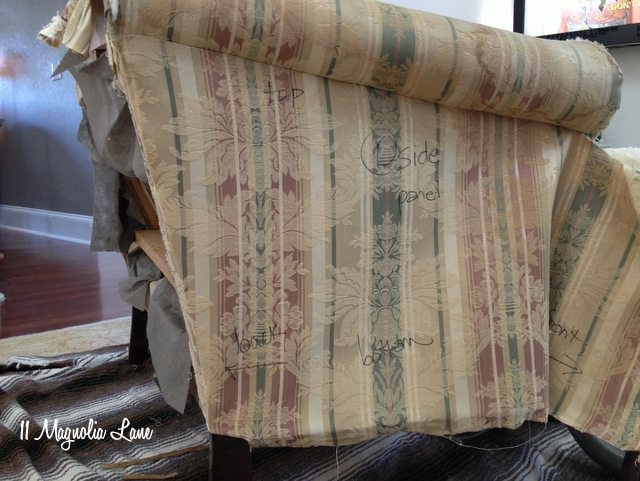
side-fabric

and then the arms:

arm-fabric

I could then finish removing the fabric from the backrest.  Remember, I had pulled the staples out from the top when I was removing the fabric on the back.

One thing that made perfect sense when I studied the “guts” of the chair was how the fabric (or upholstery lining, in this case) was pulled through the sides and back and stapled to make certain sections, like the back and seat, lie flat.  No need to try to wedge a stapler into those crevices between the seat back and arm–you just pull the fabric through and staple it on the outside of the arm.  This is an area that will definitely vary from one piece of furniture to the next, but it will make sense when you see it!
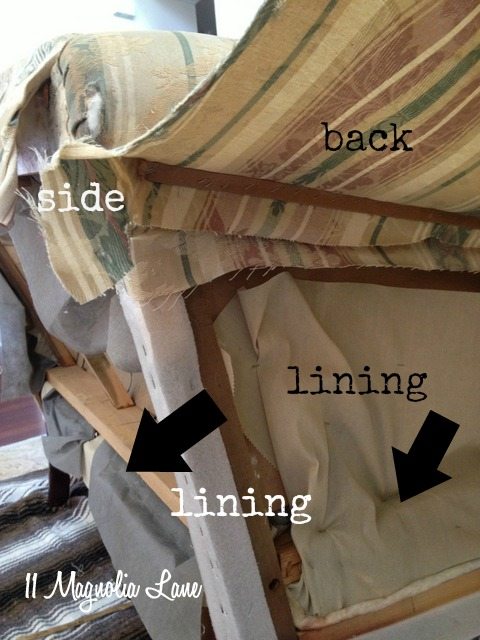
lining

After a few hours of work, and several HGTV shows, my loveseat was buck naked!
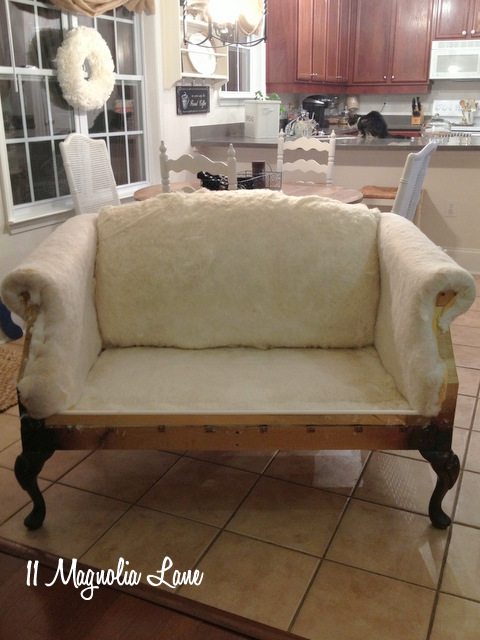
loveseat-stripped

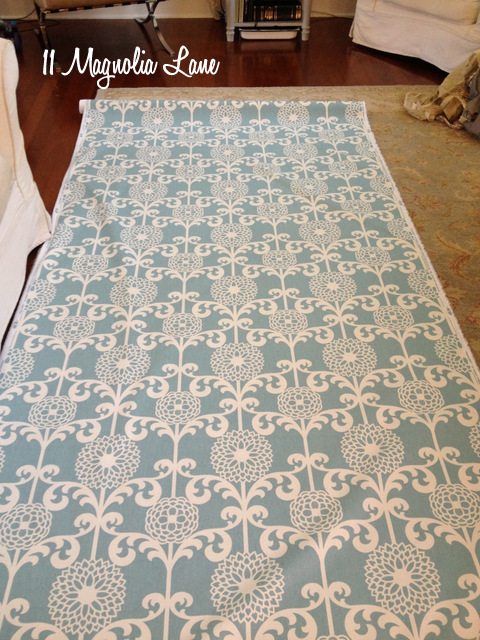
I rolled out the fabric:

fabric-rolled-out

I laid out all the pieces on the fabric, being careful to orient them so that the large flowers (dahlias?) were centered where they needed to be centered.  See the lining on the bottom piece of fabric in the photo below (that’s the seat back, by the way)?  That’s what I was talking about earlier–the lining gets pulled through and stapled on the sides and the back.
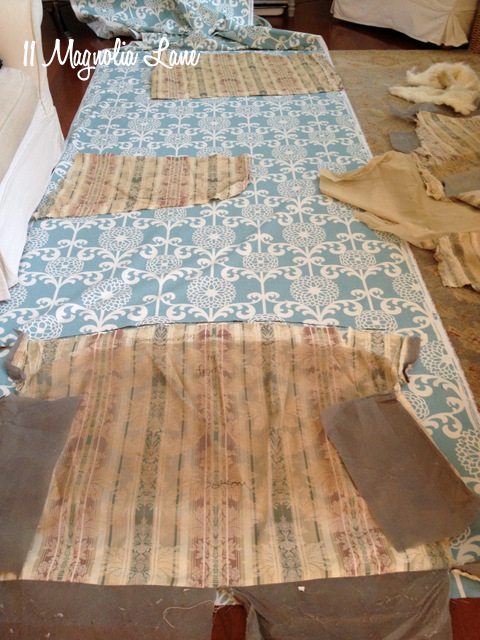
fabric-pattern-cut

And then all progress stopped when Harley and Sunny moved in, thinking this was some kind of new dog bed.  I retired for the evening with a glass of wine!
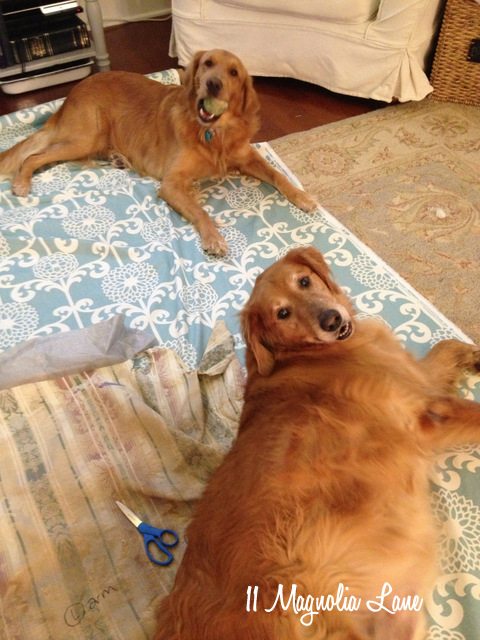
dogs-fabric

When I had a chance to work on the loveseat again, I moved to the garage.  I sprayed the entire frame down with Lysol (I had already vacuumed everything I could) and painted the legs white.  This is really where you want to paint the legs if you’re going to, although I had several folks on Hometalk tell me I should have left them brown.  Everyone has an opinion!  What do you think?

I then simply reassembled in the order I had removed things.  I actually started with the back and sides as I didn’t have the upholstery liner for the seat fabric at that point.  There is some flexibility in the order of reassembly.  Where lining was sewed to fabric, I did the same thing.
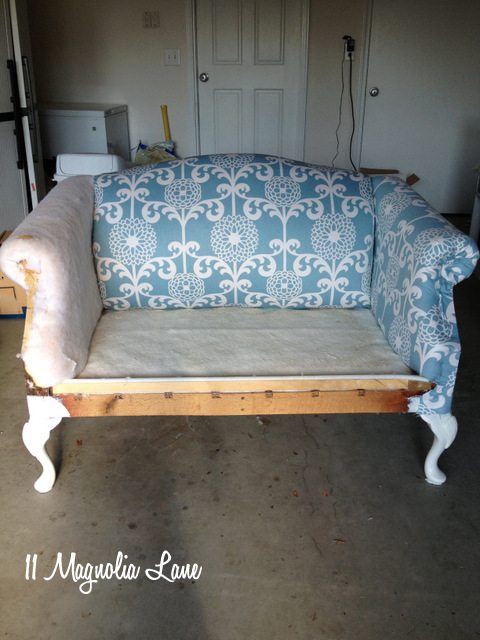
reupholstery

Remember the way the arm fabric was pleated?  It’s not exactly the same, but close for my first try.
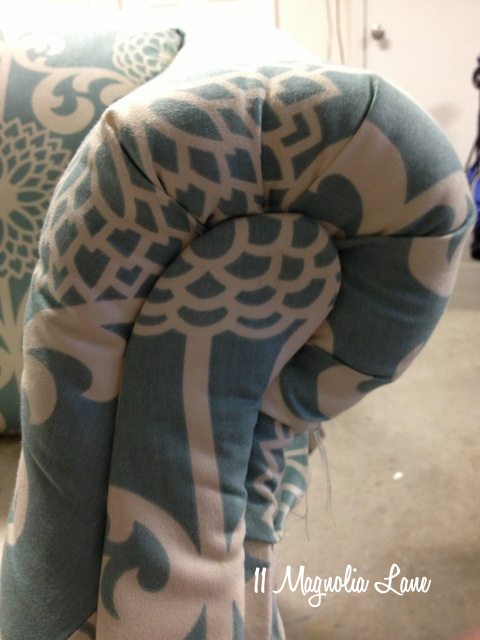
reupholstery-loveseat-arm

There’s not much to tell about redoing things, but I went slowly, made sure my pattern lined up, and took my time to be sure that I was leaving as few wrinkles as possible.  It’s far from perfect, but it was the best I could do on my first attempt!

As I mentioned earlier, I used a brown zebra patterned sheet (from the thrift store, of course) instead of using the upholstery lining.  It was a poly/cotton blend and I figured it would have as much give as the traditional lining would.
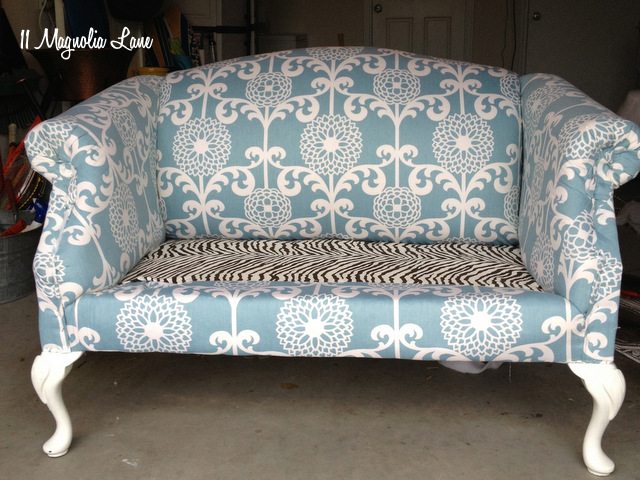
loveseat-zebra

I used the same fabric on the bottom.  This was the very last piece I replaced.
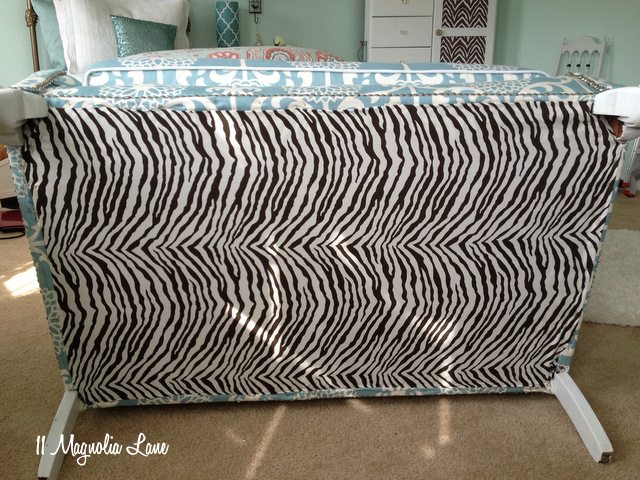
zebra-bottom

This picture didn’t turn out very well, but on my neighbor’s recommendation, I wrote the yardage along with the fabric details on the underside, in case I ever need to recover it again, although I sincerely hope I won’t!
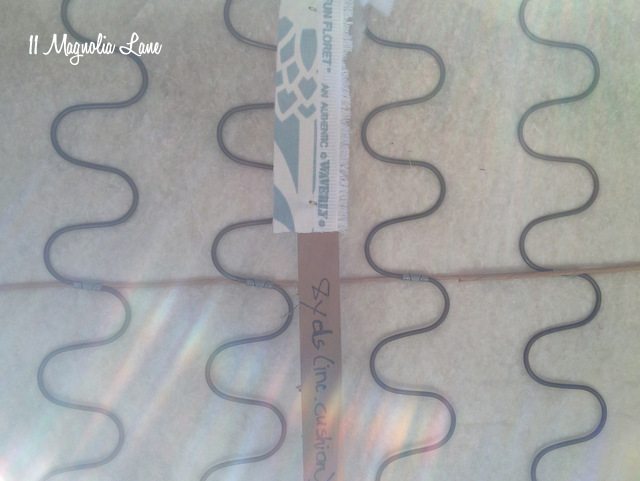
fabric-inside

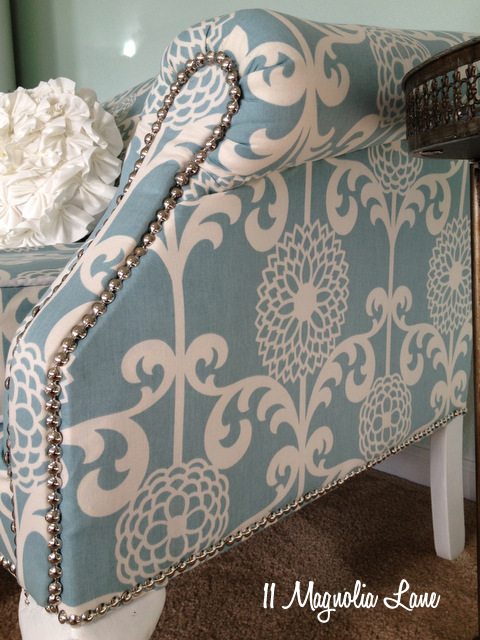
The loveseat originally had piping everywhere that you see nailhead trim on the finished product.  I still used piping on the back and the seat cushion {Miss Mustard Seed’s video tutorial on sewing piping is excellent if you don’t know how}, but nailhead trim everywhere else.  It was honestly just a guess at to what would look best, but not overdone. I used the nailhead around the arm pieces:
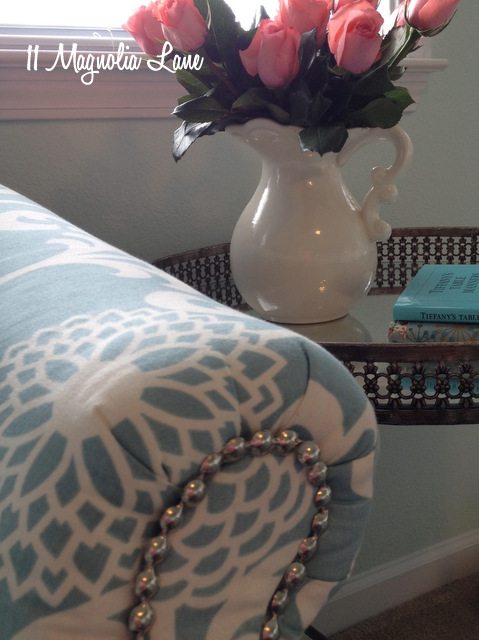
nailhead-trim-arm-001

and the bottoms of the sides:

side of loveseat

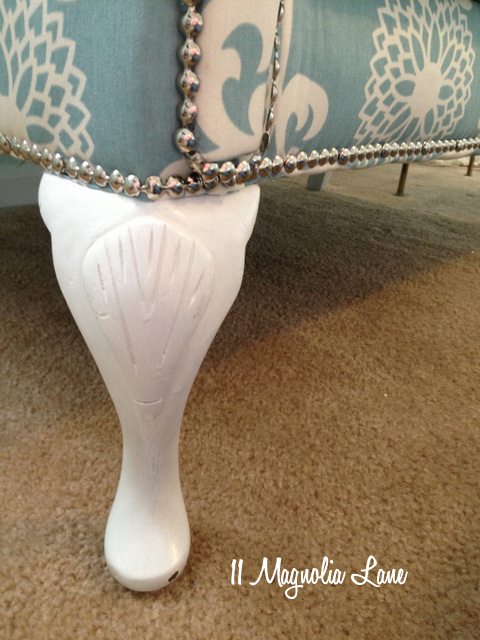
nailhead trim white painted leg

and around the bottom of the front:

front-loveseat

and the bottom of the back:

loveseat back

This is the nailhead trim that I used (it’s less on Amazon than it was at Joann, even with the coupon–wish I’d known that a month ago!).  We are affiliates for Amazon, but you pay the exact same price whether you order through this link or directly through Amazon.com, of course.


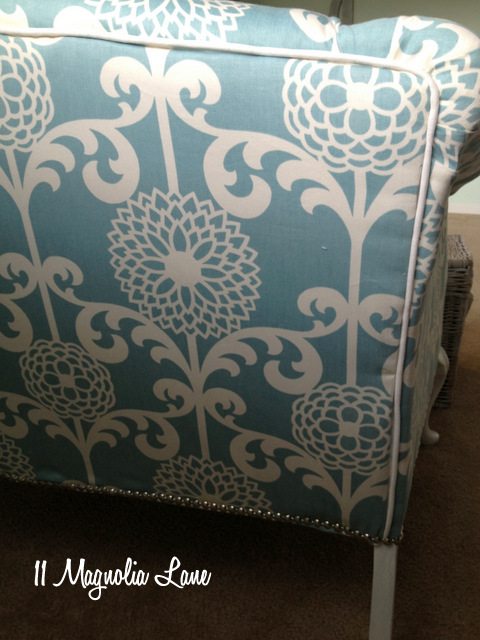
Around the top and sides of the back, I used white cording and I think it was a nice contrast against the aqua and white of the floral fabric.
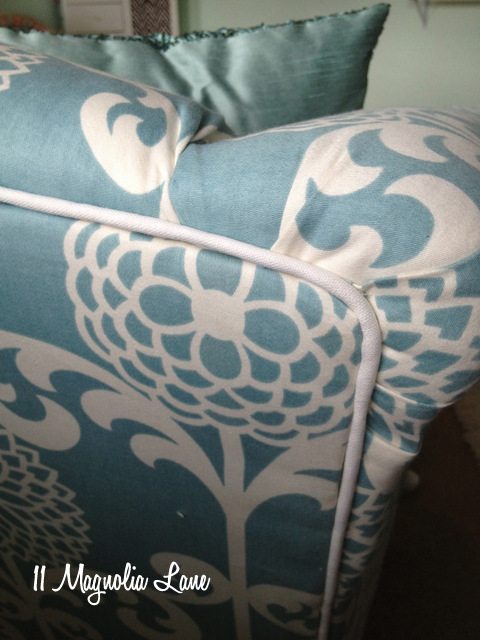
rear of loveseat cording

Kelli and I also used the white piping for the seat cushion.  We reused the original foam for the cushion.
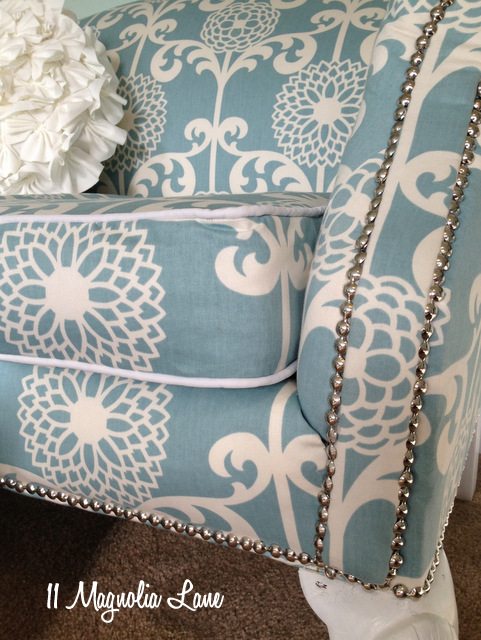
white-contrast-piping-cushion

It’s not perfect, but it’s good enough for my first attempt, and now that I know I can do it, I can’t wait to try again.  It wasn’t hard, but it was time-consuming and required a fair amount of patience.  If you’re like me and it annoys you to pay hundreds of dollars for someone to do something that you’re pretty sure you could do yourself, then give it a shot.  On the other hand, it takes quite a few hours to complete a project like this, so pretty much anything they charge is well worth your time!  Your choice…

Here are a few “after” shots to finish things off…and please let me know if I can answer any questions.
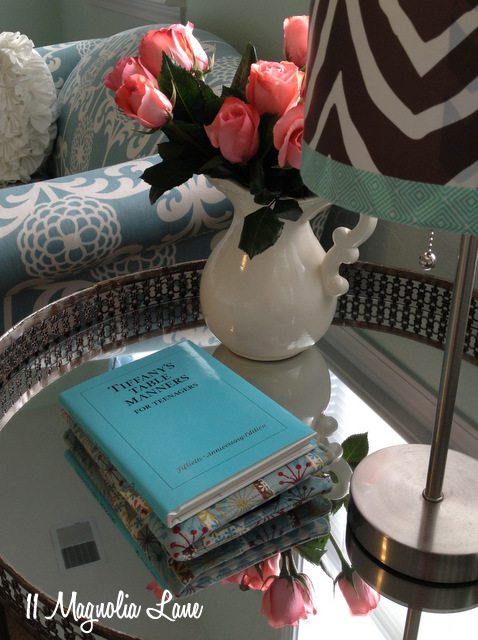
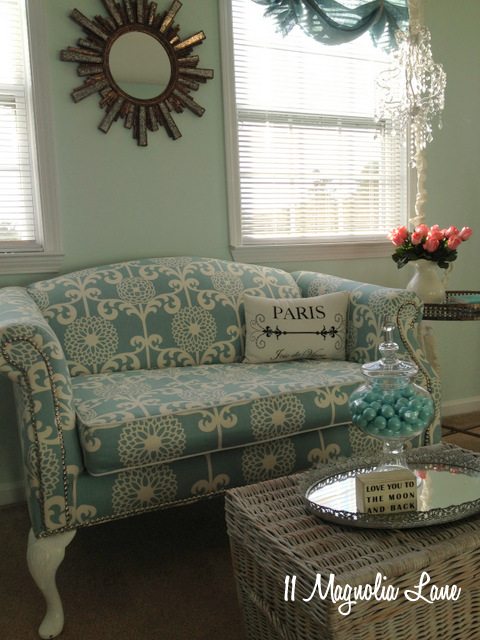
gold mirrored table

after-chandelier

loveseat-collage

Our posts contain affiliate links.  If you make a purchase after clicking on these links, we will earn a small commission, which helps to keep our content free.  You don’t pay a cent more than you would otherwise, since that would be tacky!


Thanks for stopping by!


icon-facebook-1icon-instagram-1icon-mail-1icon-pinterest-1icon-twitter-1

YOU MIGHT ALSO LIKE THESE POSTS... :

Our New Remodeled Kitchen
Easy DIY Projects (Ones You can do in a Day)
Tutorial: Quick and Easy Way to Hang Silver ...
DIY Custom Plate Rack (For $40!)

Filed Under: DIY/Projects/Tutorials, Furniture

Reader Interactions

Comments

  1. Liz says

    November 15, 2013 at 6:54 pm

    Loved this tutorial! This became especially inspiring when I read that it was your first time doing something like this. I have been wanting to re-upholster more complex pieces like the one you did but so nervous to jump into something that might be over my head. Definitely on my list for things to learn/try in the future once I do a little more research. But all in all – great tutorial, so helpful and fun to read! (your dogs are adorable btw) 🙂

    Reply
    • Christy says

      November 18, 2013 at 10:57 am

      Thanks, Liz. I was a little nervous about it, too, but that’s the best way for me to learn–just jumping in and doing! The pups say thanks. 🙂

      Reply
  2. Vicki Daugherty says

    November 16, 2013 at 8:38 am

    Wow, this is impressive! I’m not certain I would be brave enough, or patient enough, to attempt this, so my hat is off to you. The end result is fabulous and looks so professional. Kudos to you. Vicki in Louisville, KY.

    Reply
    • Christy says

      November 18, 2013 at 10:57 am

      Thanks, Vicki. It was a tremendous pain in the rear, to be honest, but I’m so glad I did it! 🙂

      Reply
  3. Cindy says

    November 16, 2013 at 8:47 am

    I am sooo impressed. My Grandma could reupholster in her sleep, but if has always been too intimidating for me. But I think it’s wonderful for your first effort…kudos!

    Reply
    • Christy says

      November 18, 2013 at 10:58 am

      Thanks, Cindy. It wasn’t hard, just time consuming (and I’m not known for my patience!).

      Reply
  4. Crystal says

    November 16, 2013 at 10:01 am

    Wonderful job, I think you chose a great pattern & I think the legs look better painted white.

    Reply
    • Christy says

      November 18, 2013 at 10:58 am

      Thanks, Crystal!

      Reply
  5. Claudia says

    January 3, 2014 at 9:44 pm

    Wow, I just love this. It is beautiful.

    Reply
    • Christy says

      January 5, 2014 at 11:20 am

      Thank you so much, Claudia1

      Reply
  6. Valori says

    January 4, 2014 at 4:15 am

    I am impressed…but then I should know that a military spouse (former Navy wife for 23years) can do anything she sets her mind to. I am very encouraged by your success. I am an Interior Decorator and much like you have done small DIY upholstery jobs. I have a sofa that I bought for a whopping $5.00 at the Habitat for Humanity Store. I have the fabric and lining to re-upholster it but have lacked the courage…until now! As the sofa is now it belongs on the curb for pick up…but if I can accomplish similar results to yours…then I have a beautiful, bargain piece for my living room. I have made sofa/love seat slip covers so the sewing part is not an issue. My fabric is a woven piece with a stria so I will only have to match the direction and not a pattern. Yes, just more of talking myself into taking the plunge into upholstery! Thank you for the inspiration, the photos and tips! Wish me luck! Valori

    Reply
    • Christy says

      January 5, 2014 at 11:22 am

      Valori–It sounds like you have nothing to lose, and as a mil spouse you already know you can do anything! 🙂 I figured if I messed it up, all I would lose was my time and very little money, but if I succeeded, then I’d have a new skill. You can do it–I think sewing slipcovers is much harder–I was a dismal failure when I tried those! Let me know how it turns out.

      Reply
  7. Abby says

    January 4, 2014 at 9:27 am

    I think it looks really, really impressive! Well done! I appreciate the photos that you took along the way and your detailed instructions.

    Reply
    • Christy says

      January 5, 2014 at 11:22 am

      Thanks, Abby!

      Reply
  8. Linda says

    January 19, 2014 at 12:53 pm

    I love this piece you did! It is gorgeous! Really well done by you,too!Would love to think I could do the same,but,I’m not so sure!You are fearless!! LOL Great job and great post,too! Thanks so much!!

    Reply
    • Christy says

      January 25, 2014 at 12:54 pm

      Thanks so much, Linda. Seriously, you never know if you can do it until you try. I was sure I’d be putting it by the curb (especially about halfway through!!), but it worked out!

      Reply
  9. Elaine says

    February 5, 2014 at 8:54 pm

    You have inspired me to finally attempt this on my own $15 GW loveseat! I have a bolt of yellow-gold velvet from a clearance sale. Have been a little afraid of a velvet sofa–the cocker spaniel leaves pawprints on all my slipcovers! But the color of the velvet matches his fur, so the dust bunnies won’t look too awful. The boys are all grown & finally on their own–just dog, hubby, & me now. Sooo, what do you all think of velvet? HELP!

    Reply
    • Christy says

      February 7, 2014 at 8:05 am

      Velvet will be great, and you can still Scotchguard it for the dog. 🙂

      Reply
  10. Beverly Hayes says

    February 14, 2014 at 10:33 am

    Christy, I have the exact same sofa I bought at DI for 25.00!!! Your steps were very helpful, and even though I have reupholstered a couple of wingback chairs before, every piece is different. I started stripping the piece and the lining on the seat part under the cushion seems to be attached (sewn) to the fabric on the arm rests? I stick my hand through the crease and I cannot reach the board where the fabric would be stapled to if the lining was separate. I will keep stripping to see what I find.
    By the way, since you asked, I believe I would have painted the legs antique bronze for a more formal look. The white is cute too if you are going for a more shabby chic style. The fabric is beautiful though. I chose a neutral that is very pretty and plan to accent it with a few bright colored pictures. Thanks for the tips!

    Reply
    • Christy says

      February 16, 2014 at 9:05 am

      Beverly, on mine that lining was pulled all the way through UNDER the arms and then stapled to the frame on the outside of the arms and underneath the sofa (if that makes sense). The only way that I figured that out was to keep on removing staples. Good luck with yours! Oh, and the wing chairs are darling–thanks for sharing!

      Reply
  11. Beverly Hayes says

    February 14, 2014 at 10:38 am

    Here is the link to my chairs! Sorry I did not mean to comment so many times:)
    http://bzhomeliving.blogspot.com/2012/11/wing-back-chairs-finally-finished-take.html

    Reply
  12. Cindy says

    March 16, 2014 at 12:57 pm

    Looks fabulous! I love the white legs. I’m a professed DIYer and am very impressed. Your tutorial is awesome as well. You have more patience than you give yourself credit for. I have 2 dogs and love them dearly…BUT…..I probably would have chased them off my fabric lol. Love it that you didnt 🙂

    Reply
    • Christy says

      March 17, 2014 at 8:07 pm

      Sunny (the older, fatter one) doesn’t really care if he gets shooed off anyway–he only moves when he wants to! 🙂

      Reply
  13. KsShug says

    March 16, 2014 at 9:29 pm

    I love, love, love this piece! You’ve given me the courage and instructions to try this myself. Thank you for being so detailed.

    Reply
    • Christy says

      March 17, 2014 at 8:06 pm

      You’re so welcome–good luck with your first attempt!

      Reply
  14. Emily says

    May 5, 2014 at 1:51 pm

    I just stumbled upon this post, I have the same fabric for curtains and pillows. It is great, bright, and fun fabric. I have always wondered how it would look on a piece of furniture and now after seeing this I know it would look great. You did an amazing job, I have always been terrified of a full reupholster but your tutorial is so detailed I just may have to give it a try!

    Reply
    • Christy says

      May 10, 2014 at 1:46 pm

      Emily–it is a great fabric, isn’t it? As for trying to reupholster, give it a shot. You never know until you try!

      Reply
  15. Betty819 says

    July 1, 2014 at 1:57 pm

    Nobody would never know a professional upholstery person didn’t do this project. Pat yourself on the back because you did a beautiful job! But please tell me why you chose to cover the very bottom of the sofa in that zebra print? Let me guess; it is what you had on hand and didn’t want to have to go out and buy more fabric? You could have probably even used a white sheet or any other white cotton fabric. The original fabric that was on your sofa is like my sofa now, but in different colors..Mine doesn’t have the rose stripe in it. My sofa is 84 in. long but is that a love seat or sofa that you have? I’ve always wanted to take a class and learn how to do my own upholstery. Go to the head of the class; you earned the honor!

    Reply
    • Christy says

      July 5, 2014 at 2:25 pm

      Thanks for your kind words, Betty! It was a great first project–a bit bigger than I thought it would be going in, but aren’t all DIY projects like that?! Yes, I used the brown zebra sheet because it’s what I had on hand, and I decided I liked it so much better than the white muslin and upholstery webbing options at the store. I love aqua and brown together, and I think it’s a fun surprise when you look underneath. Mine is a loveseat, by the way. Thanks again!

      Reply
  16. Jessica says

    September 10, 2014 at 6:21 pm

    Just wanted to tell you that I absoluetely love your blog! You have actually saved me from making a mistake of not renting an older home due to the outdated cosmetic problems. The landlord refuses to let us paint or hang wallpaper so all your tips especially on decorating a rental and this re upholstered chair have given me some gret ideas and I am now EXCITED to start this new chapter. Thank you 🙂

    Reply
    • Christy says

      September 12, 2014 at 7:08 am

      Jessica–That is SO cool! Thanks for taking the time to write and tell me that–it makes my day. 🙂 Christy

      Reply
  17. Laurie Powell says

    September 16, 2014 at 4:38 pm

    I LOVE it & GREAT job!!! Now I want to recover mine, that is in the attic!!! I like the white ‘leg’ especially with the white wicker chest table & white trim around the windows! Nice & clean looking!!! Way to go girl!!! Thanks for all of your time & photos!!!

    Reply
    • Christy says

      September 17, 2014 at 2:43 pm

      Thanks so much, Laurie. You’re too kind! Good luck on your piece!!

      Reply
  18. Linda says

    November 26, 2014 at 10:16 am

    Laurie… Sofa looks great !!! I have a sofa and loveseat give to me, and I wanted to recover them, but I was just too scared to begin. Thank you for your inspiration, and determination. I CAN DO THIS !!! And also I want to thank you and your husband for his service. It is such a difficult thing for a man to leave his family behind, and it is such a difficult job, for the Wife to keep house and home together till he gets back. You are doing a great job !! God bless America….

    Reply
    • Christy says

      December 1, 2014 at 3:50 pm

      Linda–
      Thank you for your kind words, about the loveseat and also about my husband. You made my day. 🙂

      Yes, you CAN tackle a reupholstery project! Just take your time and take lots of photos and notes along the way. Good luck!

      Reply
  19. Patty says

    December 26, 2014 at 1:07 pm

    Wow Christy, what an inspiration you have been! Thank you so much! I believe now that one day I shall try this myself. And of course huge thanks to your husband for his service to our great country.

    Reply
  20. Lori says

    March 23, 2015 at 12:35 pm

    Great job, Christy! Loved all the photos and tutorial.

    Reply
  21. April says

    April 2, 2015 at 5:07 pm

    This post was EXACTLY what I needed! I acquired a love sofa, almost just like this, at an estate sale. I love the bones of the sofa, but definitely needs to be reupholstered. It is so expensive to have done and I kept thinking, “Surely we can do this our self.” I just didn’t know where to start. Your site will help me at every step. By the way, yours turned out beautifully and painting the legs was perfect. Thanks for the help!

    Reply
  22. Penelope says

    April 30, 2015 at 10:03 pm

    Wow! I was so pleased to find your tutorial on how to reupholster a loveseat because it is exactly like mine. As I was reading your instructions, I felt like you were giving me information about my very own loveseat. I have been searching for information on how to redo this small camel back loveseat and your tutorial will be very helpful. By the way, your loveseat is beautiful. If mine comes out that nice, I will be happy.

    Reply
  23. P Kone says

    July 2, 2015 at 1:44 am

    how did you attach the white cording? I have a little loveseat that is not as charming as this but the fabric is ripped and i figure if it gets more ruined who cares. I was thinking of using the cloth drop cloths that you find in hardware stores. call me crazy but I love that color and i can’t find anything like it in our little town fabric store.

    Reply
  24. Jenny B. says

    September 24, 2015 at 1:52 pm

    Saw your loveseat makeover on Better After today. 🙂 Thank you for such a detailed tutorial! You did a great job. I love this post because now I know I want to pay someone to reupholster my chairs. I am sure I *could* do it, but after really seeing all the work that goes into it, I know it’s not a project I want to tackle (especially for two skirted armchairs that need to match). I can now completely understand why upholstery work is so expensive! 🙂

    Reply
  25. Lilly says

    October 25, 2015 at 11:35 am

    This is absolutely gorgeous. I love the pattern and the white legs and piping. One question……how did you reattach the cardboard thingies on the front of the arm without the staples showing?

    Reply
    • Christy says

      October 27, 2015 at 10:03 am

      Thank you, Lilly! There are tacks in the cardboard (the batting and fabric go on top of them, over the cardboard) and then you just have to re-nail them into the loveseat. I just saved them and reused them. Hope that helps!

      Reply
  26. Lee Ann says

    October 28, 2015 at 12:58 pm

    I am going to attempt my first big upholstery project, thanks for sharing. Your reveal of true color reminds me why I cringe when people paint over upholstery, YUCK!! GROSS!!! and leaving all the smell and possible gross batting is worse, I love the fresh new look and material, well done

    Reply
  27. Carolina says

    November 17, 2015 at 12:39 am

    What a great job. I have a loveseat pull out bed that I just bought and am afraid, I will fail. Or give up in mid stream and leave the project uncompleted. Especially wanting to use velvet.
    Thanks for the blow by blow. Good stuff

    Reply
  28. Kimbelry Anderson says

    January 5, 2016 at 11:56 am

    Hi Christy. You did an awesome job. I love thrift shopping and I found a retro love seat for $150. The upholstery is beautiful but it does not go with my living room, so I do want to redo it but like so many others I’m afraid that I will get frustrated and just lose all hope on the project.

    Reply
  29. Gaby Ozoa says

    January 18, 2016 at 8:32 pm

    Thank you for sharing!! Your finished product is absolutely gorgeous. I just love the pattern and coloring!! I just got a beautiful (but very dirty – insert sad face here) love seat today for free! Yay! However, because the fabric is so dirty my first thought was to trash it, but I couldn’t bear the thought, so I figured maybe I could try reupholstering it. So I came across your blog and let me just say that I have NEVER reupholstered anything in my life. Knowing that it was your first time trying such a huge project and seeing such a wonderful finished product that looks like new, I feel confident that I can do it too!! Right now though the only tools I have in my arsenal is a flat head screwdriver and a needle nose plier. I could maybe borrow a nail gun from my cousin, but that’s about it. Would you be so kind as to list anything else that I may need for this project?? That would be so helpful! Thank you again for sharing! I can’t wait to get started on mine!

    Reply
    • Christy says

      January 24, 2016 at 3:50 pm

      Thanks so much for the lovely comment, Gaby! And way to go on finding a FREE love seat–you’ve got nothing to lose by trying to reupholster it. Just take your time and go slowly.

      If you can borrow a pneumatic stapler instead of a nail gun, that would save you a lot of time; if not, buy a heavy duty staple gun. And if you do nail head trim, you’ll need a hammer. You’ll know more once you take it apart and see how yours is put together.

      Good luck and keep me posted!
      Christy

      Reply
  30. Kerry M. says

    June 19, 2016 at 3:27 pm

    I was searching Pinterest for a solution for the exact same settee and came across your post!! I love the fabric you chose. Thanks for the instructions. We may give it a try now!!

    Reply
    • Christy says

      June 23, 2016 at 10:56 am

      I’m so glad it was helpful, Kerry! I have to admit that it was a tough job, but I think any moderately skilled DIY’er can accomplish it. Good luck with your project!

      Reply
  31. Jamie Chapman says

    February 11, 2017 at 11:11 am

    Personally, I like the white legs! Great job by the way. Makes me feel like I could totally tackle a reupholstery project!
    Thanks fir all the pictures.
    Jamie C.
    Hitchcock, TX

    Reply
    • Christy says

      February 15, 2017 at 12:33 pm

      Thanks for writing, Jamie! I promise, if I can do this project, you can, too! Christy

      Reply
  32. Tracie says

    March 22, 2017 at 3:11 pm

    I like it! I think it looks good with the white legs, too. I upholstered a little bench I had, and I like it, but I definitely felt the “first attempt” feeling. I do have a loveseat with a faded pattern, but I got a cream Target slipcover and put that over it, but I have pondered the idea of a DIY. I thought I would have to be great at sewing, and fabric is not exactly my thing.

    There are two problems with reupholstering my loveseat: 1) I live in a one bedroom apartment and that could be very hard to tackle here, and 2) The loveseat IS “my sofa”. I have two armchairs, too, but the risk of messing up the loveseat worries me enough not to go for it!

    Yours really looks great! I think your work on it really paid off beautifully. 🙂

    Reply
    • Christy says

      March 26, 2017 at 10:22 am

      Hey, Tracie–

      Thanks so much for the lovely comment! You’re right that you will need space to spread out for a project like this…sounds like it would be money well spent to send your loveseat to a professional and just sit on those two armchairs in the meantime. If it makes you feel any better, I decided to take the easy route for a chair a found a few months ago at the thrift shop. It’s currently at the upholsterers, so I’m “cheating” too!

      Thanks again for writing–take care!

      Reply
  33. Alicia says

    March 28, 2017 at 3:16 pm

    Gorgeous! It looks like a million bucks. I can’t afford to have my couches reupholstered, so I want to do it myself. Do you know if the process would be any different for bonded leather? I am not sure if it peals off the same way.. I am so so sick of slip covers though, and I really want to try and recover them.

    Reply
    • Christy says

      March 31, 2017 at 3:51 pm

      Hey, Alicia–

      My guess is that bonded leather is cut and stapled just like upholstery fabric, but I just can’t be sure. You can usually take a few pieces off and take a look around inside the “guts” of the piece, then reattach them if it just looks too tricky to handle on your own.

      Good luck with your project!
      Christy

      Reply
  34. Krista Bedard says

    May 10, 2017 at 8:57 pm

    Dear Christy,
    You have totally inspired me. I have a wonderful loveseat that was given to me by friends, and have looked at having it reupholstered versus attempting it myself. after many months of should I – shouldn’t i, This post makes it so straightforward and logical that I am taking up the challenge. Thank you for your honesty as well regarding the amount of time and patience required – advice noted!!
    Krista

    Reply
    • Christy says

      May 22, 2017 at 10:07 pm

      Hey, Krista–
      I really think you can do it, as long as you pace yourself. After that, you’ll know whether or not it’s worth it to you to DIY it or pay a professional for future projects. Good luck!
      Christy

      Reply
  35. Pamela says

    June 19, 2017 at 2:10 am

    I definitely like the legs painted white. You did a fabulous job reupholstering. Thanks for sharing your experience, very inspiring.

    Reply
  36. Elaine Gavigan says

    November 9, 2017 at 11:11 am

    Looks great! We are thinking of reupholstering a loveseat ourselves and this is great inspiration.

    Reply
  37. Nancy says

    January 7, 2018 at 12:05 pm

    Great instructions! I recently reupholstered a very well made child’s rocker that was found at the curb. Needless to say it was very dirty. Here’s a suggestion: if you own a rug shampoo machine use the upholstery attachment and shampooc it thoroughly , let it dry outside and then as you remove the old fabric you are not breathing the dust and dirt. It doesn’t matter if you ruin the fabric because it’s only going to get tossed anyway.

    Reply
    • Christy says

      March 8, 2018 at 2:42 pm

      Hey, Nancy–
      Somehow I missed your comment, but what a great idea! There is some nasty stuff in old upholstery and that is a good way to avoid bringing it all into the house.
      Thanks for sharing your expertise with everyone.
      Christy

      Reply
  38. KATHY says

    March 23, 2018 at 11:37 am

    Hi Christy,
    DO YOU HAVE ANY ADVICE ON HOW TO DO THE PIPING?

    Reply
    • Christy says

      March 27, 2018 at 9:53 am

      My neighbor did the piping for me, but I know she cut the fabric on the bias and then sewed it. That makes it lay flat without wrinkles when it goes around a corner. My best advice is to search Pinterest as I’m sure someone has published a tutorial on sewing piping. Hope that helps!
      Christy

      Reply
  39. Melissa Skellie says

    June 12, 2018 at 12:28 pm

    Love this project and your step by step is very helpful! Also …. love the goldens ….. I expect that is what will happen when I lay my fabric out, too!

    Reply
    • Christy says

      June 20, 2018 at 5:59 pm

      The dog hair is everywhere, but it’s worth it, right?! I’m glad you enjoyed the tutorial. Good luck with your project!
      Christy

      Reply
  40. Karen Garcia says

    June 29, 2018 at 12:46 am

    WOW !! I am SO IMPRESSED with this being your first project.
    It looks totally pro to me and makes me feel like maybe …just maybe…
    i can do it too !!
    thanks !

    Reply
    • Karen Garcia says

      June 29, 2018 at 12:48 am

      PS I LOVE the white legs and the doggies are so adorable !!

      Reply
      • Christy says

        July 3, 2018 at 10:17 am

        Thanks so much, Karen! The pups are always my best helpers and like to be front and center for every project. You can definitely tackle a project like this–it’s not hard, just time consuming and tedious. I’m very glad I tried it but have to say that I’ve had no problem paying a professional for subsequent jobs!!

        Reply
  41. Anne says

    August 19, 2018 at 6:06 am

    Super job ,lovely fabric,, very professional,white legs absolutely right.sincerely Anne Webb.

    Reply
  42. AL SMITH says

    November 8, 2018 at 8:09 pm

    I’ve just started looking online at ‘before and after’ upholstery and not only are you brave and persistent to undertake the project but you have an extraordinary talent for choosing
    a great fabric. Your piece is 100% better than any other I’ve seen because you understand the
    need to have a fabric pattern that is ‘to scale’ for the chair. you did THAT so perfectly !!!
    Your talent and artistic eye is far superior to any of the others i’ve seen. super well done !
    and beautifully done ! you have a great ‘eye’ – something most people ‘don’t get”. bravo !!!

    Reply
    • Christy says

      November 14, 2018 at 10:02 am

      Hi, Al-
      Thanks so much for that lovely comment and compliment! I’m not sure if I was actually thinking about the scale of the pattern when I selected it, but I agree that it does make a huge difference and I’m glad I chose correctly. There’s nothing worse than being halfway through a big project and realizing that you don’t like your selections!

      This was an excellent learning experience but I am glad to have an experienced upholsterer just a few miles away!
      Thanks again for writing-
      Christy

      Reply
  43. Lucille Syrek says

    April 14, 2019 at 9:58 am

    You did a wonderful job. A huge task to undertake if you have never done it before. Fabric choice is perfect. You should be very proud of your self. I did this to my couch and chairs in my living room years ago so I know the work involved.

    Reply
    • Christy says

      April 17, 2019 at 11:34 am

      Thank you so much, Lucille! I think if I had known how much work it would be when I started, I might not have tackled such a big project my first time. Ignorance is bliss, right? Now I know why upholsterers charge so much (and rightfully so)!

      Reply
  44. Pamela Light says

    October 31, 2019 at 11:49 pm

    This is beautiful! And I love the white legs! Also thank you for your husband’s service and yours and kids. It’s never just the soldier.
    May God Bless you.

    Reply
    • Christy says

      November 6, 2019 at 10:13 am

      Thanks so much, Pamela. I appreciate your kind words!
      Christy

      Reply
  45. Lorraine says

    February 19, 2020 at 11:30 am

    I really like the legs painted white

    Reply
    • Christy says

      February 19, 2020 at 1:12 pm

      Thanks so much, Lorraine! I do, too.

      Reply
  46. Stephanie says

    May 12, 2020 at 8:40 pm

    You did a great job. The fabric is so pretty and I like the legs white. Found you through Pintrest.

    Reply
    • Christy says

      May 16, 2020 at 5:06 pm

      Thanks so much, Stephanie! I’m so glad you took the time to leave a comment. Christy

      Reply

Leave a Reply Cancel reply

Your email address will not be published. Required fields are marked *

Recipe Rating


This site uses Akismet to reduce spam. Learn how your comment data is processed.

Primary Sidebar

Lowest prices. Straight Teeth,

•Don’t Miss A Thing!!•

•Do You Know Jesus?•

•Featured In•

Holiday Gift Ideas

Footer

  • Email
  • Facebook
  • Instagram
  • Pinterest

Copyright © 2023 · 11 Magnolia Lane· Blog Design by Little Blue Deer
Privacy Policy

11 MAGNOLIA LANE IS A PARTICIPANT IN THE AMAZON SERVICES LLC ASSOCIATES PROGRAM, AN AFFILIATE ADVERTISING PROGRAM DESIGNED TO PROVIDE A MEANS FOR US TO EARN ADVERTISING FEES BY ADVERTISING AND LINKING TO AMAZON.COM AND AFFILIATED SITES. AS AN AMAZON ASSOCIATE, WE EARN FROM QUALIFYING PURCHASES. WE ALSO PARTICIPATE IN SEVERAL OTHER AFFILIATE PROGRAMS; THIS INCOME ALLOWS US TO MAINTAIN THE QUALITY OF YOUR USER EXPERIENCE AND KEEPS OUR CONTENT FREE. WHEN YOU PURCHASE THROUGH ANY OF OUR AFFILIATE LINKS, WE EARN A SMALL COMMISSION AND YOU DON’T PAY A CENT MORE THAN YOU WOULD OTHERWISE; THAT WOULD BE TACKY!   READ OUR FULL PRIVACY AND DISCLOSURE POLICY {HERE}.
  ©11 Magnolia Lane 2019. Unauthorized use and/or duplication of this material without express and written permission from this blog’s authors and/or owners is strictly prohibited. Please email us at admin@11magnolialane.com for more information.

  • MEET CHRISTY & AMY
    • IF YOU’RE NEW HERE…
    • WORK WITH US
    • 11 MAGNOLIA LANE 101
    • DISCLOSURE + PRIVACY (the fine print)
    • BEST OF 11 MAGNOLIA LANE
    • Back
  • TOUR OUR HOMES
    • TOUR OUR HOMES
    • CHRISTY’S MAGNOLIA COTTAGE
    • CHRISTY’S MCC HOUSE
    • AMY’S NEW HOME BUILD
    • HOLIDAY HOME TOUR SERIES
    • SPRING HOME TOUR SERIES
    • Back
  • CELEBRATIONS
    • EVENTS + ENTERTAINING
    • GIFTS
    • HOLIDAYS
    • RECIPES
    • Back
  • HOME
    • CLEANING
    • DECORATING
    • ORGANIZING
    • ROOM BY ROOM
      • BATHROOMS
      • BEDROOMS
      • CLOSETS
      • CRAFT ROOMS + OFFICES
      • DINING ROOMS
      • KIDS’ ROOMS
      • KITCHENS
      • LAUNDRY ROOMS
      • LIVING + GREAT ROOMS
      • OTHER SPACES
      • PANTRIES
      • PLAYROOMS + BONUS ROOMS
      • PORCHES + OUTDOOR SPACES
      • Back
    • TIPS
    • Back
  • SHOP
    • SHOP OUR INSTAGRAM
    • SHOP OUR AMAZON STORE
    • FRIDAY FAVORITE FINDS
    • 11 ML ETSY SHOP
    • 11ML ORGANIZING SHOP
    • Back
  • PROJECTS
    • CRAFTS
    • DIY PROJECTS + TUTORIALS
    • FURNITURE
    • PRINTABLES
    • WINDOWS, DOORS, + WALLS
    • Back
  • LIFE
    • FRIDAY FREE FOR ALL
    • HEALTH
    • SIMPLY ON SUNDAY
    • TRAVEL
    • Back
  • CONTACT
    • Email
    • Facebook
    • Instagram
    • Pinterest
17378 shares
  • 69