• Skip to primary navigation
  • Skip to main content
  • Skip to primary sidebar
  • Skip to footer
  • MEET CHRISTY & AMY
    • IF YOU’RE NEW HERE…
    • WORK WITH US
    • 11 MAGNOLIA LANE 101
    • DISCLOSURE + PRIVACY (the fine print)
    • BEST OF 11 MAGNOLIA LANE
  • TOUR OUR HOMES
    • TOUR OUR HOMES
    • CHRISTY’S MAGNOLIA COTTAGE
    • CHRISTY’S MCC HOUSE
    • Christy’s Stuttgart Flat
    • Amy’s Virginia Craftsman Home Tour
    • AMY’S VIRGINIA CRAFTSMAN Building Process
    • HOLIDAY HOME TOUR SERIES
  • CELEBRATIONS
    • EVENTS + ENTERTAINING
    • GIFTS
    • HOLIDAYS
    • RECIPES
  • HOME
    • CLEANING
    • DECORATING
    • ORGANIZING
    • ROOM BY ROOM
      • BATHROOMS
      • BEDROOMS
      • CLOSETS
      • CRAFT ROOMS + OFFICES
      • DINING ROOMS
      • KIDS’ ROOMS
      • KITCHENS
      • LAUNDRY ROOMS
      • LIVING + GREAT ROOMS
      • OTHER SPACES
      • PANTRIES
      • PLAYROOMS + BONUS ROOMS
      • PORCHES + OUTDOOR SPACES
    • TIPS
  • SHOP
    • SHOP OUR INSTAGRAM
    • SHOP OUR AMAZON STORE
    • FRIDAY FAVORITE FINDS
  • PROJECTS
    • CRAFTS
    • DIY PROJECTS + TUTORIALS
    • FURNITURE
    • PRINTABLES
    • WINDOWS, DOORS, + WALLS
  • LIFE
    • FRIDAY FREE FOR ALL
    • HEALTH
    • SIMPLY ON SUNDAY
  • TRAVEL
  • CONTACT
    • Email
    • Facebook
    • Instagram
    • Pinterest

11 Magnolia Lane

Sharing our easy DIYs, decorating, entertaining and more!

Quick and Easy Kids’ Artwork Wall Display

February 11, 2013 By Christy 6 Comments

This Post Contains Affiliate Links

190 shares
  • 1

I spent my weekend removing moldy caulk from my shower and recaulking, and replacing the ripped screen in our porch door, but you don’t want to see any of that, now do you?  I know–boring!  So, instead, I’m going to show you what I did on Friday to display some of my daughter’s artwork.  The disclaimer is that I did not come up with this idea on my own; I’ve seen it all over Pinterest and the internet.  However, after looking at five or six web sites, I can’t seem to figure out who really came up with the idea.  So, forgive me for not crediting anyone specifically for thinking this up!  Also, Amy did something pretty similar HERE (I get all of my best ideas from her!).  As is true with most of my “tutorials,” it’s really too simple to be called a tutorial!  Here’s what I did:

Kids wall artwork display

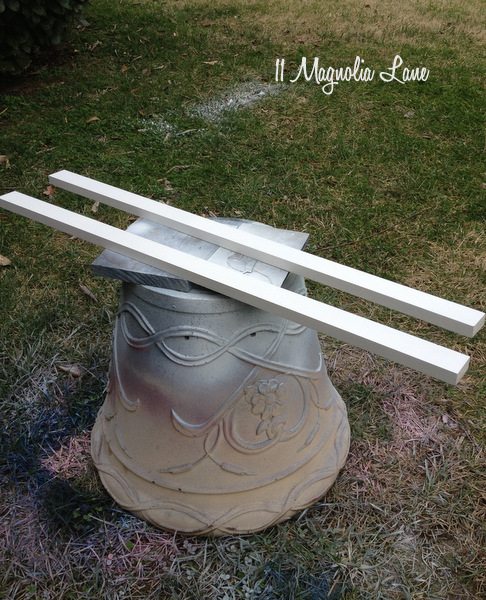
I started with 1″ x 8″ fingerjoint board, that I had left over from building my PANTRY shelves.  Because I had two pieces that were about 34″ long, that’s what I used.  I cut them to make sure they were the exact same length, sanded the edges lightly, and primed and painted them.  Here’s the paint and primer I almost always use (it’s available at Home Depot):

Prime and paint 1" x 8" fingerjoint board

Harley is safely in the background.  He likes to join me out back when I’m spray painting, but he does NOT like the hissing sound the paint makes.  Maybe it reminds him of an annoyed cat?!

This is my high-tech spray painting station.  Jealous?

Prime and paint fingerjoint board

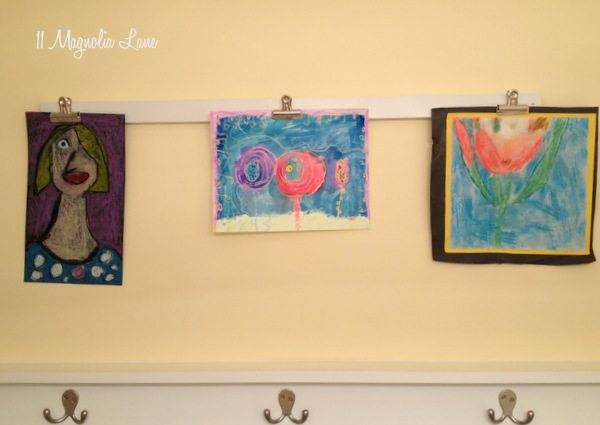
When the two boards were dry, I simply glue-gunned bulldog clips onto them.  I spaced my bulldog clips about 16″ apart, and I used three per piece of wood.  Obviously you could use a different number of clips based on the length of your board.  I’m telling you that they’re bulldog clips so you don’t have to look like an idiot at Hobby Lobby or an office supply store (like I did), asking for “those clipboard clip thingies without the clipboard.”  I got my bulldog clips at Hobby Lobby; they looked like this:

Bulldog clips from Hobby Lobby

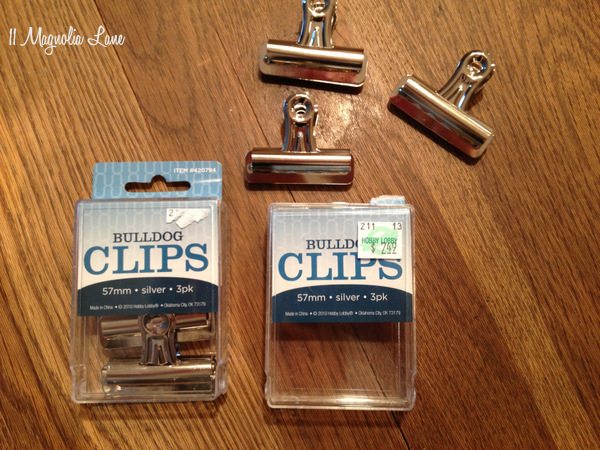
If you can’t find them, or want to order online, then you can buy them at Amazon {here} (affiliate link).
I then took my smallest drill bit (7/64″) and drilled a hole at each end of the board.  Then, using 2″ wire brad nails and a level, I hung the board on the wall.  The reason I chose this method to hang it was that I wanted to do minimal damage to the wall.  Two small nail holes will be easily patched and painted when we remove the display.  Here’s a close-up:

Drill a hole and use a wire brad nail to mount the board on the wall.

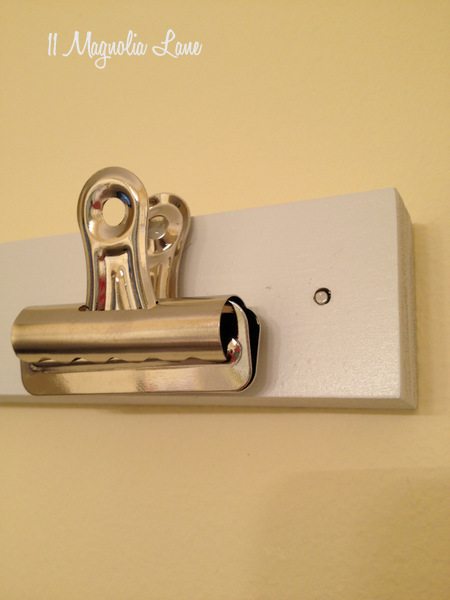
I later took a white paint pen and dotted paint on the nail head to make it less obvious.  Also, when there’s artwork hanging on the end clips, it covers the nail as well.

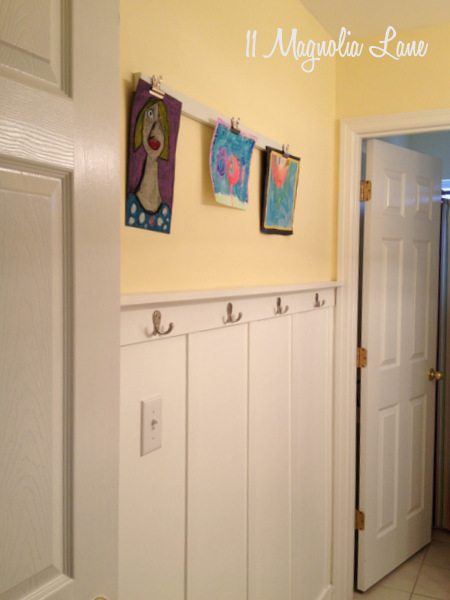
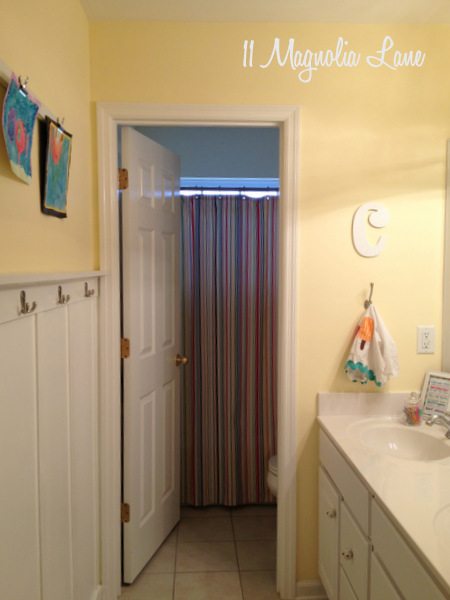
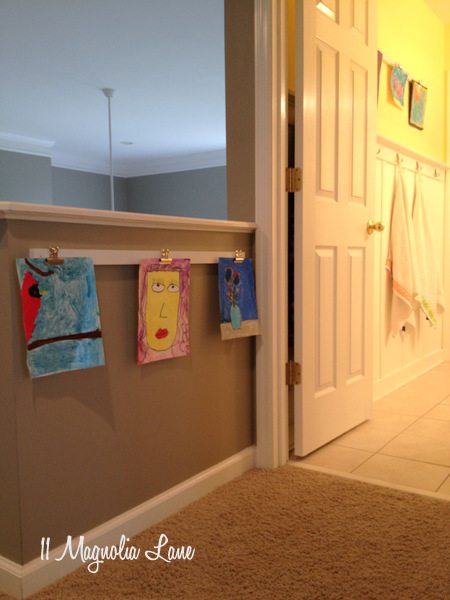
I wound up hanging one board in the kids’ bathroom, and one on the half wall just outside of their bathroom, right at the top of our stairs.  I considered putting them both in the bathroom, one on top of the other, and would have done that except that since we have board and batten in the bathroom (read about that HERE), I think the display boards would have been too high.  Here are some “after” shots:

Kids artwork gallery

Did I ever show you the mirror after I framed it out?  See above, if not.  I think it’s a great way to dress up a contractor-grade “wall of mirrors.”

Kids artwork wall

Artwork display board with bulldog clips

Kids' artwork displayMy daughter is the only one who brings me artwork anymore; my son is 12 and just not that into art anymore. 🙁  Wouldn’t it be a good idea to have one board for each kid, though?  You could swap their art out seasonally.  Stick them in the hall, the bathroom, the kitchen, even their bedroom.

We’ve discussed “paper management” before, but do you have any great ideas for containing the paper trail that comes with having children?  Let us know!

Thanks for stopping by.

icon-facebook-1icon-instagram-1icon-mail-1icon-pinterest-1icon-twitter-1

YOU MIGHT ALSO LIKE THESE POSTS... :

Winter Hallway and New Artwork
Ten Creative Closets for Kids, Crafting, and ...
Easy Foil-Wrapped Banana Sundaes Around the F...
The Powder Room at the MCC House

Filed Under: Childrens' Projects, DIY/Projects/Tutorials, Organization, Wall & Door Decor Tagged With: artwork, display, Kids, wall

Reader Interactions

Comments

  1. Beth Morrow says

    February 11, 2013 at 10:06 pm

    That is a great idea!

    Reply
    • Christy says

      February 13, 2013 at 1:07 pm

      Thanks, Beth–glad you stopped by!

      Reply
  2. Beth R says

    February 12, 2013 at 6:28 am

    I am obsessed with your shower curtain! Can you please tell me the source so I can find my own – I’ve been scouring the web to no avail looking. Also, LOVE the project!

    Reply
    • Christy says

      February 13, 2013 at 1:07 pm

      Beth–I bought the shower curtain about five years ago, so that might be why you’re having trouble finding one like it. I THINK it’s a Martha Stewart one from K-mart. The soap/lotion dispenser that I bought to match it was from Wal-mart, though, and the striped bath rug was from Target. So all three big-box stores had a primary-striped line out that year. I noticed that most of the striped shower curtains these days feature horizontal stripes, so you might be doomed to go in that direction. Good luck!

      Reply
  3. Inspire Me Heather says

    July 29, 2013 at 8:57 am

    I really like your childrens art boards & clips there and it suits that space so well! I’ve got this linked to my DIY kids art display post too today, great idea!!

    Reply
    • Christy says

      August 5, 2013 at 7:54 am

      Thanks, Heather! I’ll head over and take a look–I always need new ideas on how to handle the paper explosion in our house. Glad you stopped by!

      Reply

Leave a Reply Cancel reply

Your email address will not be published. Required fields are marked *

Recipe Rating


This site uses Akismet to reduce spam. Learn how your comment data is processed.

Primary Sidebar

Lowest prices. Straight Teeth,

•Don’t Miss A Thing!!•

•Do You Know Jesus?•

•Featured In•

Holiday Gift Ideas

Footer

  • Email
  • Facebook
  • Instagram
  • Pinterest

Copyright © 2023 · 11 Magnolia Lane· Blog Design by Little Blue Deer
Privacy Policy

11 MAGNOLIA LANE IS A PARTICIPANT IN THE AMAZON SERVICES LLC ASSOCIATES PROGRAM, AN AFFILIATE ADVERTISING PROGRAM DESIGNED TO PROVIDE A MEANS FOR US TO EARN ADVERTISING FEES BY ADVERTISING AND LINKING TO AMAZON.COM AND AFFILIATED SITES. AS AN AMAZON ASSOCIATE, WE EARN FROM QUALIFYING PURCHASES. WE ALSO PARTICIPATE IN SEVERAL OTHER AFFILIATE PROGRAMS; THIS INCOME ALLOWS US TO MAINTAIN THE QUALITY OF YOUR USER EXPERIENCE AND KEEPS OUR CONTENT FREE. WHEN YOU PURCHASE THROUGH ANY OF OUR AFFILIATE LINKS, WE EARN A SMALL COMMISSION AND YOU DON’T PAY A CENT MORE THAN YOU WOULD OTHERWISE; THAT WOULD BE TACKY!   READ OUR FULL PRIVACY AND DISCLOSURE POLICY {HERE}.
  ©11 Magnolia Lane 2019. Unauthorized use and/or duplication of this material without express and written permission from this blog’s authors and/or owners is strictly prohibited. Please email us at admin@11magnolialane.com for more information.

  • MEET CHRISTY & AMY
    • IF YOU’RE NEW HERE…
    • WORK WITH US
    • 11 MAGNOLIA LANE 101
    • DISCLOSURE + PRIVACY (the fine print)
    • BEST OF 11 MAGNOLIA LANE
    • Back
  • TOUR OUR HOMES
    • TOUR OUR HOMES
    • CHRISTY’S MAGNOLIA COTTAGE
    • CHRISTY’S MCC HOUSE
    • AMY’S NEW HOME BUILD
    • HOLIDAY HOME TOUR SERIES
    • SPRING HOME TOUR SERIES
    • Back
  • CELEBRATIONS
    • EVENTS + ENTERTAINING
    • GIFTS
    • HOLIDAYS
    • RECIPES
    • Back
  • HOME
    • CLEANING
    • DECORATING
    • ORGANIZING
    • ROOM BY ROOM
      • BATHROOMS
      • BEDROOMS
      • CLOSETS
      • CRAFT ROOMS + OFFICES
      • DINING ROOMS
      • KIDS’ ROOMS
      • KITCHENS
      • LAUNDRY ROOMS
      • LIVING + GREAT ROOMS
      • OTHER SPACES
      • PANTRIES
      • PLAYROOMS + BONUS ROOMS
      • PORCHES + OUTDOOR SPACES
      • Back
    • TIPS
    • Back
  • SHOP
    • SHOP OUR INSTAGRAM
    • SHOP OUR AMAZON STORE
    • FRIDAY FAVORITE FINDS
    • 11 ML ETSY SHOP
    • 11ML ORGANIZING SHOP
    • Back
  • PROJECTS
    • CRAFTS
    • DIY PROJECTS + TUTORIALS
    • FURNITURE
    • PRINTABLES
    • WINDOWS, DOORS, + WALLS
    • Back
  • LIFE
    • FRIDAY FREE FOR ALL
    • HEALTH
    • SIMPLY ON SUNDAY
    • TRAVEL
    • Back
  • CONTACT
    • Email
    • Facebook
    • Instagram
    • Pinterest
190 shares
  • 1