• Skip to primary navigation
  • Skip to main content
  • Skip to primary sidebar
  • Skip to footer
  • MEET CHRISTY & AMY
    • IF YOU’RE NEW HERE…
    • WORK WITH US
    • 11 MAGNOLIA LANE 101
    • DISCLOSURE + PRIVACY (the fine print)
    • BEST OF 11 MAGNOLIA LANE
  • TOUR OUR HOMES
    • TOUR OUR HOMES
    • CHRISTY’S MAGNOLIA COTTAGE
    • CHRISTY’S MCC HOUSE
    • Christy’s Stuttgart Flat
    • Amy’s Virginia Craftsman Home Tour
    • AMY’S VIRGINIA CRAFTSMAN Building Process
    • HOLIDAY HOME TOUR SERIES
  • CELEBRATIONS
    • EVENTS + ENTERTAINING
    • GIFTS
    • HOLIDAYS
    • RECIPES
  • HOME
    • CLEANING
    • DECORATING
    • ORGANIZING
    • ROOM BY ROOM
      • BATHROOMS
      • BEDROOMS
      • CLOSETS
      • CRAFT ROOMS + OFFICES
      • DINING ROOMS
      • KIDS’ ROOMS
      • KITCHENS
      • LAUNDRY ROOMS
      • LIVING + GREAT ROOMS
      • OTHER SPACES
      • PANTRIES
      • PLAYROOMS + BONUS ROOMS
      • PORCHES + OUTDOOR SPACES
    • TIPS
  • SHOP
    • SHOP OUR INSTAGRAM
    • SHOP OUR AMAZON STORE
    • FRIDAY FAVORITE FINDS
  • PROJECTS
    • CRAFTS
    • DIY PROJECTS + TUTORIALS
    • FURNITURE
    • PRINTABLES
    • WINDOWS, DOORS, + WALLS
  • LIFE
    • FRIDAY FREE FOR ALL
    • HEALTH
    • SIMPLY ON SUNDAY
  • TRAVEL
  • CONTACT
    • Email
    • Facebook
    • Instagram
    • Pinterest

11 Magnolia Lane

Sharing our easy DIYs, decorating, entertaining and more!

Our New Easy & Affordable Garage Organization

August 23, 2019 By Amy 4 Comments

This Post Contains Affiliate Links

140 shares

Today I am excited to show off the new, affordable shelving option we built to add storage in our garage.

This post is sponsored by HomeRight.

I told my husband earlier this summer I was really hoping to figure out how to park my car in the garage before it got cold. I really hate cold weather, I am already dreading those freezing cold mornings when I have to go out before dark to get kids to school–I know I am thinking ahead since it’s in the 90s here right now but #priorities!


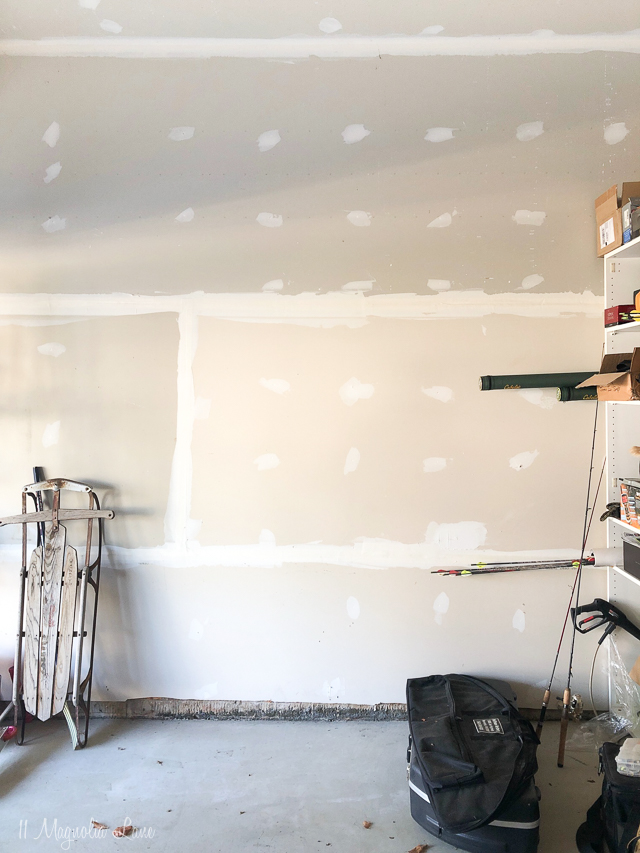
Above is the not pretty “before”. Our garage, like most garages, is a catchall for pretty much everything–sports equipment, a lawn mower, seasonal decor, leftover paint and all the DIY tools I have accumulated over the years as well as my husband’s ever-growing collection of hunting and fishing equipment not to mention all our bikes, which we ride all the time. Even though I’d tackled this space several times to try to organize it, we still weren’t at a point where we had enough open space to park a car in it. We talked about the option of getting a storage shed for the back of the house, but they are expensive and our yard has a downhill grade which made that an even more involved project.


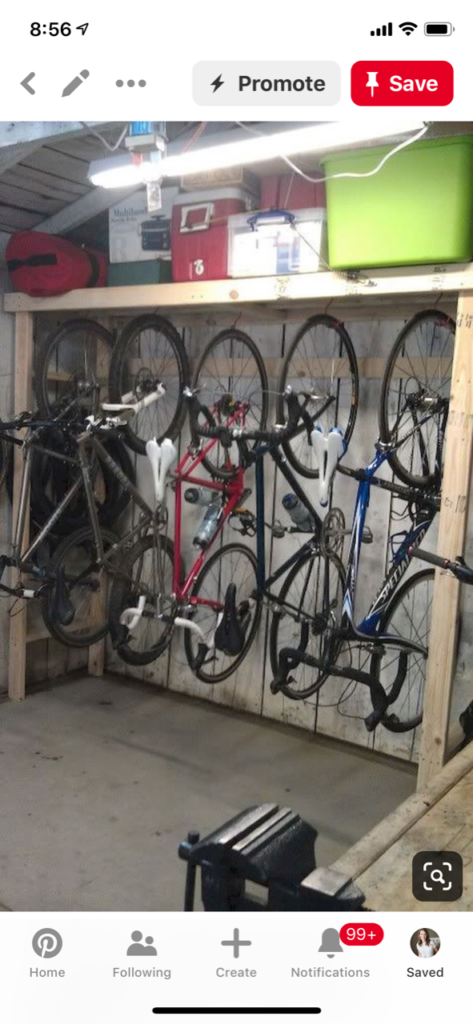
We looked on Pinterest for some inspiration and came across this photo below (I could never find the source, I tried hoping for a step-by-step tutorial) of hanging bikes with storage over top. My husband thought it would be pretty easy to recreate, and this way the bikes would be out of the way, so he set about designing a plan. (I’ll list what we used at the end).


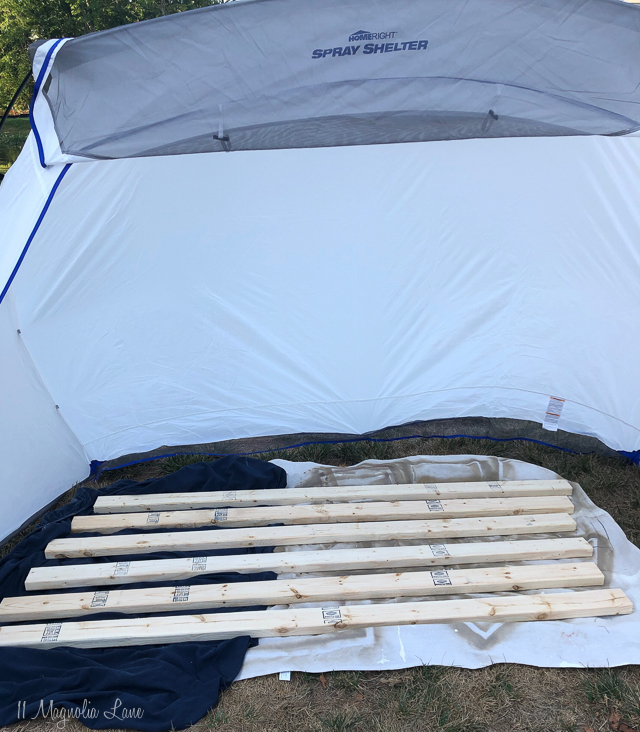
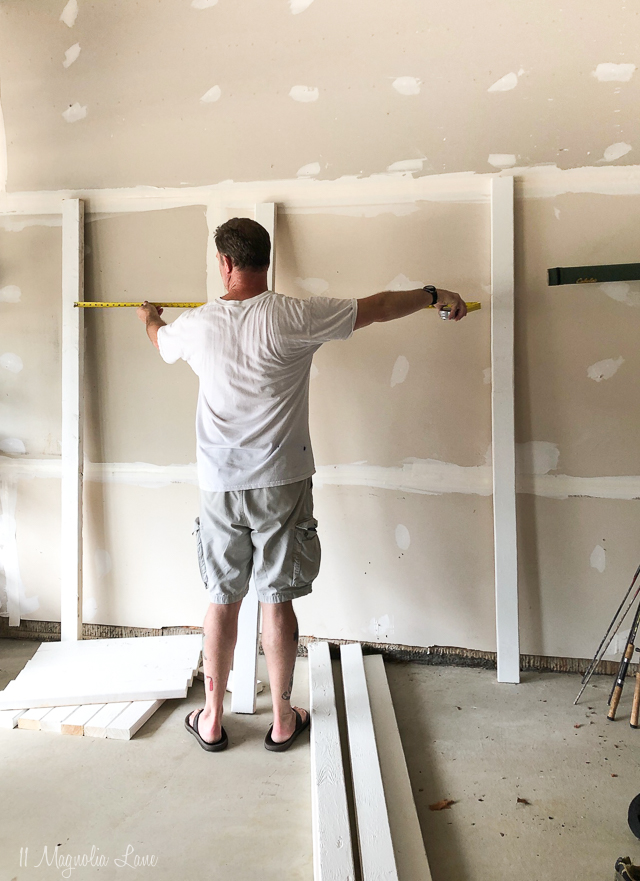
I am sure he thought it was a little overboard, but when he brought the wood home I told him I wanted to make sure it looked nice so I got out my HomeRight Super FinishMax and gave all the wood a few coats of white paint. In a perfect world, our garage walls would be painted and the floors sealed for extra beauty out here, but I got painting quotes before we moved in and had to admit it would be a waste of money. At least this storage set up looks a little bit better without it being made of raw wood.


Painting the wood only took a few extra hours and I think it looks so much better white. Painting with the Super Finish Max is so easy, and the HomeRight Spray Shelter contains all the paint overspray. I did forget to pick up a large drop cloth, so our grass got a little bit of decoration but we’re beginning a landscaping project out here this fall so I am not worried about it.


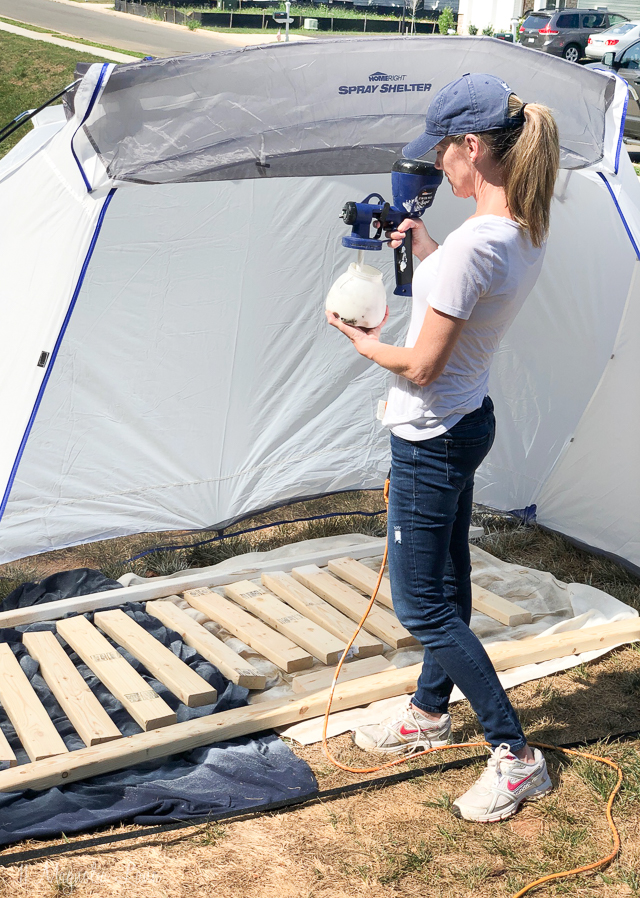
I gave all the wood two quick coats of paint, the sprayer even allows you to angle it so you can hit the sides of the boards too all at once which made it go super fast. All in all, it took less than 30 minutes to spray, plus drying time. By the end of the day everything was dry enough to start the build. I love how uniform it looks with the boards (at least the sides that show) being painted white.


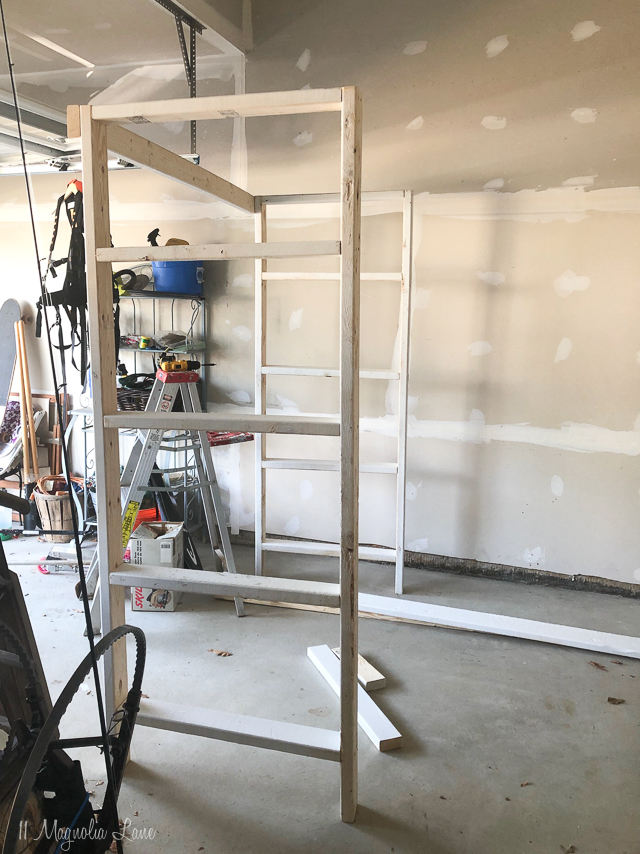
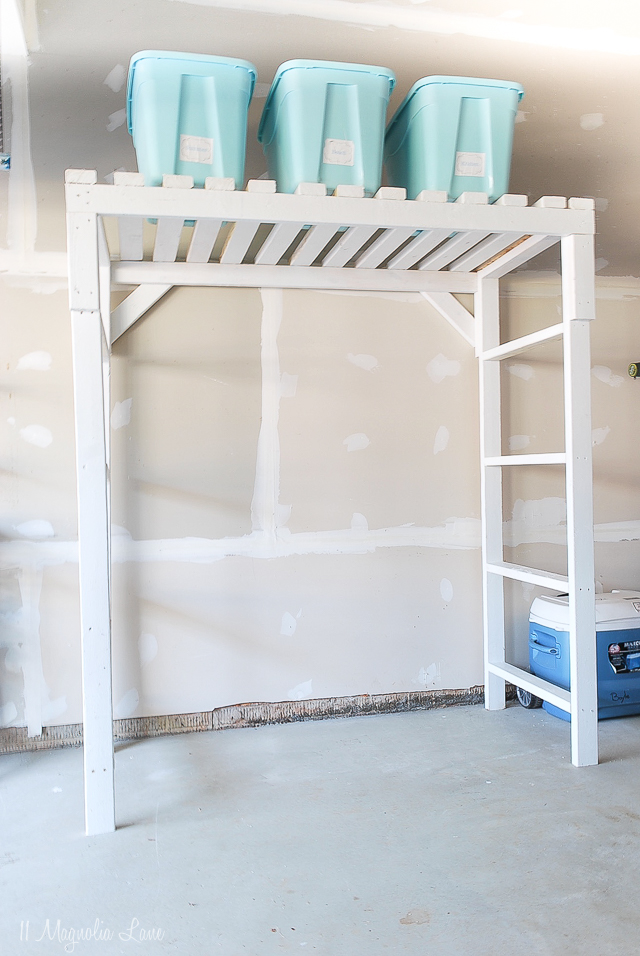
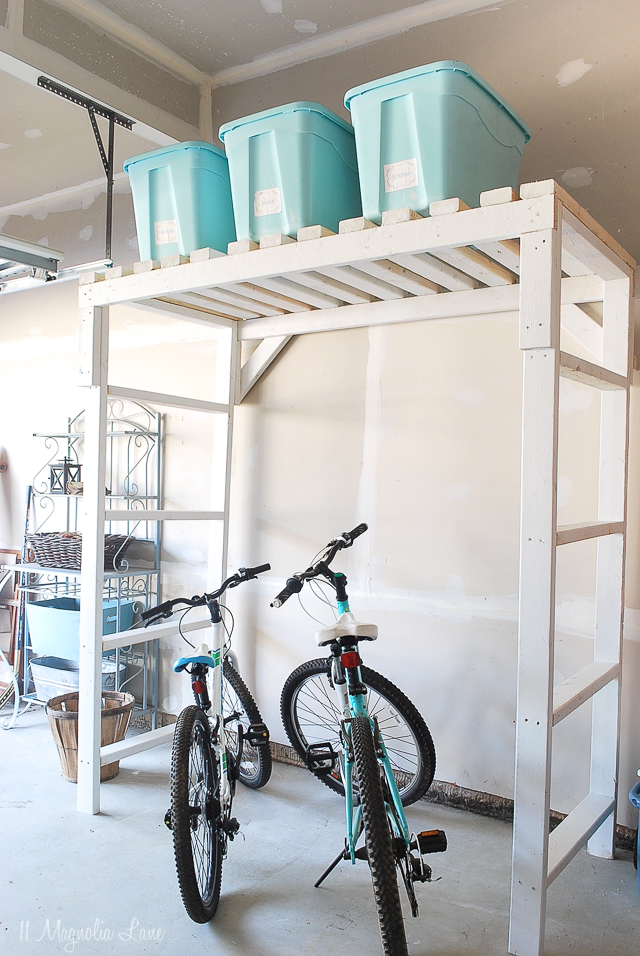
My husband started by building two ladder style supports for the sides. The reason being, if we decide we no longer need bike storage, we can easily add more shelving with this design. He then constructed the top of the shelf to hold bins of outdoor gear that had been taking up space on the floor.  Bulkier items can get tucked in the back.  If you are wondering if it’s bolted to the wall, it isn’t. Which means we can move it or even take it with us should be move. It is plenty sturdy even without the walls supporting it.


For now, this is where we’ve left off on the project but there is more to come. We ordered this wall bike rack and will hang our four bikes on it underneath. I’ll be back to share final photos once that arrives.


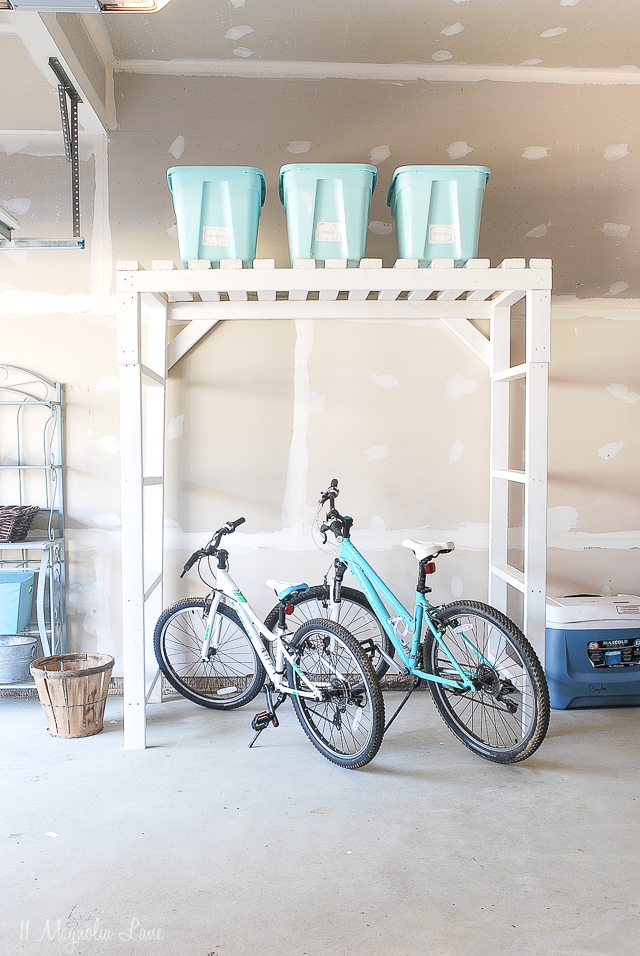
Even now with just the bikes tucked underneath we have so much more space. The garage is finally starting to come together and this part of our home is finally working for us instead of against us! We used approximately 17 2″ x 4″ x 96″ pieces of wood (from Home Depot) and a $10 box of screws, and used leftover white paint so for less than $60 we gained all this storage.

The height is just over 6′ tall to accommodate our largest bike. I am including the cut measurements if you want to get the wood pre-cut, Home Depot will usually do this for free, see below for more info.


I used my trusty Super Finish Max Paint Sprayer and a Large Spray Shelter, which are great for so many projects (see more of what we’ve done here), you can get your own below.  I definitely could have left this unpainted but to me, it was worth the extra bit of time to make it look more polished. Plenty of friends and family come and go through our garage in reality so it’s not a bad thing to have it pulled together.


Here are the project specifics. 

He used this drill, which is a powerhouse and these screws (we purchased a 1 lb. box)

4 upright legs are 2 x 4 cut to 80 inches.

Top is 2 x 4 cut to 72 inches x 2 pcs.

Top slats are 2 x 4 cut to 34 inches x 13 pcs (secured approx 2.5 inches apart)

Side slats tying legs together are 2 x 4 cut to 28 inches x 10 pcs.  (5 pcs per side. )

Supports to legs are 2 x 4 cut to 12 inches x 4 pcs (just under top 72 inch and screwed to legs.

Diagonals are 2 x 4 cut to 19.5 inches x 2 pcs (on back only, but left the option open to add them to the front.)

***

We still have a few projects left to finish up this garage once and for all but in the end, it should look halfway decent. A big thank you to my husband for making this happen, he’s one of those guys that prefers fishing to DIY’ing so I appreciate that this was an effort on his part to make me happy.

I’ll be back with a final post and a giveaway for a Super Finish Max as soon as we get the bike rack and get it installed, it’s due to arrive next week so once it’s up I’ll share final photos. Stay tuned!

XO,


small-amy-new-headshot-summer-2016-2 copy
icon-facebook-1icon-instagram-1icon-pinterest-1icon-twitter-1
 

If you enjoyed this post, we’d love to have you subscribe to our Sunday newsletter where we share our content and other fun things we’ve found to inspire your day. You can sign up below!


We promise to never sell your email information. Our posts contain affiliate links.  If you make a purchase after clicking on these links, we will earn a small commission, which helps to keep our content free.  You don’t pay a cent more than you would otherwise, since that would be tacky! Please see our full disclosure policy here.

Click here to subscribe

YOU MIGHT ALSO LIKE THESE POSTS... :

The January Edit
My Favorite Cleaning Tools + Cleaning Routine
DIY Custom Plate Rack (For $40!)
Keeping Our Home Clean - Weekly Cleaning Task...

Filed Under: Amy New House Build, DIY/Projects/Tutorials, Organization, ORGANIZATION, Other Spaces, Porches & Outdoor Spaces, PROJECTS, Wall & Door Decor Tagged With: finishmax, garage organization, homeright, organization

Reader Interactions

Comments

  1. Nancy says

    August 23, 2019 at 9:05 pm

    Thanks for sharing and including all the specifics. Y’all are saving people a lot of time and giving them a great idea. That’s so thoughtful and kind of you.

    Reply
    • Amy says

      August 24, 2019 at 3:19 pm

      Thank you so much for your kind comment. I read it out loud to my husband and he was quite proud, we appreciate hearing the positive feedback! Have a great day.

      Amy

      Reply
  2. Carol says

    August 24, 2019 at 10:51 am

    What a great idea!

    Reply
    • Amy says

      August 24, 2019 at 3:18 pm

      Thanks, we are really happy with how it turned out! XO, Amy

      Reply

Leave a Reply Cancel reply

Your email address will not be published. Required fields are marked *

Recipe Rating


This site uses Akismet to reduce spam. Learn how your comment data is processed.

Primary Sidebar

Lowest prices. Straight Teeth,

•Don’t Miss A Thing!!•

•Do You Know Jesus?•

•Featured In•

Footer

  • Email
  • Facebook
  • Instagram
  • Pinterest

Copyright © 2023 · 11 Magnolia Lane· Blog Design by Little Blue Deer
Privacy Policy

11 MAGNOLIA LANE IS A PARTICIPANT IN THE AMAZON SERVICES LLC ASSOCIATES PROGRAM, AN AFFILIATE ADVERTISING PROGRAM DESIGNED TO PROVIDE A MEANS FOR US TO EARN ADVERTISING FEES BY ADVERTISING AND LINKING TO AMAZON.COM AND AFFILIATED SITES. AS AN AMAZON ASSOCIATE, WE EARN FROM QUALIFYING PURCHASES. WE ALSO PARTICIPATE IN SEVERAL OTHER AFFILIATE PROGRAMS; THIS INCOME ALLOWS US TO MAINTAIN THE QUALITY OF YOUR USER EXPERIENCE AND KEEPS OUR CONTENT FREE. WHEN YOU PURCHASE THROUGH ANY OF OUR AFFILIATE LINKS, WE EARN A SMALL COMMISSION AND YOU DON’T PAY A CENT MORE THAN YOU WOULD OTHERWISE; THAT WOULD BE TACKY!   READ OUR FULL PRIVACY AND DISCLOSURE POLICY {HERE}.
  ©11 Magnolia Lane 2019. Unauthorized use and/or duplication of this material without express and written permission from this blog’s authors and/or owners is strictly prohibited. Please email us at admin@11magnolialane.com for more information.

  • MEET CHRISTY & AMY
    • IF YOU’RE NEW HERE…
    • WORK WITH US
    • 11 MAGNOLIA LANE 101
    • DISCLOSURE + PRIVACY (the fine print)
    • BEST OF 11 MAGNOLIA LANE
    • Back
  • TOUR OUR HOMES
    • TOUR OUR HOMES
    • CHRISTY’S MAGNOLIA COTTAGE
    • CHRISTY’S MCC HOUSE
    • AMY’S NEW HOME BUILD
    • HOLIDAY HOME TOUR SERIES
    • SPRING HOME TOUR SERIES
    • Back
  • CELEBRATIONS
    • EVENTS + ENTERTAINING
    • GIFTS
    • HOLIDAYS
    • RECIPES
    • Back
  • HOME
    • CLEANING
    • DECORATING
    • ORGANIZING
    • ROOM BY ROOM
      • BATHROOMS
      • BEDROOMS
      • CLOSETS
      • CRAFT ROOMS + OFFICES
      • DINING ROOMS
      • KIDS’ ROOMS
      • KITCHENS
      • LAUNDRY ROOMS
      • LIVING + GREAT ROOMS
      • OTHER SPACES
      • PANTRIES
      • PLAYROOMS + BONUS ROOMS
      • PORCHES + OUTDOOR SPACES
      • Back
    • TIPS
    • Back
  • SHOP
    • SHOP OUR INSTAGRAM
    • SHOP OUR AMAZON STORE
    • FRIDAY FAVORITE FINDS
    • 11 ML ETSY SHOP
    • 11ML ORGANIZING SHOP
    • Back
  • PROJECTS
    • CRAFTS
    • DIY PROJECTS + TUTORIALS
    • FURNITURE
    • PRINTABLES
    • WINDOWS, DOORS, + WALLS
    • Back
  • LIFE
    • FRIDAY FREE FOR ALL
    • HEALTH
    • SIMPLY ON SUNDAY
    • TRAVEL
    • Back
  • CONTACT
    • Email
    • Facebook
    • Instagram
    • Pinterest
140 shares