• Skip to primary navigation
  • Skip to main content
  • Skip to primary sidebar
  • Skip to footer
  • MEET CHRISTY & AMY
    • IF YOU’RE NEW HERE…
    • WORK WITH US
    • 11 MAGNOLIA LANE 101
    • DISCLOSURE + PRIVACY (the fine print)
    • BEST OF 11 MAGNOLIA LANE
  • TOUR OUR HOMES
    • TOUR OUR HOMES
    • CHRISTY’S MAGNOLIA COTTAGE
    • CHRISTY’S MCC HOUSE
    • Christy’s Stuttgart Flat
    • Amy’s Virginia Craftsman Home Tour
    • AMY’S VIRGINIA CRAFTSMAN Building Process
    • HOLIDAY HOME TOUR SERIES
  • CELEBRATIONS
    • EVENTS + ENTERTAINING
    • GIFTS
    • HOLIDAYS
    • RECIPES
  • HOME
    • CLEANING
    • DECORATING
    • ORGANIZING
    • ROOM BY ROOM
      • BATHROOMS
      • BEDROOMS
      • CLOSETS
      • CRAFT ROOMS + OFFICES
      • DINING ROOMS
      • KIDS’ ROOMS
      • KITCHENS
      • LAUNDRY ROOMS
      • LIVING + GREAT ROOMS
      • OTHER SPACES
      • PANTRIES
      • PLAYROOMS + BONUS ROOMS
      • PORCHES + OUTDOOR SPACES
    • TIPS
  • SHOP
    • SHOP OUR INSTAGRAM
    • SHOP OUR AMAZON STORE
    • FRIDAY FAVORITE FINDS
  • PROJECTS
    • CRAFTS
    • DIY PROJECTS + TUTORIALS
    • FURNITURE
    • PRINTABLES
    • WINDOWS, DOORS, + WALLS
  • LIFE
    • FRIDAY FREE FOR ALL
    • HEALTH
    • SIMPLY ON SUNDAY
  • TRAVEL
  • CONTACT
    • Email
    • Facebook
    • Instagram
    • Pinterest

11 Magnolia Lane

Sharing our easy DIYs, decorating, entertaining and more!

Nautical Bathtub Valance

January 27, 2011 By Terry 3 Comments

This Post Contains Affiliate Links

43 shares

DIY easy shower valance


Over the past couple of weeks, I have been working on transforming my sons’ generic white bathroom into a yacht club loo.

My first order of business was to add some color. Choosing a paint color has never come easily to me, and paint stores truly overwhelm me.  As we all know, you can love a color on a paint chip but it can be a very different experience when brushed all over your walls. I wanted a nautical inspired bathroom so I found a lovely shade of navy that ended up looking fabulous against the white tiles (phew!).

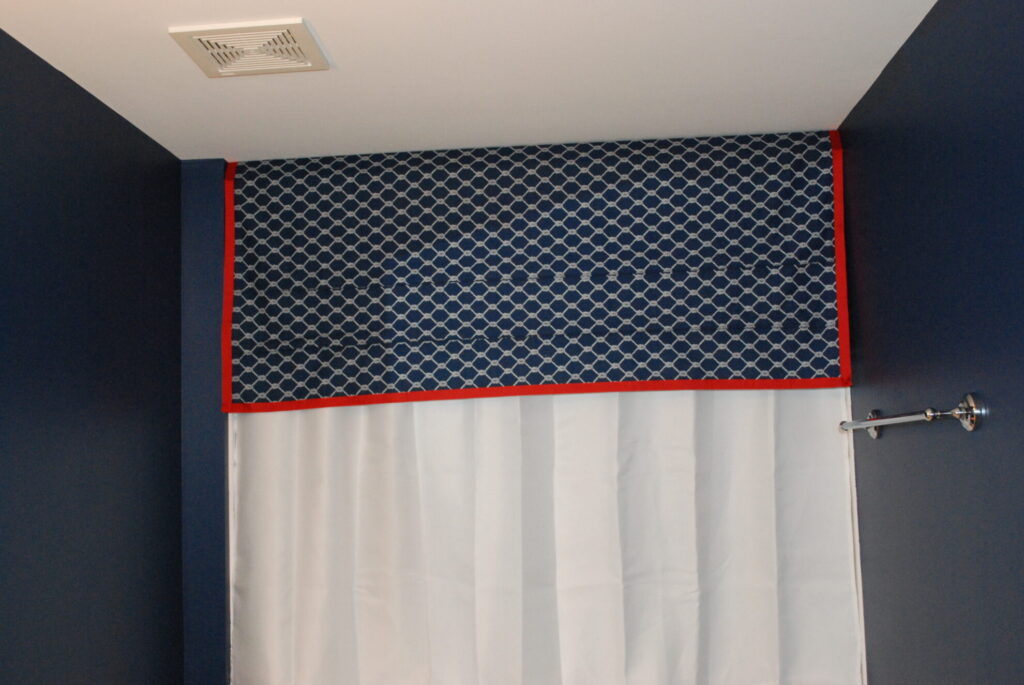
My second project was to create a valance over the tub. Years ago, while searching for inspiration at model homes, I saw a valance and fell in love.  Five years later I am finally trying it out and I wanted to share my quick and easy nautical valance with you all.  I do want to share that I am in no way shape or form a seamstress. My sewing skills are mediocre at best, but since this was a simple rectangle design with three simple pleats, you don’t really need to be great on a sewing machine to end up with fabulous results. I also know that there are probably “proper’ ways of assembling a valance, however, I typically don’t follow the rules and just dive in.   So jump in, the water is fine and my nautical valance looks pretty darn good for a novice!

Things you will need to make your valance:  Measuring tape, fabric scissors, sewing pins, 2 x 1 piece of treated wood to hang valance on (same size as valance width), (2) elbow brackets, (3) wooden dowels (same size as valance), staple gun, fabric glue, fabric accent ribbon and approx. 2 yards of fabric (probably less).

Step One:

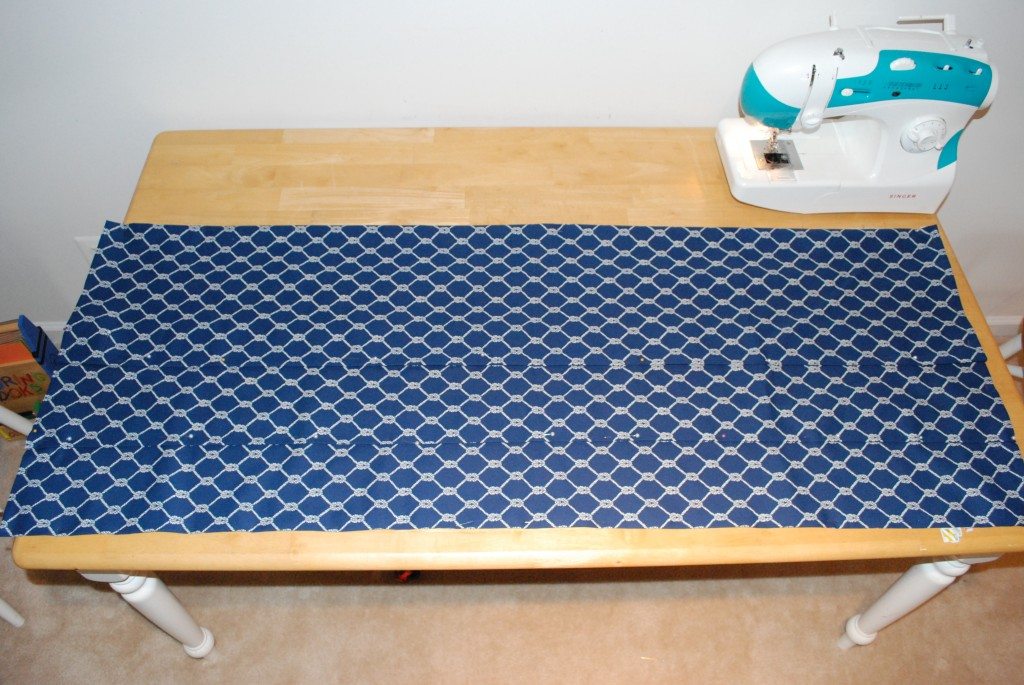
Measure, Measure, Measure!  I simply measured across the top of the shower, which was approximately 5 feet across.  You want extra fabric on each side of the measurement so you can have a nice straight hem.  I already had chosen my fabric so I ordered 1 3/4 yards to cover the length of my shower plus a bit extra for the right and left hem.  I also went to Home Depot and asked them to cut a 2 X 1-inch piece of pressure treated wood as well as three wooden dowels.  I also picked up 2 elbow brackets (in the hardware aisle), which I will use to secure the valance to the wood and ceiling.


Tools for Valance

Step Two:

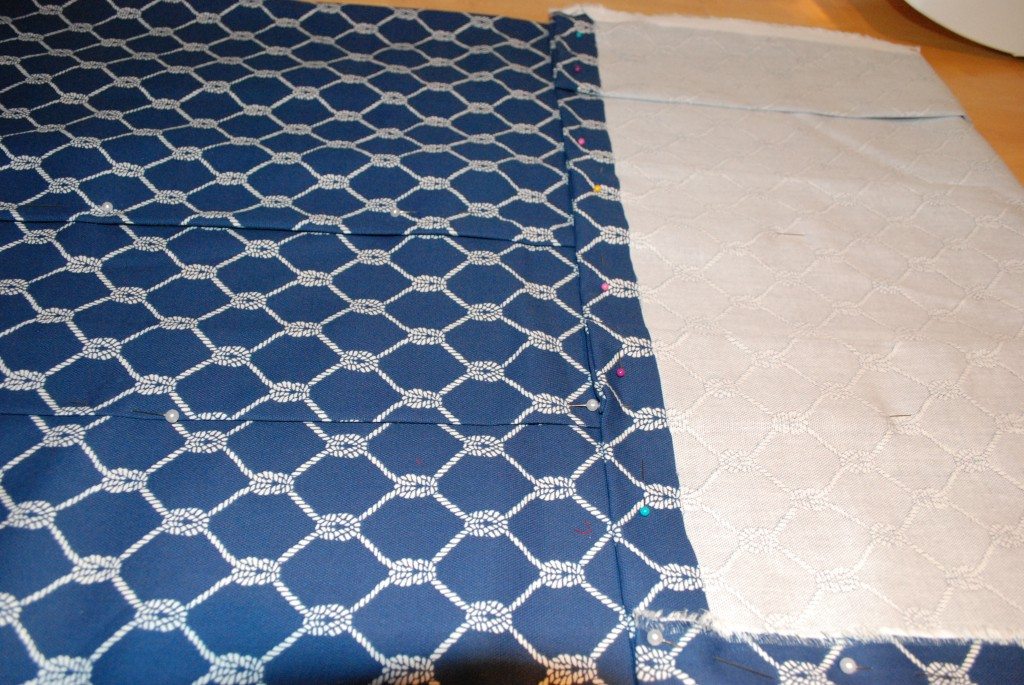
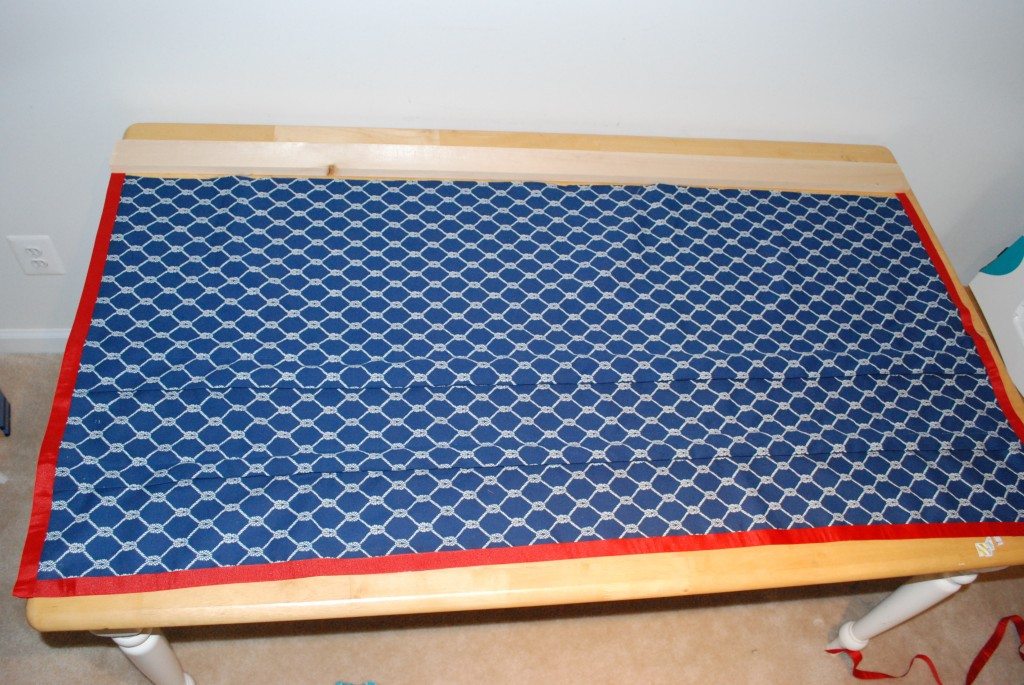
As I mentioned earlier, I really don’t follow the rules and typically jump right in, so here we go…. I simply measured out the exact width of the shower, tucked the extra hem fabric over on right & left side and began pinning everything in place.  I also folded over about an inch on the bottom to create an even and finished look.  At this time I also measured out three equal pleats and pinned those in place.


DSC_0026

(There are three pleats in this picture although it may be difficult to see them, as the fabric is dark)

Step Three:

Time to sew.  First, I stitched the bottom hem as that didn’t have any of the pleats and it was the easiest to manage.  Then I stitched each side hem, including the pleats.  Lastly, I stitched across each pleat (approx. 3/4 inches above the bottom of the pleat).  You will insert the wooden dowels into that area so you will want to leave one end open to insert the dowel.


DSC_0028


Step Four:

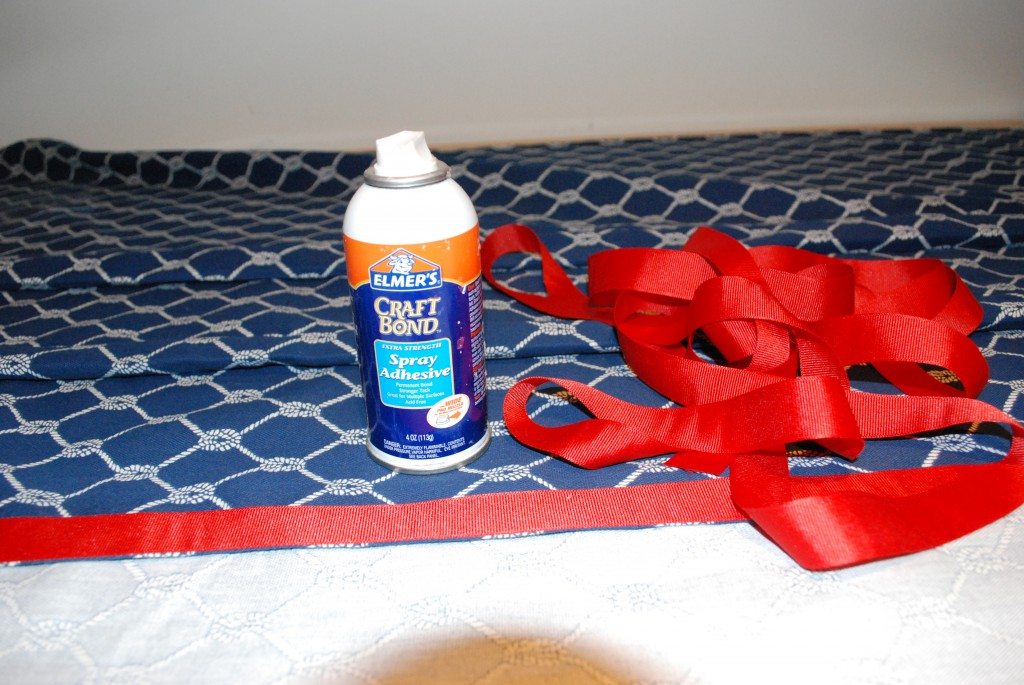
I decided that I needed a little something else as I have the navy walls and the navy fabric so I wanted to add some red trim.  I didn’t want to sew it on so I just used fabric glue.  Such a simple, no sew solution.


DSC_0029

Step Five:

Place the wood at the top of your valance (on the back side of your material).  Fold over the material and staple the material to the wooden taught.  Screw in the elbow bracket on each end of the wood.  You will then screw that elbow bracket into the wall of your shower placing the top of the wood flush against the top of the showers ceiling.


DSC_0031

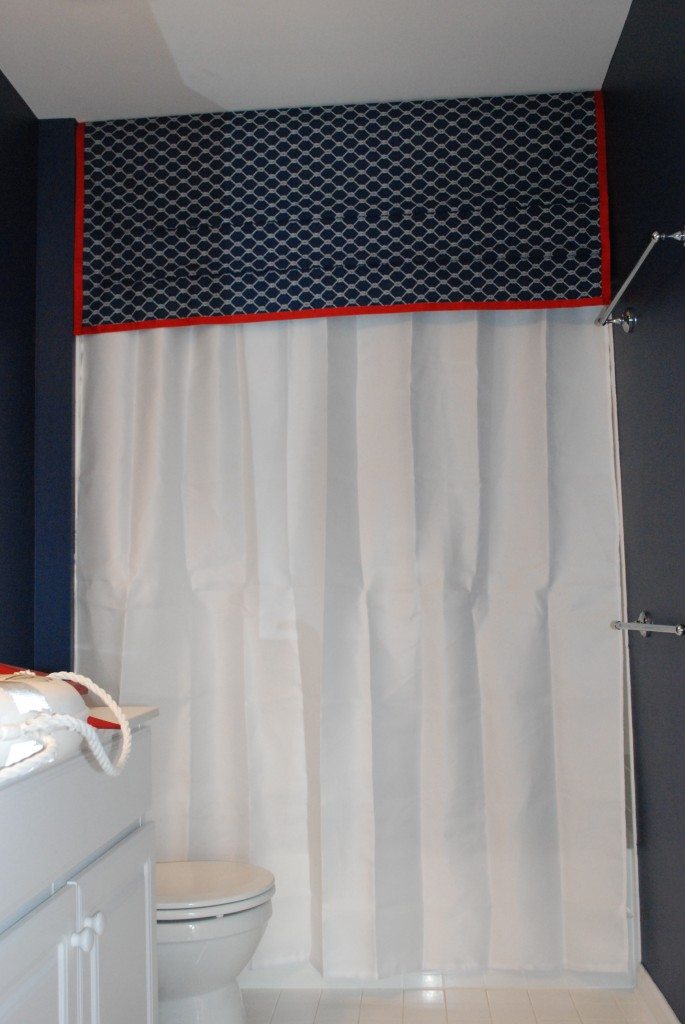
Here is the final product accentuated with a white shower curtain.  I still have to decorate their bath with some nautical accents, but I am really happy with how the valance has transformed their bathroom into a taller and more sophisticated room.


DSC_0035


DIY easy shower valance

Thanks for stopping by~

terry name graphic

icon-facebook-1icon-instagram-1icon-mail-1icon-pinterest-1icon-twitter-1

Filed Under: Childrens' Projects, DIY/Projects/Tutorials, Wall & Door Decor, Window Treatments Tagged With: Bathroom, Decor, Decoration, diy, Nautical, Valance

Reader Interactions

Comments

  1. Christina Bartz says

    January 29, 2011 at 3:48 pm

    Love, love, LOVE!
    And you do NOT give your sewing skills enough credit… just sayin’.

    Reply
  2. Holly Kay says

    February 1, 2011 at 11:33 am

    Won’t those whimsical red stars look just awesome in there? Love the navy paint and the valance looks amazing.

    Reply
  3. Get More Info says

    December 2, 2013 at 8:49 am

    Your information is incredibly useful.

    Reply

Leave a Reply Cancel reply

Your email address will not be published. Required fields are marked *

Recipe Rating


This site uses Akismet to reduce spam. Learn how your comment data is processed.

Primary Sidebar

Lowest prices. Straight Teeth,

•Don’t Miss A Thing!!•

•Do You Know Jesus?•

•Featured In•

Footer

  • Email
  • Facebook
  • Instagram
  • Pinterest

Copyright © 2022 · 11 Magnolia Lane· Blog Design by Little Blue Deer
Privacy Policy

11 MAGNOLIA LANE IS A PARTICIPANT IN THE AMAZON SERVICES LLC ASSOCIATES PROGRAM, AN AFFILIATE ADVERTISING PROGRAM DESIGNED TO PROVIDE A MEANS FOR US TO EARN ADVERTISING FEES BY ADVERTISING AND LINKING TO AMAZON.COM AND AFFILIATED SITES. AS AN AMAZON ASSOCIATE, WE EARN FROM QUALIFYING PURCHASES. WE ALSO PARTICIPATE IN SEVERAL OTHER AFFILIATE PROGRAMS; THIS INCOME ALLOWS US TO MAINTAIN THE QUALITY OF YOUR USER EXPERIENCE AND KEEPS OUR CONTENT FREE. WHEN YOU PURCHASE THROUGH ANY OF OUR AFFILIATE LINKS, WE EARN A SMALL COMMISSION AND YOU DON’T PAY A CENT MORE THAN YOU WOULD OTHERWISE; THAT WOULD BE TACKY!   READ OUR FULL PRIVACY AND DISCLOSURE POLICY {HERE}.
  ©11 Magnolia Lane 2019. Unauthorized use and/or duplication of this material without express and written permission from this blog’s authors and/or owners is strictly prohibited. Please email us at admin@11magnolialane.com for more information.

  • MEET CHRISTY & AMY
    • IF YOU’RE NEW HERE…
    • WORK WITH US
    • 11 MAGNOLIA LANE 101
    • DISCLOSURE + PRIVACY (the fine print)
    • BEST OF 11 MAGNOLIA LANE
    • Back
  • TOUR OUR HOMES
    • TOUR OUR HOMES
    • CHRISTY’S MAGNOLIA COTTAGE
    • CHRISTY’S MCC HOUSE
    • AMY’S NEW HOME BUILD
    • HOLIDAY HOME TOUR SERIES
    • SPRING HOME TOUR SERIES
    • Back
  • CELEBRATIONS
    • EVENTS + ENTERTAINING
    • GIFTS
    • HOLIDAYS
    • RECIPES
    • Back
  • HOME
    • CLEANING
    • DECORATING
    • ORGANIZING
    • ROOM BY ROOM
      • BATHROOMS
      • BEDROOMS
      • CLOSETS
      • CRAFT ROOMS + OFFICES
      • DINING ROOMS
      • KIDS’ ROOMS
      • KITCHENS
      • LAUNDRY ROOMS
      • LIVING + GREAT ROOMS
      • OTHER SPACES
      • PANTRIES
      • PLAYROOMS + BONUS ROOMS
      • PORCHES + OUTDOOR SPACES
      • Back
    • TIPS
    • Back
  • SHOP
    • SHOP OUR INSTAGRAM
    • SHOP OUR AMAZON STORE
    • FRIDAY FAVORITE FINDS
    • 11 ML ETSY SHOP
    • 11ML ORGANIZING SHOP
    • Back
  • PROJECTS
    • CRAFTS
    • DIY PROJECTS + TUTORIALS
    • FURNITURE
    • PRINTABLES
    • WINDOWS, DOORS, + WALLS
    • Back
  • LIFE
    • FRIDAY FREE FOR ALL
    • HEALTH
    • SIMPLY ON SUNDAY
    • TRAVEL
    • Back
  • CONTACT
    • Email
    • Facebook
    • Instagram
    • Pinterest
43 shares