I don’t know about you, but I have an almost pathological obsession with taking down my holiday decor. Today is February 15th, and the few red and pink Valentine’s Day items in my house go away TODAY! Yes, I have a hard time leaving my Christmas decorations up until New Year’s, but I force myself. 🙂
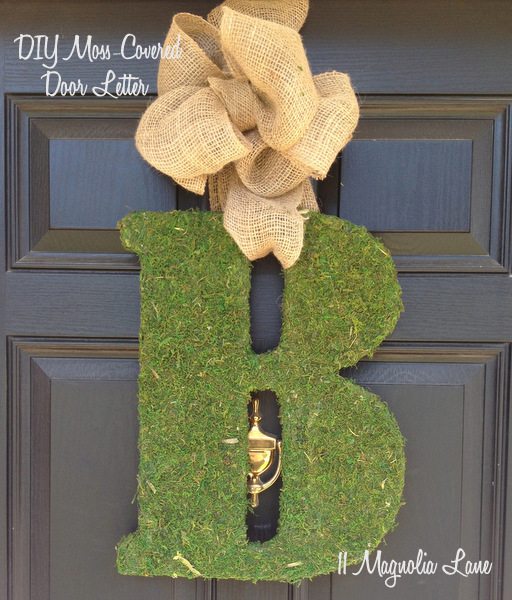
Since I’m taking down my decoupaged hugs and kisses XO wreath today (read about that HERE for next year), I needed something to replace it on my front door. And since it’s mid-February, for those of us here in Tennessee, it’s almost Spring. So, what better color than green for the front door?
Our posts contain affiliate links. If you make a purchase after clicking on these links, we will earn a small commission, which helps to keep our content free. You don’t pay a cent more than you would otherwise, since that would be tacky!
Pottery Barn sells their moss letters for $79 a pop {here}. Of course, theirs are LIVE moss, but even so, that’s a little steep for me. I completed this project for about $17, and that’s including the cost of a glue gun and hot glue sticks, which I already had on hand.
Here’s what I bought at Hobby Lobby:
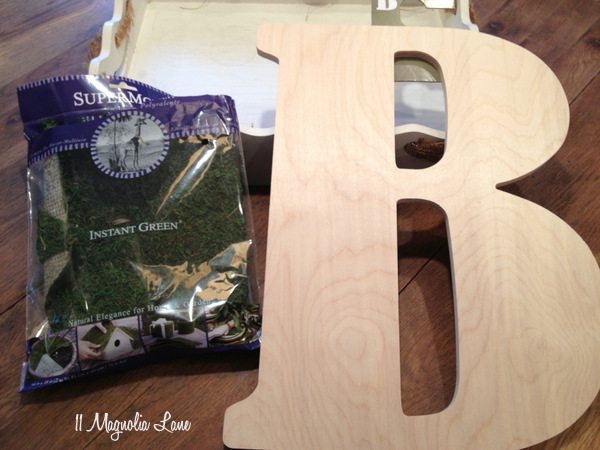
The big wood letters are $12.99 at Hobby Lobby; I bought mine on a 50% off week. It’s 18″ high. The sheets of moss are $7.99, and I used my 40% off coupon. I also bought a roll of burlap ribbon there for $2.50, since I had just cut up the last of my old grain sack from the flea market. (Don’t have a Hobby Lobby nearby? Buy the moss online here, the 18″ wood letter here, and the burlap ribbon here).
Amy talks about covering a sphere with moss HERE, and I just followed her directions, which are basically cut the moss to fit, glue it to the form, and cut slits to make it lay flat. I copy all of her ideas eventually, anyway. Did y’all know we were college roommates? Sometimes I think we’re twins separated at birth because our taste is pretty much identical, but I digress…back to the moss! I think the moss is very easy to work with–it’s so forgiving since it doesn’t show the seams when you glue in a small scrap to fill in a spot. However, mark my words, it makes an absolutely gigantic mess! Be prepared to vacuum your counter, your floor, and yourself when you’re done! I only had half a package of moss when I started this project, and I ran out part way through. I hate when that happens!
Um, yes, I covered a sphere with moss and stuck it in an urn. Amy told me to! 🙂 And doesn’t it look great?!
After an emergency stop at Hobby Lobby, where the manager knows me by name (it’s like when Norm used to walk into Cheers, if you’re old enough to remember that), I plugged in the glue gun again and finished up the project. Here’s what I wound up with:
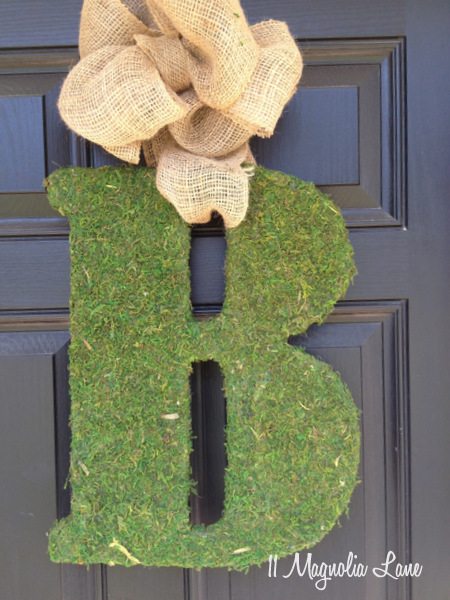
Here are a couple of tips:
- Run the moss around the edges of the letter. Mine covered all the unfinished wood. I guess to save a little on moss/glue/work, you could also spray paint your edges dark green, but I think this looks better.
- Save all the tiny pieces you have left over from trimming the moss; you can glue that on your letter in any gaps you see and no one will be able to tell. Or, use it on the next project.
- I used the burlap ribbon to dress things up a bit; however, the letter is actually hanging on a metal wreath hanger. The burlap hides it, though. I formed a bow through trial and error (there is NO method to my madness when it comes to bow-making) and secured it with florist wire). As an aside, I really, really like the burlap ribbon I bought at HobLob!
That’s it–easy! I’m probably going to put this letter on the front door and take the moss sphere and the urn out there, too. I already have a big wooden “B” on the old window hanging on my porch, and that would be redundant, so that’s going to go on the screened porch for awhile, and I’m going to hang a grapevine wreath in its place. I’ll let you see a few pictures when I’m done, either in a post or on our Facebook page.
What do you guys have on your front porches these days?
Verynice! But, the weatherman says we (Jacksonville, Fl) are going to have freezes next Monday & Tuesday! Hope it isn’t cold where you are! I showed my daughter as she was walkingout the door…and she really
Iked your wreath! Believe me, that is a compliment!
Thanks, Marie. Brrr–sounds like it’ll be pretty cold for JAX. Stay warm!
So cute! Ideas like this make me wish my last name didnt start with V. The V is just akward to hang. I blame my husband 😉
Too funny–yes, it kind of is his fault! You could either mount it on a wreath (using a smaller letter, of course), or secure the burlap to both sides of the top of the V. These particular letters also have pre-drilled backs to make them easy to mount on screws or nails. Good luck!
Glue end of the ribbon to the top of the
V add your bow voila.
You’re so right–thank you!
Already went to Hobby Lobby, got all the stuff, and made it!! Thank you, I love it!
That was impressively fast, Tracy! 🙂
I really like this and would like to try it for my front door which is black, I think it would show up so well! I’ve pinned it so I won’t forget:) Really cute and I hope I make as good a bow as you did!
It will look so nice, Rondell. Have fun!
Love the moss letter….I so need to do that for my doors!…Beautiful job!!
Thanks, Shirley!!
I love this and am hoping to make it this week! Just a quick question though, how did you attach the burlap ribbon to the metal wreath hanger at the top?
Kimberly, I just kind of shoved the wreath hanger through the burlap. I know, very high tech, right?!
Perfect– I love it when it’s easy! You guys are brilliant and I love your site.
Love, love, love this! Did you use the 5 1/2″ burlap ribbon? Thanks so much, Christy :)! Can’t wait to make this!
That’s exactly what I used. Have fun crafting!
Thanks so much!
I went to Hobby Lobby yesterday and couldn’t find these letters. 🙁 Think they don’t sell them anymore? I hope they still do! What section of the store did you find yours??
Kelli–I found mine in the aisle where they sell all the unfinished wood letters. But, they are displayed stacked like books on a bookshelf and that makes them a little harder to see. They haven’t carried them for very long, so I doubt they’ve discontinued them already. Good luck!
Good to know!!! I’m holding out hope that I’ll find them. Thank you for the response. 🙂
LOVE this! You inspired me and I did this last night with a slightly smaller B. I’m going to hang it in my powder room for a little color! 🙂 Thanks for the great and easy idea. I always get great satisfaction knowing that I made something for $16 that Pottery Barn sells for $79!! 🙂
Yeah, Lauren! You have every right to feel a bit smug!
Great, Laura–thanks for letting me know!
Hello! I am currently making this for my Easter front door and I was wondering if you could explain now you tied the burlap bow and how wide the burlap is… Thank you!! 😉
Hey, Mandy–The burlap ribbon is about 6″ wide. I have it hanging on a 3M command hook now instead of the wreath hanger I used originally. I wrapped the ribbon through the top of the B, left about a 6-8″ loop, and tied a bow, then hung the burlap on the command hook. To use a wreath hanger, you just need to wrap the burlap ribbon around the wreath hanger and push the hook of the hanger through the ribbon at the top. I hope that makes sense! Let me know how yours turns out!
Thank you for the explanation! Makes sense. What kind of a bow is that? I like how “full” it looks!
There is no “method to my madness” when it comes to bows–but this one probably looks full because of the 6″ width of the burlap. I count six loops. I make the loops and then use florist’s wire to hold the bow in place and secure it, but all of that gets hidden on the backside.
Thanks for the directions. I am getting married in October and thought I could play with this idea to make a single letter or monogram to be displayed somewhere in the decor. Maybe even table numbers!
I wondered how long these stay looking fresh and pretty? I can’t be messing with moss in the few days prior but if they will last a couple weeks…maybe. I am in Napa so it will be warmish in the day then…I could store them inside though.
Thanks again
Hey there, Tiffany. Best wishes to you on your engagement and upcoming wedding! Yes, you can make these ahead of time. Just keep them out of the sun until you’re ready to use them. The ones that I’ve used inside the house have stayed pretty and green, but the ones that I’ve used outside (on the front door and porch) have faded in the sun. It’s a gradual thing, but best to keep them inside until the big day.
I’m just finished making the moss letters and am wondering if you can help me with the bow please
I used thin florist’s wire and 6″ burlap ribbon to make the bow. You just make a loop with the burlap, then a second one, and then wire them at the center. Continue until it’s as poofy as you want. I really just do it by trial and error, there isn’t a “formula” although I have seen some on pinterest. Hope that helps!
Hi, Christy! I loooooove this – a perfect transition into Spring when it’s still too soon to put up bunnies. 😉 Quick question — I went to Hobby Lobby’s site and all they have are 13″ letters. Do they just sell the 18″ ones in the store, you think? Thank you!
WHere can you find large quantities of the bagged moss? I want to cover three large initials for a backdrop at a wedding rehearsal.