• Skip to primary navigation
  • Skip to main content
  • Skip to primary sidebar
  • Skip to footer
  • MEET CHRISTY & AMY
    • IF YOU’RE NEW HERE…
    • WORK WITH US
    • 11 MAGNOLIA LANE 101
    • DISCLOSURE + PRIVACY (the fine print)
    • BEST OF 11 MAGNOLIA LANE
  • TOUR OUR HOMES
    • TOUR OUR HOMES
    • CHRISTY’S MAGNOLIA COTTAGE
    • CHRISTY’S MCC HOUSE
    • Christy’s Stuttgart Flat
    • Amy’s Virginia Craftsman Home Tour
    • AMY’S VIRGINIA CRAFTSMAN Building Process
    • HOLIDAY HOME TOUR SERIES
  • CELEBRATIONS
    • EVENTS + ENTERTAINING
    • GIFTS
    • HOLIDAYS
    • RECIPES
  • HOME
    • CLEANING
    • DECORATING
    • ORGANIZING
    • ROOM BY ROOM
      • BATHROOMS
      • BEDROOMS
      • CLOSETS
      • CRAFT ROOMS + OFFICES
      • DINING ROOMS
      • KIDS’ ROOMS
      • KITCHENS
      • LAUNDRY ROOMS
      • LIVING + GREAT ROOMS
      • OTHER SPACES
      • PANTRIES
      • PLAYROOMS + BONUS ROOMS
      • PORCHES + OUTDOOR SPACES
    • TIPS
  • SHOP
    • SHOP OUR INSTAGRAM
    • SHOP OUR AMAZON STORE
    • FRIDAY FAVORITE FINDS
  • PROJECTS
    • CRAFTS
    • DIY PROJECTS + TUTORIALS
    • FURNITURE
    • PRINTABLES
    • WINDOWS, DOORS, + WALLS
  • LIFE
    • FRIDAY FREE FOR ALL
    • HEALTH
    • SIMPLY ON SUNDAY
  • TRAVEL
  • CONTACT
    • Email
    • Facebook
    • Instagram
    • Pinterest

11 Magnolia Lane

Sharing our easy DIYs, decorating, entertaining and more!

DIY Fireplace Makeover with Stacked Stone

February 20, 2015 By Amy 4 Comments

This Post Contains Affiliate Links

204 shares

stone-fireplace-header
A few weeks ago my friend Ani posted some pictures of their “weekend project” on Facebook, sharing how they had recently made over their fireplace wall using Air Stone. I was SO impressed! I texted her immediately and begged to let us feature their project here on the blog. She kindly not only agreed but also sent me more pictures and all the details of how they actually did the project, isn’t she sweet? 🙂

Ani is one of those people you meet and are instantly impressed, she is funny, smart and she has the most awesome house too! I miss having her just down the block but I am selfishly grateful she is showing us more of what she has been up to here. You can see her DIY growth chart in this post HERE and I’ll sneak in a few more cute pictures of her house at the end of this post, but for now here is her awesome fireplace makeover in her own words:

But first, here is a shot with the “before” of her builder-grade fireplace: {I know just look at her cute decor!}
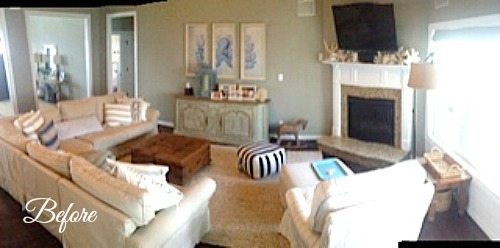
Ani Fireplace Before,
 

Full-Fireplace-Stone
 

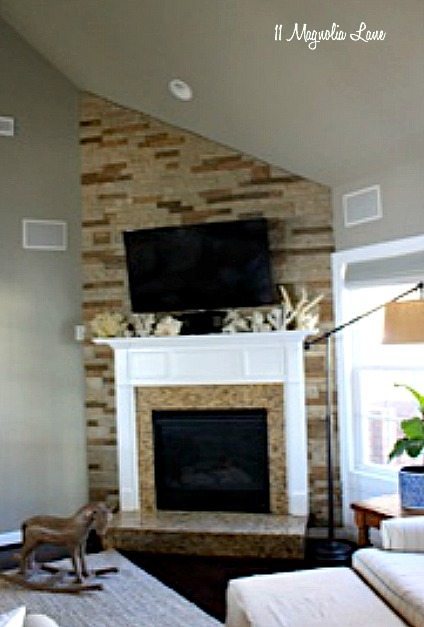
ANI: Our fireplace is placed at an angle, and the ceiling is sloped.

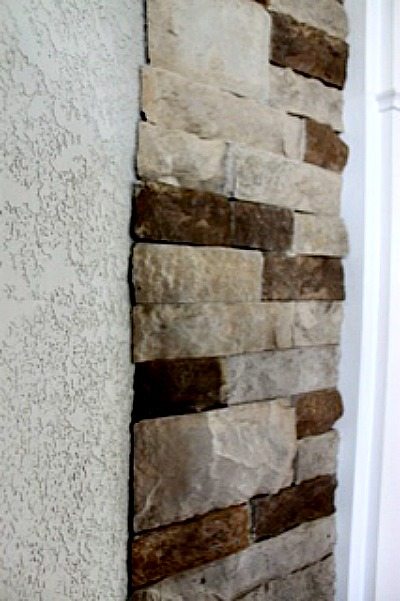
To calculate the surface area, I just measured the length times the width of the space we needed to cover (had to do a little trig for the slope), and subtracted the area of the actual fireplace. 1 carton of stones covers 8 square feet. We wound up using six complete cartons with only about a dozen individual stones left over; moral being if you measure correctly there won’t be much waste. Air Stone does make a “natural edge” version of this product, that you could use to properly end, or cap, the wall, if your fireplace is in the middle of a flat wall. Our wall is on an angle, so we had to do it the hard way.

fireplace stone close-up
On the left side (facing) of the fireplace, we had to miter every stone by 60 degrees. I included a picture of the edge, so you can see how the edge meets the wall. If we didn’t do so, the stones would just stick straight out from the wall like a stick of butter. 

air-stone-wall-together
 

On the right side (facing) of the fire place, the wall has trim detail and window casing, then eventually meets the other wall. That was trial and error, but we eventually found the right angle to set the saw at to make these cuts. Where our ceiling meets the wall, we had to use the miter saw to cut those at 28.5 degrees. {This would be a good place to say that the manufacturer DECLARES that the only tool you need for this job is a hack saw.}
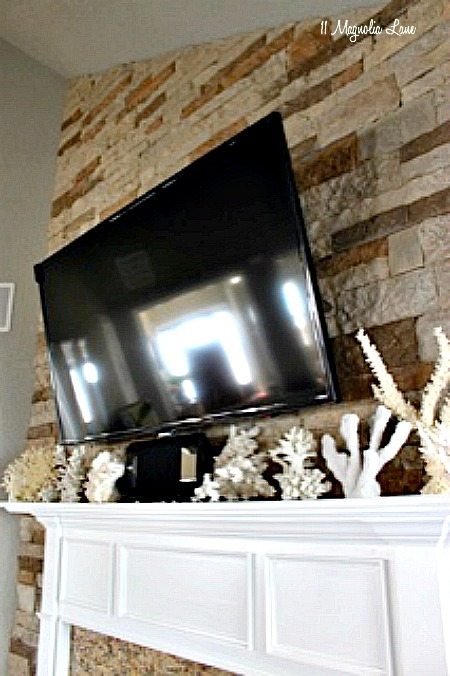
Anyway, around the mantel was a little tricky; we made a paper template, cut the template out, and then traced the shape onto the stone and cut that with a hack saw.

stacked-stone-fireplace-close-up
The manufacturer makes a specific adhesive for this product but it wasn’t in stock so we used Liquid Nails. As for how much, I would say squeeze what you think would be a reasonable amount of glue onto the back of the stone, then double that, and then give one more good squirt! This job took a LOT of glue – we used at least a dozen tubes of liquid nails. Liquid nails makes an outdoor product specifically for stone, a heavy duty product for “tough” jobs, and then of course the regular product. We tried all three and they all performed the same way so you are probably OK to buy the basic kind.
In total the job took us about 14 hours. We used a square, a miter saw, a compass, a hack saw, liquid nails, and a caulk gun. In hind sight – it would have been wise to employ the use of a ledger board for tricky areas like around the TV mount, but we just stuck the stones on the wall and held them in place by putting thumb tacks below them so they wouldn’t slide while they were drying. Super hi-tech!

Stone-Fireplace1


Isn’t is a great project? What a huge difference it makes, and they did it themselves!

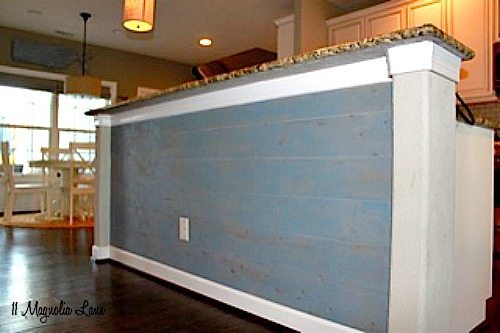
She sent me some pictures of some other projects they recently “whipped up”…like adding this pretty planking to their breakfast bar in their kitchen…

planking-kitchen-island


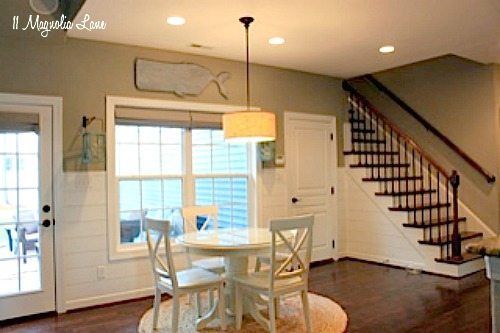
And they added planked the walls in the Breakfast Room, which you can see it below.

ani-breakfast-room


She also sent me pictures of her darling daughters’ bathroom, but I think it’s so cute it deserves its own post, so more to come! Thank you so much Ani, for sharing your lovely home and with us!

XO,


AB New Headshot Small Blog

icon-facebook-1icon-instagram-1icon-mail-1icon-pinterest-1icon-twitter-1NEW Google+

Filed Under: DIY/Projects/Tutorials, Other Spaces Tagged With: DIY project, fireplace, fireplace makeover, kitchen island, plank walls, stone fireplace

Reader Interactions

Comments

  1. Mike says

    April 6, 2016 at 8:12 pm

    Nice job, I was looking to do this also, what type of blade did you use on the miter saw to cut the angles?

    Reply
  2. interlocking pavers says

    October 1, 2017 at 3:45 am

    I got this website from my pal who shared with me
    concerning this website and at the moment this time I am visiting this web site and reading very informative content at this place.

    Reply
  3. swimming pool pavers says

    October 2, 2017 at 9:58 am

    Nice weblog right here! Also your website loads up very fast!

    What web host are you using? Can I am getting your affiliate link in your host?
    I wish my site loaded up as quickly as yours lol

    Reply
  4. walkway pavers says

    October 2, 2017 at 10:33 am

    Hi to all, the contents present at this web site are in fact remarkable for
    people knowledge, well, keep up the nice work fellows.

    Reply

Leave a Reply Cancel reply

Your email address will not be published. Required fields are marked *

Recipe Rating


This site uses Akismet to reduce spam. Learn how your comment data is processed.

Primary Sidebar

Lowest prices. Straight Teeth,

•Don’t Miss A Thing!!•

•Do You Know Jesus?•

•Featured In•

Footer

  • Email
  • Facebook
  • Instagram
  • Pinterest

Copyright © 2022 · 11 Magnolia Lane· Blog Design by Little Blue Deer
Privacy Policy

11 MAGNOLIA LANE IS A PARTICIPANT IN THE AMAZON SERVICES LLC ASSOCIATES PROGRAM, AN AFFILIATE ADVERTISING PROGRAM DESIGNED TO PROVIDE A MEANS FOR US TO EARN ADVERTISING FEES BY ADVERTISING AND LINKING TO AMAZON.COM AND AFFILIATED SITES. AS AN AMAZON ASSOCIATE, WE EARN FROM QUALIFYING PURCHASES. WE ALSO PARTICIPATE IN SEVERAL OTHER AFFILIATE PROGRAMS; THIS INCOME ALLOWS US TO MAINTAIN THE QUALITY OF YOUR USER EXPERIENCE AND KEEPS OUR CONTENT FREE. WHEN YOU PURCHASE THROUGH ANY OF OUR AFFILIATE LINKS, WE EARN A SMALL COMMISSION AND YOU DON’T PAY A CENT MORE THAN YOU WOULD OTHERWISE; THAT WOULD BE TACKY!   READ OUR FULL PRIVACY AND DISCLOSURE POLICY {HERE}.
  ©11 Magnolia Lane 2019. Unauthorized use and/or duplication of this material without express and written permission from this blog’s authors and/or owners is strictly prohibited. Please email us at admin@11magnolialane.com for more information.

  • MEET CHRISTY & AMY
    • IF YOU’RE NEW HERE…
    • WORK WITH US
    • 11 MAGNOLIA LANE 101
    • DISCLOSURE + PRIVACY (the fine print)
    • BEST OF 11 MAGNOLIA LANE
    • Back
  • TOUR OUR HOMES
    • TOUR OUR HOMES
    • CHRISTY’S MAGNOLIA COTTAGE
    • CHRISTY’S MCC HOUSE
    • AMY’S NEW HOME BUILD
    • HOLIDAY HOME TOUR SERIES
    • SPRING HOME TOUR SERIES
    • Back
  • CELEBRATIONS
    • EVENTS + ENTERTAINING
    • GIFTS
    • HOLIDAYS
    • RECIPES
    • Back
  • HOME
    • CLEANING
    • DECORATING
    • ORGANIZING
    • ROOM BY ROOM
      • BATHROOMS
      • BEDROOMS
      • CLOSETS
      • CRAFT ROOMS + OFFICES
      • DINING ROOMS
      • KIDS’ ROOMS
      • KITCHENS
      • LAUNDRY ROOMS
      • LIVING + GREAT ROOMS
      • OTHER SPACES
      • PANTRIES
      • PLAYROOMS + BONUS ROOMS
      • PORCHES + OUTDOOR SPACES
      • Back
    • TIPS
    • Back
  • SHOP
    • SHOP OUR INSTAGRAM
    • SHOP OUR AMAZON STORE
    • FRIDAY FAVORITE FINDS
    • 11 ML ETSY SHOP
    • 11ML ORGANIZING SHOP
    • Back
  • PROJECTS
    • CRAFTS
    • DIY PROJECTS + TUTORIALS
    • FURNITURE
    • PRINTABLES
    • WINDOWS, DOORS, + WALLS
    • Back
  • LIFE
    • FRIDAY FREE FOR ALL
    • HEALTH
    • SIMPLY ON SUNDAY
    • TRAVEL
    • Back
  • CONTACT
    • Email
    • Facebook
    • Instagram
    • Pinterest
204 shares