• Skip to primary navigation
  • Skip to main content
  • Skip to primary sidebar
  • Skip to footer
  • MEET CHRISTY & AMY
    • IF YOU’RE NEW HERE…
    • WORK WITH US
    • 11 MAGNOLIA LANE 101
    • DISCLOSURE + PRIVACY (the fine print)
    • BEST OF 11 MAGNOLIA LANE
  • TOUR OUR HOMES
    • TOUR OUR HOMES
    • CHRISTY’S MAGNOLIA COTTAGE
    • CHRISTY’S MCC HOUSE
    • Christy’s Stuttgart Flat
    • Amy’s Virginia Craftsman Home Tour
    • AMY’S VIRGINIA CRAFTSMAN Building Process
    • HOLIDAY HOME TOUR SERIES
  • CELEBRATIONS
    • EVENTS + ENTERTAINING
    • GIFTS
    • HOLIDAYS
    • RECIPES
  • HOME
    • CLEANING
    • DECORATING
    • ORGANIZING
    • ROOM BY ROOM
      • BATHROOMS
      • BEDROOMS
      • CLOSETS
      • CRAFT ROOMS + OFFICES
      • DINING ROOMS
      • KIDS’ ROOMS
      • KITCHENS
      • LAUNDRY ROOMS
      • LIVING + GREAT ROOMS
      • OTHER SPACES
      • PANTRIES
      • PLAYROOMS + BONUS ROOMS
      • PORCHES + OUTDOOR SPACES
    • TIPS
  • SHOP
    • SHOP OUR INSTAGRAM
    • SHOP OUR AMAZON STORE
    • FRIDAY FAVORITE FINDS
  • PROJECTS
    • CRAFTS
    • DIY PROJECTS + TUTORIALS
    • FURNITURE
    • PRINTABLES
    • WINDOWS, DOORS, + WALLS
  • LIFE
    • FRIDAY FREE FOR ALL
    • HEALTH
    • SIMPLY ON SUNDAY
  • TRAVEL
  • CONTACT
    • Email
    • Facebook
    • Instagram
    • Pinterest

11 Magnolia Lane

Sharing our easy DIYs, decorating, entertaining and more!

Creating a Crafty DIY Silhouette–Easy Tutorial

September 21, 2012 By Terry 4 Comments

This Post Contains Affiliate Links

382 shares
  • 41

DIY silhouette tutorial

Teeny Tiny Custom Textiles


TaDa Creations

I have wanted to get professional silhouettes done of both my boys for years, but I have simply not had the time or money.  I know that they are not difficult to do, yet I wasn’t sure that I would do my sweet boys justice.  I also wanted to have something that would last forever.  Silhouettes capture such a sweet and innocent time that I personally don’t want to ever forget.  My youngest son just turned 5, so I knew I was running out of time and needed to either make an appointment or do it myself.

When I was little, my school did silhouettes with a projector light, piece of black construction paper and chalk.  I remember feeling very special when it was my turn to have my shadow traced.  I loved the sweet details of my ponytail and eye lashes.   It was a really simple project yet such a wonderful gift we later presented to our mothers as a school keep sake. They were simple,  true to life, and my mother still has it to this day.  As I have said, it is just something you hold onto.

Thinking back to that school experience made me realize that I didn’t need to pay for a silhouette, I could do this on my own.  With the changes in technology from then to now, I knew I could simply take a photograph and cut it out.  I also knew that Photoshop has the capabilities to do the same thing.  I am no pro when it comes to Photoshop and I personally wanted to cut every strand of hair that stood up, their button noses and of course their eye lashes.  I don’t know why that part gets me all choked up but it does.

DIY Silhouettes

Here is how I created my very own silhouettes:

Here’s what you need: Craft Paper, Profile printout of your child’s head, scissors, glue and a frame

  1. Take a photo of your child’s profile with a light background.  I sat both my kids on the same stool in front of our white shuttered windows.  It was a light background but it also allowed sunlight to come it.

    Side Profile of my oldest son

    Side profile of my youngest son. NOTE: I turned him the opposite direction

  2. Print out the photos on card stock and size down to fit the frame you selected to display them it.  I did 5 X 7 frames for my first “crafty” silhouette.  Next time I am doing a much larger round frame so I will need to print out a 7.5 X11.
  3. Using an exacto knife/ small scissors, cut out your child’s profile.  Get into the details of their hair and lashes.  The personalized details really make each silhouette more realistic and special.  This is a bit time consuming and ensure your knife is sharp and take a deep breath.

Cut out his/her profile with knife or scissors


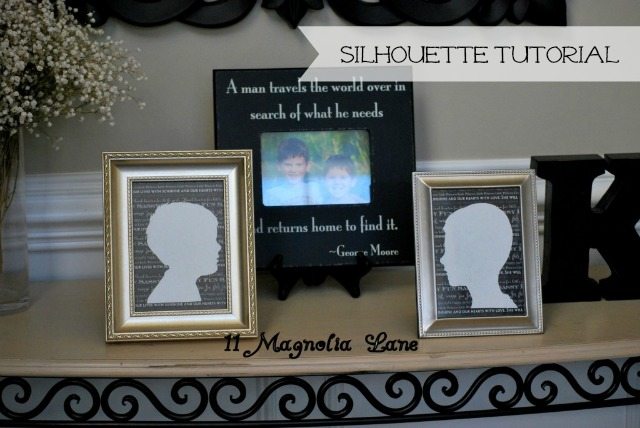
  1. I decided to go the “crafty” quick route with my fist silhouette, I simply turned over the paper (photo side down, white side up) and pasted it to a piece of craft paper.  I still wanted the black and white theme but I didn’t want it to be traditional especially in my front foyer.   I liked that it was a bit different and unexpected.  The craft paper that I choose has a printed word pattern across it, which I love.  It made it modern, fun and very different than your traditional silhouette.   I also used a rectangular silver frame, again not the traditional round black frame you typically see.   I personally think that it works well in my black and white casual foyer and home.

    Choose whatever patterned paper you prefer for your child’s silhouette

I really enjoyed this project and I am already working on my next silhouette project.  This time I am going the traditional route.  That means I will either need to play around in Photoshop or cut out a template and then trace their silhouette onto black card stock.  This means double cutting, but I actually enjoy that part, so I think I am going to take the hands on approach.  I would also love to add their monogram below so I cannot wait to show you how those turn out.

This is where they sit in my home, my black and white foyer.

Happy Crafting!!

terry name graphic

icon-facebook-1icon-instagram-1icon-mail-1icon-pinterest-1icon-twitter-1

YOU MIGHT ALSO LIKE THESE POSTS... :

Tutorial: Quick and Easy Way to Hang Silver ...
How to add ART to your walls for {practically...
Tutorial: How to Paint Horizontal Stripes On...
DIY Painted Wood Frames for Sports Pictures

Filed Under: Childrens' Projects, DIY/Projects/Tutorials, Wall & Door Decor Tagged With: black and white, craft paper, Crafts, frames, Kids crafts, Silhouettes, tutorial

Reader Interactions

Comments

  1. Eileen says

    September 22, 2012 at 9:42 am

    What a BRILLIANT idea! They turned out beautifully!

    Reply
  2. Beatriz says

    September 22, 2012 at 2:42 pm

    Wow! I love it! I will definitely have to do one for my daughter. Great job.

    Reply
  3. Katie says

    January 28, 2014 at 2:32 pm

    Hi – Great, EASY tutorial! I am posting a silhouette project that I did on my blog tomorrow. I did mine in Photoshop but I wanted to link to some tutorials that show other ways to do it. Hope it’s ok if I link to yours! I’ll credit your blog and link directly to this post.

    If you want to check it out, it will be live tomorrow (wednesday) at about 10am at http://www.somethingtobefound.com

    Thanks!

    Reply
  4. Ray says

    January 19, 2017 at 2:30 pm

    Your craft paper says little princess…

    Reply

Leave a Reply Cancel reply

Your email address will not be published. Required fields are marked *

Recipe Rating


This site uses Akismet to reduce spam. Learn how your comment data is processed.

Primary Sidebar

Lowest prices. Straight Teeth,

•Don’t Miss A Thing!!•

•Do You Know Jesus?•

•Featured In•

Holiday Gift Ideas

Footer

  • Email
  • Facebook
  • Instagram
  • Pinterest

Copyright © 2023 · 11 Magnolia Lane· Blog Design by Little Blue Deer
Privacy Policy

11 MAGNOLIA LANE IS A PARTICIPANT IN THE AMAZON SERVICES LLC ASSOCIATES PROGRAM, AN AFFILIATE ADVERTISING PROGRAM DESIGNED TO PROVIDE A MEANS FOR US TO EARN ADVERTISING FEES BY ADVERTISING AND LINKING TO AMAZON.COM AND AFFILIATED SITES. AS AN AMAZON ASSOCIATE, WE EARN FROM QUALIFYING PURCHASES. WE ALSO PARTICIPATE IN SEVERAL OTHER AFFILIATE PROGRAMS; THIS INCOME ALLOWS US TO MAINTAIN THE QUALITY OF YOUR USER EXPERIENCE AND KEEPS OUR CONTENT FREE. WHEN YOU PURCHASE THROUGH ANY OF OUR AFFILIATE LINKS, WE EARN A SMALL COMMISSION AND YOU DON’T PAY A CENT MORE THAN YOU WOULD OTHERWISE; THAT WOULD BE TACKY!   READ OUR FULL PRIVACY AND DISCLOSURE POLICY {HERE}.
  ©11 Magnolia Lane 2019. Unauthorized use and/or duplication of this material without express and written permission from this blog’s authors and/or owners is strictly prohibited. Please email us at admin@11magnolialane.com for more information.

  • MEET CHRISTY & AMY
    • IF YOU’RE NEW HERE…
    • WORK WITH US
    • 11 MAGNOLIA LANE 101
    • DISCLOSURE + PRIVACY (the fine print)
    • BEST OF 11 MAGNOLIA LANE
    • Back
  • TOUR OUR HOMES
    • TOUR OUR HOMES
    • CHRISTY’S MAGNOLIA COTTAGE
    • CHRISTY’S MCC HOUSE
    • AMY’S NEW HOME BUILD
    • HOLIDAY HOME TOUR SERIES
    • SPRING HOME TOUR SERIES
    • Back
  • CELEBRATIONS
    • EVENTS + ENTERTAINING
    • GIFTS
    • HOLIDAYS
    • RECIPES
    • Back
  • HOME
    • CLEANING
    • DECORATING
    • ORGANIZING
    • ROOM BY ROOM
      • BATHROOMS
      • BEDROOMS
      • CLOSETS
      • CRAFT ROOMS + OFFICES
      • DINING ROOMS
      • KIDS’ ROOMS
      • KITCHENS
      • LAUNDRY ROOMS
      • LIVING + GREAT ROOMS
      • OTHER SPACES
      • PANTRIES
      • PLAYROOMS + BONUS ROOMS
      • PORCHES + OUTDOOR SPACES
      • Back
    • TIPS
    • Back
  • SHOP
    • SHOP OUR INSTAGRAM
    • SHOP OUR AMAZON STORE
    • FRIDAY FAVORITE FINDS
    • 11 ML ETSY SHOP
    • 11ML ORGANIZING SHOP
    • Back
  • PROJECTS
    • CRAFTS
    • DIY PROJECTS + TUTORIALS
    • FURNITURE
    • PRINTABLES
    • WINDOWS, DOORS, + WALLS
    • Back
  • LIFE
    • FRIDAY FREE FOR ALL
    • HEALTH
    • SIMPLY ON SUNDAY
    • TRAVEL
    • Back
  • CONTACT
    • Email
    • Facebook
    • Instagram
    • Pinterest
382 shares
  • 41