
• Skip to primary navigation
  • Skip to main content
  • Skip to primary sidebar
  • Skip to footer
  • MEET CHRISTY & AMY
    • IF YOU’RE NEW HERE…
    • WORK WITH US
    • 11 MAGNOLIA LANE 101
    • DISCLOSURE + PRIVACY (the fine print)
    • BEST OF 11 MAGNOLIA LANE
  • TOUR OUR HOMES
    • TOUR OUR HOMES
    • CHRISTY’S MAGNOLIA COTTAGE
    • CHRISTY’S MCC HOUSE
    • Christy’s Stuttgart Flat
    • Amy’s Virginia Craftsman Home Tour
    • AMY’S VIRGINIA CRAFTSMAN Building Process
    • HOLIDAY HOME TOUR SERIES
  • CELEBRATIONS
    • EVENTS + ENTERTAINING
    • GIFTS
    • HOLIDAYS
    • RECIPES
  • HOME
    • CLEANING
    • DECORATING
    • ORGANIZING
    • ROOM BY ROOM
      • BATHROOMS
      • BEDROOMS
      • CLOSETS
      • CRAFT ROOMS + OFFICES
      • DINING ROOMS
      • KIDS’ ROOMS
      • KITCHENS
      • LAUNDRY ROOMS
      • LIVING + GREAT ROOMS
      • OTHER SPACES
      • PANTRIES
      • PLAYROOMS + BONUS ROOMS
      • PORCHES + OUTDOOR SPACES
    • TIPS
  • SHOP
    • SHOP OUR INSTAGRAM
    • SHOP OUR AMAZON STORE
    • FRIDAY FAVORITE FINDS
  • PROJECTS
    • CRAFTS
    • DIY PROJECTS + TUTORIALS
    • FURNITURE
    • PRINTABLES
    • WINDOWS, DOORS, + WALLS
  • LIFE
    • FRIDAY FREE FOR ALL
    • HEALTH
    • SIMPLY ON SUNDAY
  • TRAVEL
  • CONTACT
    • Email
    • Facebook
    • Instagram
    • Pinterest

11 Magnolia Lane

Sharing our easy DIYs, decorating, entertaining and more!

Tutorial: How to Paint Upholstery Fabric and Completely Transform a Chair!

September 9, 2013 By Christy 223 Comments

This Post Contains Affiliate Links

58800 shares
  • 1596
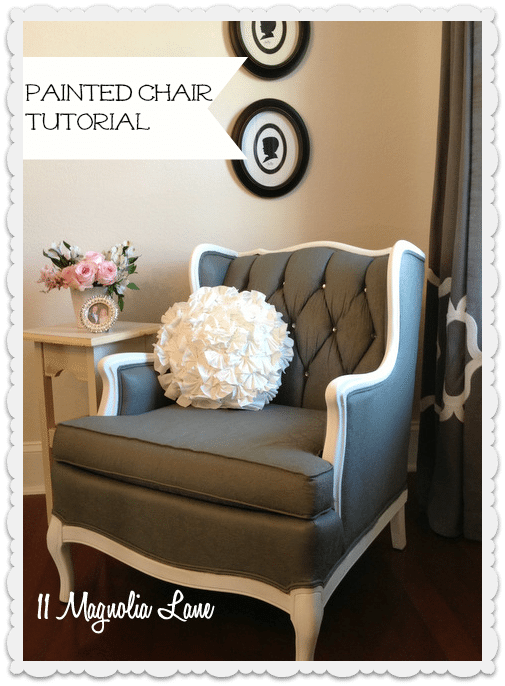
I had something else planned to show you today, but this awesome weekend project got bumped to the top of the list because I just love how it turned out.  I scored a great old chair at the Salvation Army on Friday (it had great bones, as they say), and spent the weekend painting it and making it absolutely glamorous.

How to paint upholstery fabric and completely transform a piece of furniture. This painted chair was so easy!
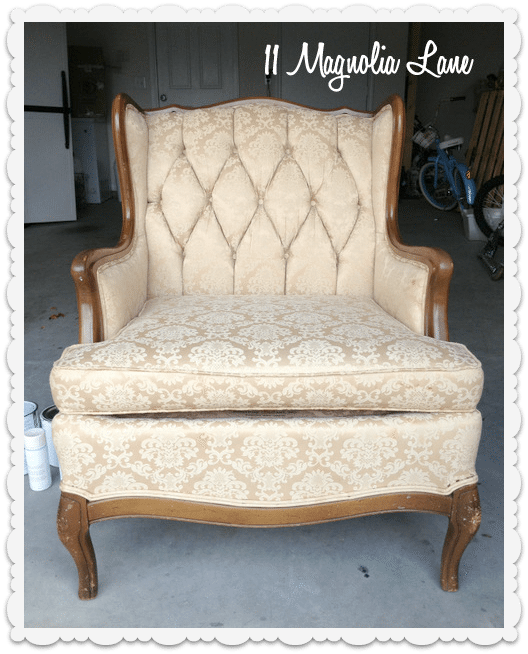
When I posted about my dining room a few days ago, I showed the before picture of this old girl and mentioned that I had a place already picked out for her, in a corner that still needed something to finish the room off.  Here’s how she looked when I brought her home:

thrift store chair before
Can you see the potential?  Gorgeous swoopy lines, lots of wood trim, beautiful tufting, and I even liked the damask pattern on the jacquard fabric.  I knew it would look beautiful painted.  It was also comfortable, and didn’t have any funky smells (if you ever see me in a thrift store, I’m the girl who’s sniffing the furniture!).

Here’s what I did:

How to paint upholstery fabric
I gave the wood trim a wipe down and two quick coats of Annie Sloan chalk paint in Pure White (I had some left over from my dining room table and chairs).  I contemplated silver trim, but decided against it–maybe on the next chair!  I splashed a few drops on the fabric, and in hindsight, I should have been more careful.  I was able to cover it, but it took several coats.  Here she is with the painted trim–I could already tell she was going to be a beauty!

{Ready to tackle your own project? Simply Click HERE to have a Step by Step list of instructions e-mailed to you along with a handy supply list!}
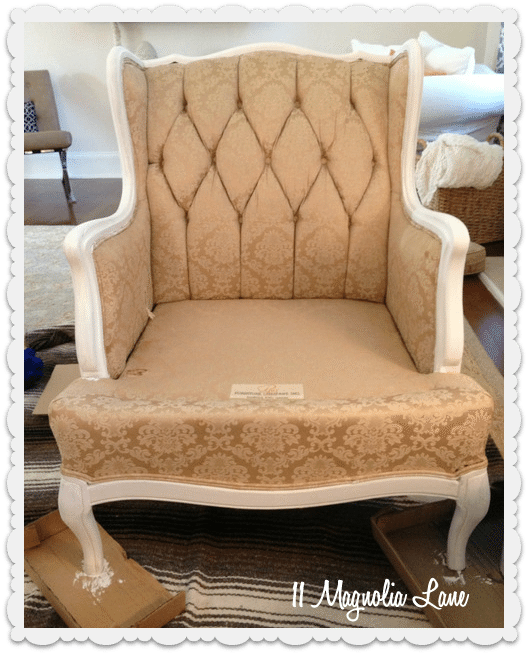
painted fabric chair white trim
I’ve painted fabric before, but cotton–not upholstery fabric (which is probably polyester).  I had pinned a great blog post on how to paint chairs by Shannon at Fox Hollow Cottage {here}.   I used that post as starting points and made adjustments when I needed to.  (Update:  I’ve since painted a velvet chair; and Amy has used chalk paint on one of her chairs)

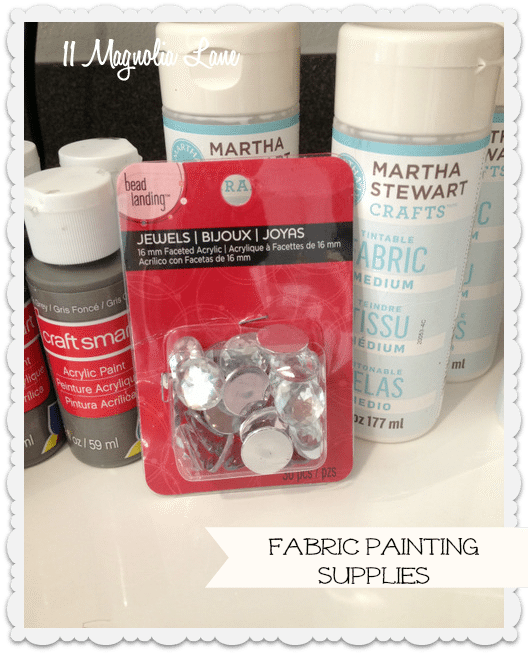
Here are the supplies I used:

painted fabric chair supplies

  • I used four 8 oz. bottles of the Martha Stewart fabric medium and only had an eensy bit left over.  Fabric medium is what keeps the fabric from becoming super-stiff after you paint it.  It was on sale for about $4.50 a bottle at Michael’s.  If you can’t find it there or don’t live near one, here’s a link to the same (or similar) items I used from Amazon through our affiliate program:
  • I used ten 2 oz. bottles of Craft Smart acrylic paint in Dark Grey.  They were $0.69 apiece so it was still cheaper than buying a quart of latex paint.  If I was doing more than one chair, I would probably get paint mixed at the store, though.
  • The rhinestone jewels I used on the buttons–more on them later.  They were $3.99 but I used a 40% off coupon.
  • Also, a squirt bottle filled with water, a brush, and a clean up towel.  I used a regular 2″ paint brush for all of the coats, and a small artist’s brush to paint the piping so that I didn’t get paint on the white wood trim.

I mixed a 1:1:1 solution of paint, fabric medium, and water and used that for the first coat, since that was what the other ladies recommended.  Because my fabric wasn’t as thick and dense, though, it was a little too thin.  I mixed my other coats 1:1:1/2 and the lower water content worked much better for me.

Spraying a small area with water to make things spread more easily before painting, you can see that coat #1 gives partial coverage–the pinky gold is still showing through.
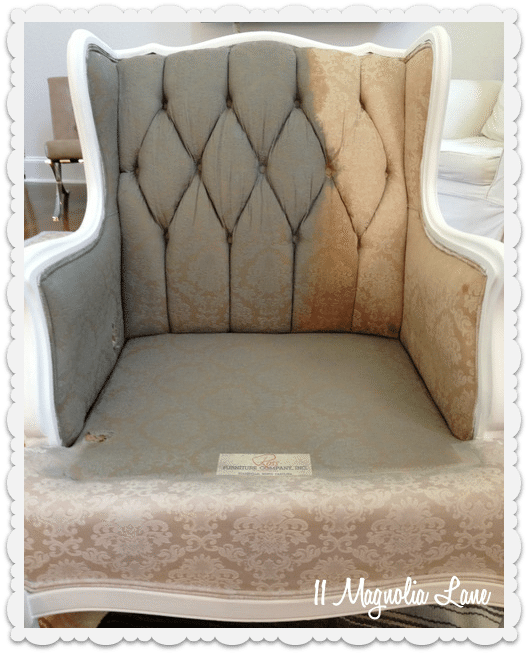
painted chair fabric first coat
I didn’t tape off the wood trim, I just painted carefully and used my clean up rag to wipe off any paint that got on it.

Because my seat had a removable cushion, I elevated it on a few soup cans and painted one side, let it dry, then painted the other.  Times four!
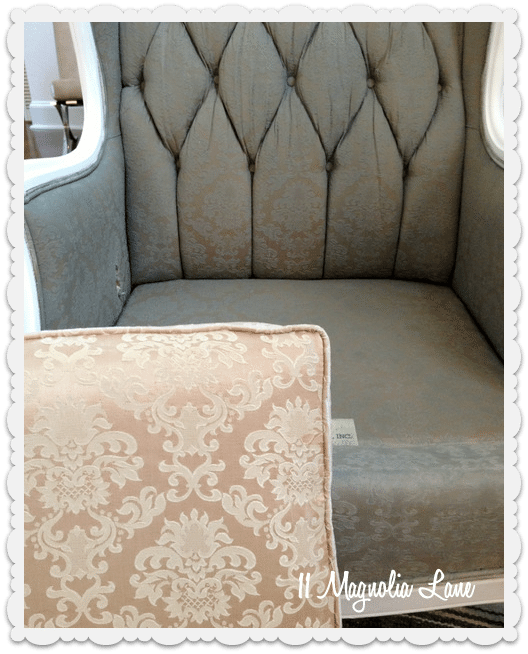
painted chair first coat
I let it dry between coats, but not overnight as the other tutorials suggested.  I did one coat in the morning and one in the evening on Saturday, and the same thing on Sunday.  Also, I did not need to use any sandpaper on my fabric–again, probably because it wasn’t velvet.

I needed to get my hands a little dirty to get paint into all the folds and tufting on the front, but it was worth it.  I discovered most of it during the sermon at church on Sunday (oops!).
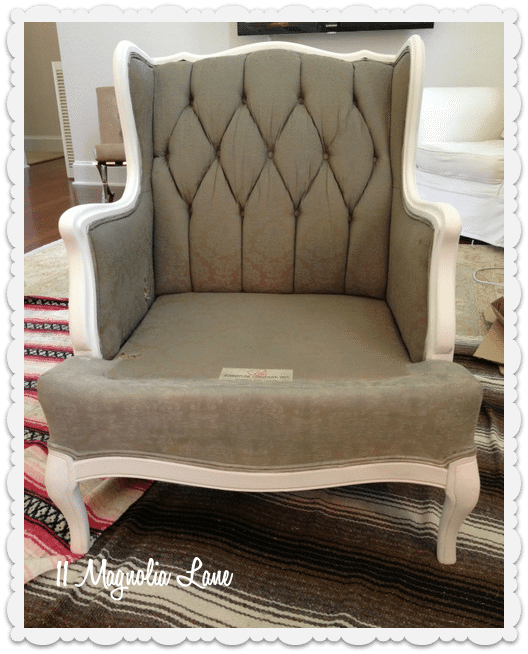
fabric painted chair first coat complete
I probably could have stopped after three coats, but I needed one last coat to cover those few splotches of white paint from the trim, and the more I painted, the more I fell in love with the dark grey color.  I used an artist’s brush on the last two coats to be sure that I thoroughly covered the cording.

Here she is with all four coats of paint and her cushion back in place:
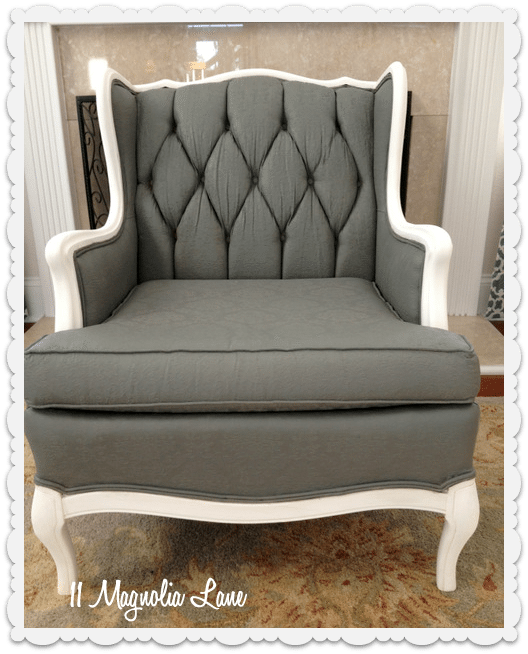
fabric painted chair after
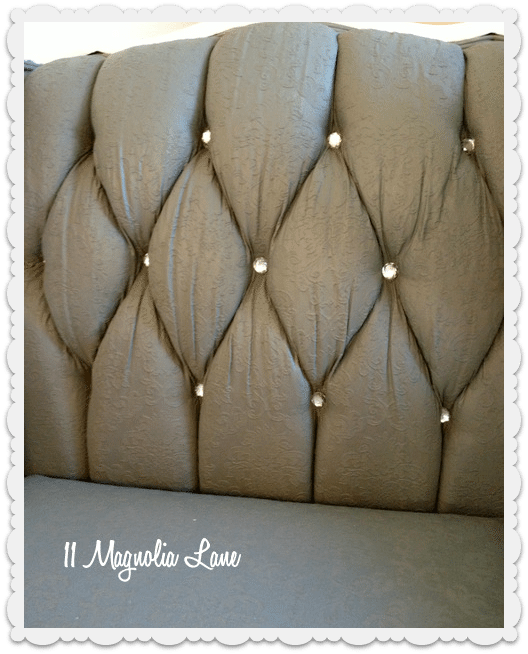
Now, I could probably have stopped there, but I think we all know that a little bit of bling makes everything better.  So I put the acrylic rhinestone jewels into the tufting, right on top of the buttons, and secured them in place with a drop of fabric glue.  Perfect!

painted chair with bling
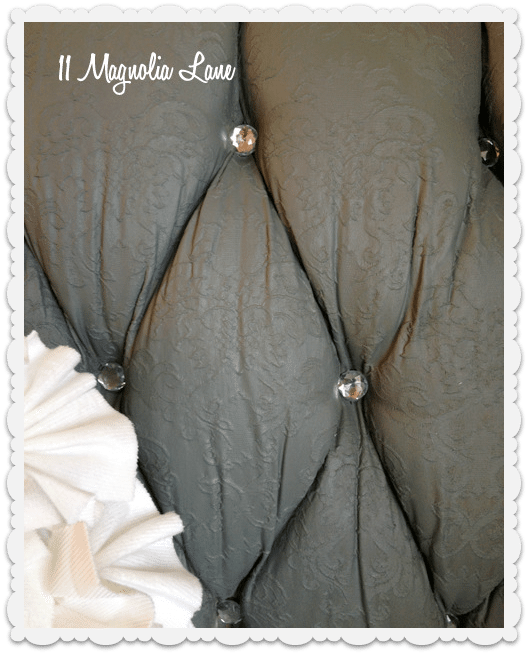
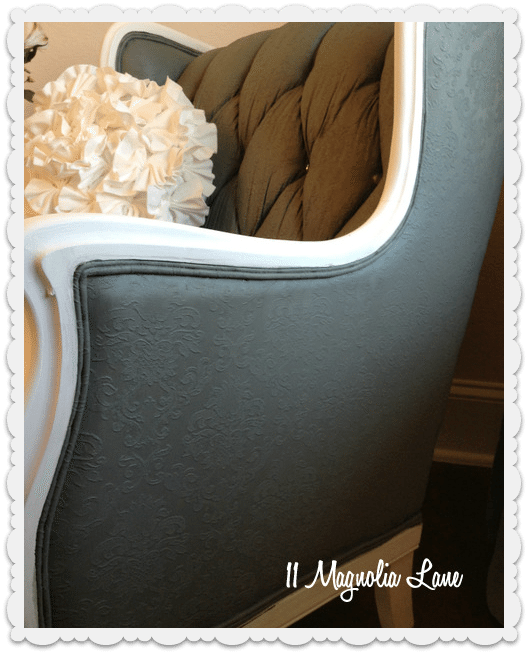
Here’s a close up so you can see the rhinestones and how nicely the damask pattern shows through.  It reminds me a bit of matelasse, but there’s a sheen to the fabric from all the layers of paint.

painted chair bling damask
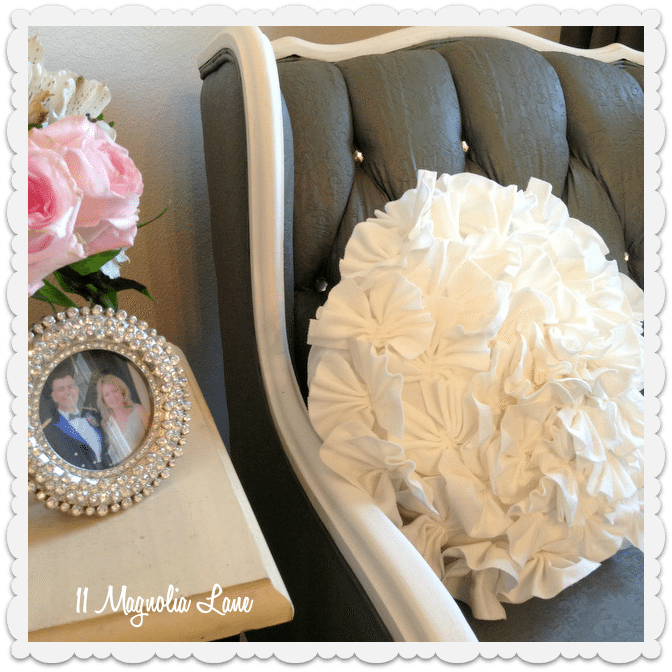
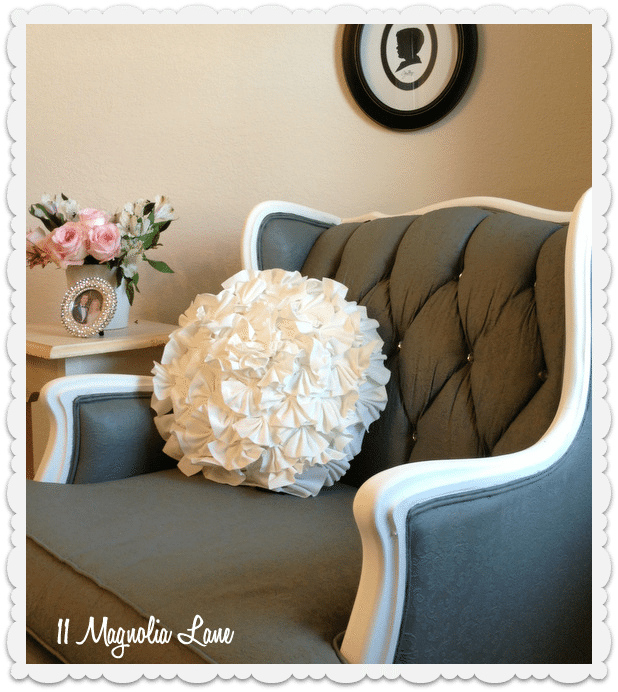
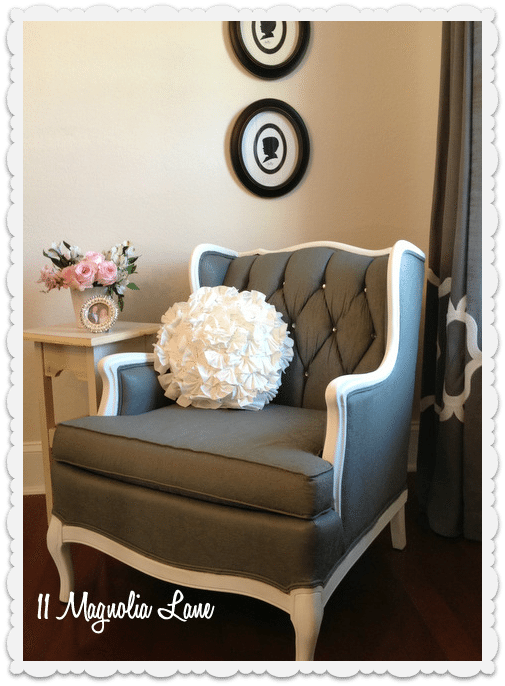
And here are some “beauty shots” of my glamorous chair in her new spot in my dining room:

painted chair close up
painted fabric chair from side
painted chair with flowers
painted chair with silhouettes
|  Pillow:  HomeGoods (similar ones available here)  |
The fabric is stiff, but not as stiff as things I’ve painted without using fabric medium.  It feels like outdoor/patio cushions, if you know what I mean.   I’ve passed beautiful pieces up so many times in the past because I didn’t want to shoulder the cost of reupholstering them, but now I know that I don’t have to.  I’ll bet spills and stains just roll right off, too!

I haven’t tested it yet, but from what I’ve read the paint is now colorfast, even when wet.  I’ve read tutorials where others used latex paint (flat and satin), chalk paint, and several other kinds, and it seems to work with all of them.   I’ll definitely let you know in a few months how it’s held up.

In the meantime, isn’t she *awesome*?!

Update: Five years (!) later, my chair still looks gorgeous.  Now it’s in my home office; here’s a recent photo:
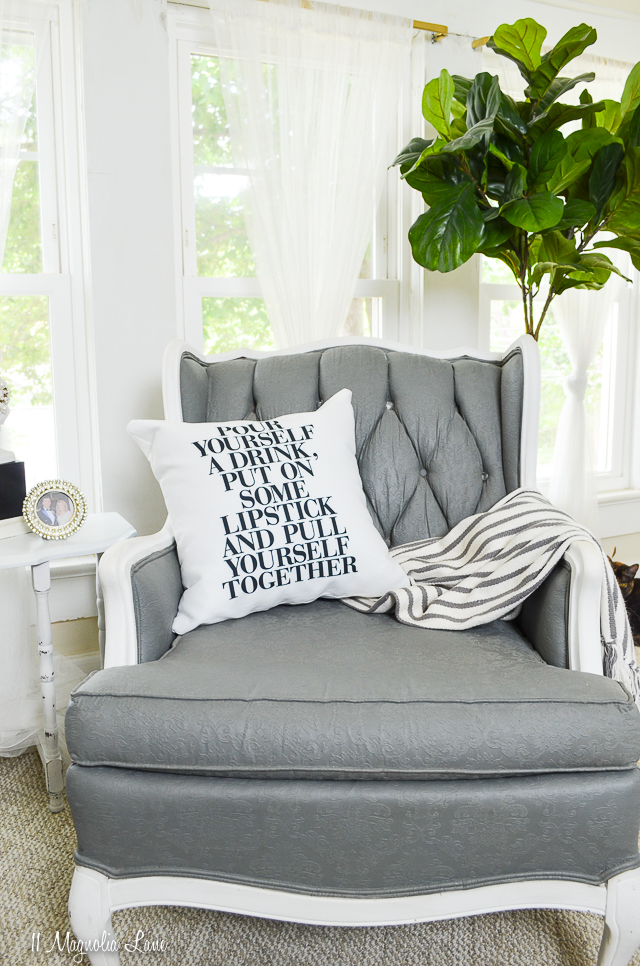
How to freshen up your summer decor with Society6 | 11 Magnolia Lane

Sources


Update:  I have written a second post {read it here} answering your questions about the process I followed and how the chair is holding up, seven months later.  Be sure to check it and the comments below if you have any questions–thanks!

If you want to see a black velvet chair that I painted several months later, that post is here.

Black velvet painted chair

You can also use chalk paint to transform  chair, that process is slightly different, you can see how to do that {here}.

And, I tried the same method on my outdoor cushions; that post is {here}.

Also, if you’re a renter (or live in military housing) I wrote a post that will give you tips for painting and decorating to make your rental feel like home; you can read it {here}.

Tutorial: How to paint upholstery fabric and transform a chair | 11 Magnolia Lane

*****

Thanks for stopping by!

Final New Christy headshot 2015
icon-facebook-1icon-instagram-1icon-mail-1icon-pinterest-1icon-twitter-1

YOU MIGHT ALSO LIKE THESE POSTS... :

Tutorial: Quick and Easy Way to Hang Silver ...
DIY Custom Plate Rack (For $40!)
Updated Mudroom + Painting Doors for Impact
Our Powder Room Makeover with Serena + Lily W...

Filed Under: DIY/Projects/Tutorials, Furniture, PROJECTS Tagged With: Chair, diy, fabric, paint, tutorial, upholstery

Reader Interactions

Comments

  1. Christy says

    September 9, 2013 at 5:13 pm

    Gorgeous! I just can’t believe it’s paint! The deep gray with the white is perfect. Off to Pinterest to pin it!

    Reply
    • Christy says

      September 10, 2013 at 9:42 pm

      Thanks, Christy. I’m so glad I changed to the darker grey…I started out light and it just didn’t pop!

      Reply
    • Paula says

      January 3, 2014 at 12:27 am

      I love your painted upholstery. You are so talented. Than you for sharing. Can that be done to chair covers? I’m so tired of paying for them and the color no really being what I am looking for. Can get costly.

      Reply
  2. Phyllis Cantrell says

    September 9, 2013 at 5:49 pm

    She looks beautiful. You did a fantastic job. I’m loving your blog……

    Reply
    • Phyllis Cantrell says

      September 9, 2013 at 5:57 pm

      One more thing, you should name her Savannah.

      Reply
      • Christy says

        September 10, 2013 at 9:43 pm

        Great idea, Phyllis. I’m so glad you’re following; I always enjoy hearing from you on Facebook!

        Reply
  3. Janis@All Things Beautiful says

    September 9, 2013 at 6:45 pm

    Oh Christy, you did a fabulous job! Love the lines of that chair. Your color choice is awesome and the jewels on the buttons is icing on that beautiful cake of a chair!!! I saw some jewel nailheads on a chair at a hotel and have been wanting to put them somewhere. So cute with just a touch of bling! I’m a fan…xoxo

    Reply
    • Christy says

      September 10, 2013 at 9:46 pm

      Can you believe I almost didn’t buy it?! I would still be kicking myself…

      So glad you stopped by, Janis. I have such fun watching what you’re up to on Instagram!

      Reply
  4. Allyson says

    September 9, 2013 at 7:59 pm

    Wow!! You did such a fabulous job! I Have been looking for a chair similar to this, with thoughts of reupholstering…but now that I have seen this, maybe I will try painting instead! Thanks!!!

    Reply
    • Christy says

      September 10, 2013 at 9:47 pm

      Thanks, Allyson. It was SO much faster and cheaper than reupholstering–give it a try!

      Reply
  5. Kim says

    September 10, 2013 at 5:51 am

    I was following you doing this on instagram and wow, did it turn out wonderful. Love the color and the added bling.

    Reply
    • Christy says

      September 10, 2013 at 9:56 pm

      Thanks, Kim! I think we’re doing a fall porch post for you next month–can’t wait!

      Reply
  6. Meg Saunders says

    September 10, 2013 at 7:57 am

    Love! Love! Love! This chair! Everything about it! It is perfect! 🙂 Great job 🙂 🙂

    Reply
    • Christy says

      September 10, 2013 at 9:57 pm

      Thanks, Meg. She turned out great!!

      Reply
  7. Lauren says

    September 10, 2013 at 8:33 am

    I can’t believe that is painted! I’d never have even considered that as an option. It makes rehabbing an old piece seem so much less daunting to me. Looks SOOO good!!!!

    Reply
    • Christy says

      September 10, 2013 at 10:00 pm

      It almost makes me regret all the pieces I’ve missed out on over the years, though, because I didn’t know you COULD paint! Oh, well, now we know!!

      Reply
  8. Jeannie Scott says

    September 10, 2013 at 9:25 am

    Absolutely Beautiful!!! Love the dark gray with the white!! And of course everything needs a little bling bling!!!! I have read several blogs on painting fabric with Annie Sloan Chalk Paint and after finished painting the fabric, they have waxed the fabric with the soft wax by Annie Sloan. It makes the fabric soft and durable……just an idea.

    Reply
    • Christy says

      September 10, 2013 at 10:01 pm

      Hmm, it wouldn’t surprise me, but I’m almost afraid to try since I love it so much as it is. Maybe on my next piece…

      Thanks for the tip, though, Jeannie! What can’t you do with AS and wax?!

      Reply
  9. Roye Nell Love says

    September 10, 2013 at 9:32 am

    I have two matching chairs that I was about to have reupholstered. The fabric is in great condition, so after seeing this blog; I’ve decided I will try to paint the fabric instead! Thank you for sharing this! Blessings to you!

    Reply
    • Christy says

      September 10, 2013 at 10:01 pm

      I’m so glad it was helpful to you, Roye. Good luck with your project!

      Reply
  10. Susan S. says

    September 10, 2013 at 6:22 pm

    That chair is just bee-u-tiful!!!! I wish I had more patience to tackle thinks like that. I just painted my first Annie Sloan piece…an old jam type cabinet. All of you gals keep me motivated….so love your blog!!!

    Reply
    • Christy says

      September 10, 2013 at 10:06 pm

      Good for you, Susan! That sounds like more work than painting one chair, though! 🙂

      Reply
  11. Cheyenne Morris says

    September 10, 2013 at 8:50 pm

    I love the chair!!! It looks great!!! But I really love that pillow!!! Please tell me you have a tutorial on how to make it!!! 🙂 Thanks!

    Reply
    • Christy says

      September 10, 2013 at 10:07 pm

      I cannot tell a lie, Cheyenne, I bought it at Home Goods for $12.99 just last week. It doesn’t look like it would be hard to make, but for that price it probably is cheaper just to buy one!

      Reply
  12. Mariana says

    September 10, 2013 at 10:14 pm

    Fantastic; I now have the courage to do the 2 white Queen Ann’s’ chairs which have separate cushions & pickled white wood. Great job.

    Reply
    • Christy says

      November 9, 2013 at 8:43 am

      You can do it, Mariana!

      Reply
  13. Rebecca says

    September 11, 2013 at 7:56 am

    LOVE the chair!!! LOVE the entire blog actually! I visit all the time and when I do, I get inspired to make my home gorgeous. Then I realize it’s small and I have no room for all the lovely projects I see. Of course, it IS just me, so I can do what I want, which means lots of ideas have been implemented! 🙂

    Reply
    • Christy says

      November 9, 2013 at 8:44 am

      You can always do new projects and then sell the old ones on Craigslist–I do that all the time. It helps fund my decorating addiction, too. 🙂

      Reply
  14. Marsha says

    September 12, 2013 at 10:48 pm

    just curious as to how you were able to get the cushion to “plump up” and look so perfect. The chair is absolutely stunning!!!!!!!!!

    Reply
    • Christy says

      September 14, 2013 at 11:25 pm

      Marsha, I didn’t do anything! It just looks that way on its own–such a pretty chair. I just helped it live up to its potential. 🙂

      Reply
  15. Tami says

    September 13, 2013 at 2:36 pm

    Gorgeous, just absolutely gorgeous!

    Reply
    • Christy says

      September 14, 2013 at 11:26 pm

      Thanks, Tami. It’s probably my favorite project EVER!

      Reply
  16. Pat Bialek says

    September 17, 2013 at 8:40 am

    Love your chair! I have also painted upholstered chairs but just with regular latex paint! They do end up a little stiff and I’m anxious to try your method! I do have a question though! In your “before” picture, the cushion looks a little “squished” in the front center and I’m wondering if you did anything to puff it up a little?

    Reply
    • Christy says

      September 18, 2013 at 2:13 pm

      Thanks, Pat! It is still a bit stiff, but not too bad. I might try more fabric medium next time and see if that makes a difference. No, I didn’t do anything to the cushion. Maybe the darker color hides the fact that the cushion’s a bit flat?

      Reply
  17. Jenna says

    September 20, 2013 at 5:37 am

    That chair is stunning! I love the grey. The frame is beautiful with all those curves! Awesome find and awesome job recovering it!

    Reply
    • Christy says

      November 9, 2013 at 8:44 am

      Thanks so much, Jenna!

      Reply
  18. Tammy @ A Walk in the Countryside says

    September 20, 2013 at 8:09 am

    Fantastic job! I love the color! I have a love seat in the bedroom that I plan on painting as soon as I get to the city to buy some fabric medium. I also read on another blog that waxing it afterwards helps to soften it a little more. Thanks for sharing!

    Reply
    • Christy says

      November 9, 2013 at 8:45 am

      I’ve read that, too–it’s worth a shot!

      Reply
  19. Abby says

    September 20, 2013 at 8:23 am

    Simply stunning! I love the color combo, and the way the damask shows through. Pinning to refer back to, if I ever find a chair half as nice!

    Reply
    • Christy says

      November 9, 2013 at 8:45 am

      You will…if not at the thrift store, then on Craigslist or at a yard sale. Get your paint brush ready!

      Reply
  20. phyllis.gidgett says

    October 5, 2013 at 8:03 pm

    thank you for the help so fast. iam very very new to all of this. did not know what a blogger was till last week. boy what a great place to find by looking for home ideas, I will be back and back iam sure. gidgett

    Reply
    • Christy says

      October 7, 2013 at 9:14 pm

      I’m glad it was helpful–be sure to stop back by, Gidgett!

      Reply
  21. Cydne says

    October 6, 2013 at 10:56 pm

    I love this idea of painting the chair, it looks so cute. I have a double rocking chair with very dated upholstery and I am going to try painting it before I spend money on reupholstery

    Reply
    • Christy says

      October 7, 2013 at 9:12 pm

      I figure it’s worth a try–worst case scenario you’ll be out a few dollars and a few hours of your time, best case scenario you’ve saved a fortune on reupholstering. Good luck!

      Reply
  22. Rogers says

    October 7, 2013 at 11:18 pm

    Wow. The transformation of the chair is excellent. Good work. Thanks for sharing this excellent blog.

    Reply
    • Christy says

      October 8, 2013 at 8:01 pm

      Thanks, Rogers!

      Reply
  23. nancy carlson says

    October 11, 2013 at 11:01 am

    Wish I would have seen this BEFORE I tore down a nice old chair that needed some help. But it does simplify the color options when looking for fabric – just pick the sturdiest and cheapest and then paint it!

    Reply
    • Christy says

      October 13, 2013 at 7:42 am

      Exactly, Nancy! $2 a yard sounds about right to me! 🙂

      Reply
  24. Karen says

    October 12, 2013 at 3:55 pm

    Hi. Your chair is amazing. I am now ready to try this. One question though. Do you spray or brush on the first layer of paint/medium/water mixture.
    Thanks

    Reply
    • Christy says

      October 13, 2013 at 7:43 am

      Karen, I used a brush for all of the paint/medium/water. I sprayed the water on using the water bottle, first, then painted with the brush as I added color. Hope that makes sense–let me know if you have any more questions, and good luck!

      Reply
  25. Tamara says

    October 14, 2013 at 4:36 pm

    I just picked up two wingback chairs at a thrift store over the weekend and your blog is the first one that came up when i googled “using fabric paint on upholstery”…. So glad to see how nice your chair turned out. Gives me hope on these two new treasures I found!

    Reply
    • Christy says

      October 21, 2013 at 2:12 pm

      Hey, Tamara–I’m so glad you found us! Let me know how your chairs turn out. When I think of all the beautiful pieces I’ve passed on over the years, I wish I had known you could paint fabric a long time ago! Thanks for stopping by – Christy

      Reply
  26. Monica says

    October 20, 2013 at 10:02 am

    I love the way your chair turned out. I have been trying to decide if I’m brave enough to paint some chairs I have . I am now going to jump in and do it. Thanks for sharing

    Reply
    • Christy says

      October 21, 2013 at 2:26 pm

      Good luck with your chairs, Monica! I bet they’ll look great.

      Reply
  27. Mia says

    October 27, 2013 at 9:38 pm

    Doing this today for a antique tufted chaise someone left on the curb 0__0. I did the trim silver and want to do the cushion a antique white/cream. What happens when you sit on it? Does it hold up well? I have a toddler so I am wondering how it is going to hold up .

    Reply
    • Christy says

      October 28, 2013 at 2:21 pm

      Wow–what a curbside treasure you found! When you sit on it, it’s a little stiff. Not like it’s going to crack, but just like it’s made out of oilcloth or a very heavy fabric. I would think it would be a wonderful choice for a toddler because I’m guessing that spills will just wipe right off!

      Reply
  28. David Wilson says

    November 6, 2013 at 6:00 pm

    Very cool… I am painting a set of 6 chairs I’m going to sell in my booth now. I couldn’t afford to recover cause it would have made the chairs unsaleable. This is a great solution and keeps a good old piece of furniture in use. LOVE IT!!! Thanks for the tutorial… that was very helpful!

    Reply
    • Christy says

      November 7, 2013 at 12:09 am

      You’re so welcome, David. Glad you found it helpful and that it’s going to help make your chairs gorgeous!

      Reply
  29. Marianne says

    November 8, 2013 at 10:28 pm

    Wow, I’m totally impressed and might just get up the nerve to try it. 🙂 Thanks for posting with so many great tips.

    Reply
    • Christy says

      November 9, 2013 at 8:46 am

      You’re so welcome! Give it a try. 🙂

      Reply
  30. Jen Lew says

    November 12, 2013 at 8:59 pm

    My chair came out amazing –> http://www.pinterest.com/pin/182114378655505236/ and I can not thank you enough for the inspiration and tutorial. Plus, this was my introduction to Annie Sloan chalk paint – since reading this post a few weeks ago I have painted and revitalized the old chair and painted 3 pieces of furniture and a lamp with AS paint… I’m addicted. Thanks again for your amazing blog! -Jen

    Reply
    • Christy says

      November 13, 2013 at 3:52 pm

      LOVE IT, Jen! Thanks so much for letting me post it on Facebook for our readers to see and enjoy.

      Reply
  31. Britt says

    November 14, 2013 at 8:09 pm

    How is your chair holding up? Have you tried anything with the wax you all mentioned in these comments? Does the wax come off on clothing or is it absorbed into the paint? I want to save my furniture from my amazingly sweet, cute & young children! I am hoping this can be our solution, but with it being our living room furniture it needs to be comfy too. Thanks for the post!!

    Reply
    • Christy says

      November 18, 2013 at 10:54 am

      Britt–I haven’t waxed it, so I can’t answer your questions about that. It’s in a corner of our dining room, and it doesn’t get sat on very much. That being said, it’s holding up great. I don’t think I’d recommend it for a piece you sit on every day, though, like your family room sofa or loveseat. Slipcovers might be your best bet for those!

      Reply
  32. Rachel says

    November 15, 2013 at 4:56 pm

    Christy, your chair turned out lovely. I have a question…the medium is white and when you mix it with the paint it dilutes the paint. For ie. if you mix it with red it would turn out pink, brown into tan etc. Does this affect the color you actually want on your chair? I actually want to do my sofa. It is in excellent condition but very outdated and I’m afraid the color I want will not be the color I get after mixing it.

    Reply
    • Christy says

      November 18, 2013 at 10:56 am

      Rachel–while the medium is white, it’s so watery that it doesn’t impact the color very much. However, you do need to apply multiple thin coats for the best result. So if you don’t feel like the color is deep enough, you just put on a few more coats of paint. Good luck with your sofa!

      Reply
  33. Kelly says

    November 18, 2013 at 4:16 pm

    Christy-
    I LOVE how this chair turned out! I have been researching how to paint old furniture and this has really helped. We just moved into a new place that came with a hideous flowered sectional sofa. We thought about getting rid of it and buying a new couch, but we live upstairs and getting it down our very narrow stairwell was going to be tough… aside from that, the sectional is very comfortable. After getting it cleaned, we’re looking for the cheapest way to redo it. Do you suggest your way of the fabric medium and latex paint, or would the SprayItNew spray bottles be a cheaper way?

    Reply
    • Christy says

      November 21, 2013 at 10:19 am

      Kelly, I’m not familiar with the spray bottles that you mention, so I can’t really give you a good comparison on cost or effectiveness. I will say that my method still produces a rather stiff fabric, so if they promise that the fabric will remain supple, that might be your best bet for a piece that will get daily use. Hope that helps!

      Reply
  34. Sandy says

    November 22, 2013 at 5:03 am

    I saw Annie Sloan on HomeTalk painting a chair with her chalk paint & a damp brush. It looked so quick & easy, I decided to try it. I’m just waiting to get my paint. And yes, she said to rub in the wax when the paint was dry to protect the paint & make the fabric more supple! I must also say, I’m so glad I found your site because this is all new to me! Your chair is georgeous, so now I have another option to try! THX for the great info!! I will definitely be following your site from now on!!

    Reply
    • Christy says

      November 29, 2013 at 11:20 pm

      That’s great advice, Sandy–thank you! And I’m so glad you’ll be a regular here. We’re glad to have you!

      Reply
  35. Emily says

    December 4, 2013 at 9:13 am

    Hi Christy. Love the chair! You’ve given me hope for the dining room chairs I recently picked up for a song. Like yours, great bones but not-so-great upholstery. Question: did you have to apply heat to the fabric after painting? A few other blogs mention that they had to either iron the fabric or blast it with a hairdryer. Thank you!

    Reply
    • Christy says

      December 6, 2013 at 10:41 am

      No heat, Emily. There might be different fabric mediums (or waxes) out there that require a heat application, but not this one. Good luck!!

      Reply
  36. Melody says

    December 7, 2013 at 7:29 am

    Hi Christy! Great job on your chair! I picked up a not-so-lovely channel back chair at Goodwill and am painting it with cream paint. Question for you: do you continue to spray water on fabric after the first coat? Thank you for posting your tutorial to inspire us! I’ve always had limited funds for decorating and have made my house beautiful with used items. Blessings to you & Merry Christmas! Melody

    Reply
    • Christy says

      December 8, 2013 at 9:33 am

      Hi, Melody–yes, I did. I think it helps to thin the coats out more so the fabric doesn’t dry so stiff. Good luck with your chair! I’m with you on the limited funds and used items–but it’s more fun than just going to the store and buying something new and expensive, anyway!

      Reply
  37. Shaina Turner says

    December 16, 2013 at 10:01 pm

    I’m so jealous of your chair! I have been looking for a wingback chair to paint but I love the pattern on yours. You did a beautiful job(:

    Reply
    • Christy says

      December 18, 2013 at 2:53 pm

      Thanks, Shaina. I absolutely love how it turned out! Hang in there–you’ll find one!

      Reply
  38. Christy says

    December 29, 2013 at 12:32 pm

    Thanks so much, Allison (and thank your mom for us, too!)! Let me know how your chair turns out–you can send me a picture through Facebook or Instagram!

    Reply
  39. Heather Smith says

    January 1, 2014 at 12:42 pm

    Can’t wait to try this! I noticed you said you used an artist brush on the last coat, but what sort did you use on the first couple? Thanks!

    Reply
    • Christy says

      January 1, 2014 at 9:43 pm

      Heather, I actually used a regular 2″ brush (for latex paint) for all the coats. I used the artist’s brush on the last two coats just to be sure I covered the cording all the way to the edges of the wood, since I didn’t want to get too much gray on the white painted wood. Good luck with your project!

      Reply
  40. Chris says

    January 7, 2014 at 8:08 am

    So glad I ran across this! I got a Victorian couch, wood trim, tufted, great lines and details, going to paint but I know I need a lot more paint than you used, I am going to buy paint, what do you recommend to mix with fabric medium: latex? Indoor latex? Not familiar with paints. I want to change it from white to a bright Tiffany blue

    Reply
  41. Dee says

    January 7, 2014 at 11:34 am

    the painting job is beautiful….one question. Can you seat on it and how does it feel?

    Reply
    • Christy says

      January 8, 2014 at 10:11 am

      Hi, Dee–
      Yes, you can sit on it. It feels a bit stiff, but not as stiff as, say, a naugahyde or pleather restaurant booth. I think it’s a great option for an accent chair, but not your comfy reading chair. I hope that helps!

      Reply
  42. stacy smith says

    February 2, 2014 at 5:55 pm

    If this chair were velvet….what would you do different? I have almost the same exact chair but it is orange velvet and I’m not sure how to paint it!

    Reply
    • Christy says

      February 4, 2014 at 12:32 pm

      Stacy, I can’t really say for sure since I haven’t painted velvet, but I assume you’d just have to be sure to really work the paint into the pile. I believe Shannon at Fox Hollow Cottage has painted a velvet chair, so you might head over there and see if she has any tips. Good luck!

      Reply
  43. Nanners says

    February 3, 2014 at 9:03 pm

    This is an inspiring and adorable project! Thanks so much for sharing you beautiful chairs.

    Reply
    • Christy says

      February 4, 2014 at 12:32 pm

      My pleasure–so glad you enjoyed it!

      Reply
  44. Doris says

    February 6, 2014 at 9:15 pm

    Can you paint using regular acrylic paint? What is the “medium” you mentioned? Is it necessary? If I use acrylic paint, can I just thin it water so it will spread easier with a brush or should I use a sponge roller? I have a love seat done in a south-eastern color pattern. I want to make it dark blue. Cotton fabric. I have lots of questions.

    Reply
    • Christy says

      February 7, 2014 at 8:14 am

      Doris, the fabric medium keeps the paint from drying so stiffly, so you could certainly skip it if you didn’t mind an extra-crunchy chair. You aren’t going to be painting a chair that you’re planning to sit on every day, anyway, because it just wouldn’t be comfortable. Yes, you can use regular acrylic paint, and I’m sure you can use either a brush or a roller, depending on the particular project. This is the only painted piece that I have done, so this is the only experience I have to share with you, but you have nothing to lose by experimenting a bit. Good luck!

      Reply
  45. Marie says

    February 11, 2014 at 11:11 am

    Can you go from a dark fabric to a light coloe?

    Reply
    • Christy says

      February 13, 2014 at 12:27 pm

      Marie–I have seen another blogger cover over a bright pattern with pale pink, so the answer is yes. I would imagine you’ll have to be prepared to use more coats of paint, though, so don’t skip using the fabric medium, or your fabric will be super-crunchy. Good luck!

      Reply
  46. Kimberly Bruhn says

    February 15, 2014 at 1:15 pm

    Just came by to see your technique (from Centsational Girl)…and wanted to say that I’ll be right there with you “sniffing the chairs” for funk….my kids get sooo embarrassed so I guess that’s a two-fer! Thanks for the hints…

    Reply
  47. Cathy says

    February 15, 2014 at 4:01 pm

    Hi,
    Great job! I’m wondering about your paint brushes. You mention that for the last two coats you used a painter’s brush to make sure you had coverage for the piping. What type of brush did you use for the first two coats? Is a painter’s brush a regular paint brush?
    Thanks for your time,
    Cathy

    Reply
    • Christy says

      February 16, 2014 at 9:19 am

      Cathy–I used an artist’s brush on the piping. An artist’s brush is a very small paint brush, purchased at a craft store rather than a hardware store. I used that to be sure that I didn’t get paint on the white wood trim when I was painting the piping. The regular 2″ painter’s brush that I used for the rest of the project didn’t allow me the control I needed to paint the piping. Hope that helps!

      Reply
  48. Whitney says

    February 21, 2014 at 2:33 pm

    That chair is fabulous!
    I have a few questions, sorry if they’ve already been asked but didn’t have the time to read every single comment. Anyway, I have a corner bench that I picked up from a bar when they were remodeling and years ago had my mother re-upholster it with a beige sort of canvas type material. Silly me to choose something light in color! Haha well since having children it’s got some stubborn stains so I was wondering if you knew if the stains would show through or would the paint hide them? Also, still using the medium, would Martha Stewart’s fabric paint be a good option? I feel like that might be a silly question because I know it would work haha but I mean would it maybe be better than using acrylic?

    Reply
  49. robyn says

    February 23, 2014 at 3:30 am

    thank you for the great post! Starting on my first painted upholstery project tomorrow. I hope it looks as good as your chair!

    Reply
    • Christy says

      February 27, 2014 at 11:24 am

      Thanks, Robyn. Good luck with your project–let me know how it turns out!

      Reply
  50. Janet says

    March 1, 2014 at 1:19 pm

    Simply lovely chair!
    If someone was to sit on your chair, have they ever stood up to find paint residue on their clothes. I’d feel awful if I ruined someone’s clothing, especially if they were wearing white 🙂
    Thank you!

    Reply
    • Christy says

      March 1, 2014 at 6:28 pm

      Thanks, Janet! Nope–the paint dries after a few hours or days, depending on how many coats you use. If you lean against a wall that’s been freshly painted, you get paint on you. A day (or a week, or a month…) later, you lean against the wall, and you don’t. Hope that helps!

      Reply
  51. Anna larson says

    March 8, 2014 at 8:40 am

    You did an excellent job, and I love how you explained every detail. Your an awesome teacher 🙂 The chair is beautiful I love the color & the bling pops it. I love that you took something old and made it new again. 🙂

    Reply
    • Christy says

      March 9, 2014 at 12:32 pm

      Thanks, Anna! It was such a fun project!

      Reply
      • Elisabeth Parkinson says

        March 10, 2014 at 2:12 pm

        Christy you have inspired me- I was just researching reupholstery costs/ fabrics. Tell me what type paint did you use to paint the WOOD of the chair? And what type brush you used to paint the fabric- also you wet it first correct?

        Reply
        • Christy says

          March 11, 2014 at 7:48 am

          Elisabeth–I used Annie Sloan Chalk Paint in Pure White on the chair (I’m sure regular latex would have done just fine, too). I used a 2″ painter’s brush (Purdy, probably) for the chair, and yes, I sprayed it with water as I was painting. Hope that helps!

          Reply
  52. jo wyrosdick says

    March 11, 2014 at 6:36 am

    I painted some chair cushions using you formula with less water and paint that I had on hand. Folk Art. When we sit on them they “swoosh” in other words they let out air. I thought about using a needle and poking holes around them. Does your cushion do this? What did I do wrong?

    Reply
    • Christy says

      March 12, 2014 at 10:21 pm

      Jo, I’m not sure if you did anything wrong, but do your cushions have zippers on them? If not, there’s probably no way for air to escape because you’ve sealed the fabric with the paint. If you do have zippers, then unzip them a half inch or so and see if that helps. My seat cushion has a zipper and so it doesn’t swoosh. 🙂 Next time, do thinner coats and you should get a better result. I hope that helps!

      Reply
  53. mara says

    March 15, 2014 at 11:57 pm

    hi! your creation is beautiful. i do have a question and i appreciate your time answering. i just put my first coat on my chair and there are some areas that dried a lot darker than others. did you have that problem too and did the extra coats fix that? i would love to know if you have any experience with that. i am not crafty at all and this is really my first project so i am a little clueless to how this all works 🙂 thanks so much!

    Reply
    • Christy says

      March 17, 2014 at 8:05 pm

      Mara, yes, your first coat will not likely cover it completely–if it did, you wouldn’t need additional coats! It’s better to add multiple thin coats then just one or two thick coats, as your cushions will be too stiff otherwise. Just keep painting until you get the coverage you want. Good luck!

      Reply
  54. Brenda says

    March 19, 2014 at 12:24 pm

    Christy, how did it hold up because it has been a while now? Would really like to know. Thinking about doing outdoor patio cushions…wondering how well that would hold up? Beautiful difference on your chair!

    Reply
    • Christy says

      March 22, 2014 at 5:42 pm

      Brenda, I think that is a great idea! I was just looking at my outdoor cushions today and thinking about how faded and sad they’re looking. They’re five years old, and even though I cover them, they still have to contend with sun and rain. And, they’re so expensive to replace–hmmm. My chair is in great shape, but it’s in my dining room and doesn’t get used every day. Given the way the cushions feel, though, they’d be water resistant. Let me know if you give it a try, and I might be posting again on outdoor cushions before the end of the summer!

      Reply
  55. Nan says

    March 25, 2014 at 8:23 am

    Your chair looks fabulous, love the look with the pillow and drapery is the background.
    I’m contemplating painting my outdoor coushins on my Patio set( A Better Homes and Gardens set ) and Umbrella.Have you ever painted the outdoor material before?

    Reply
    • Christy says

      March 25, 2014 at 12:20 pm

      Nan, I haven’t, but I plan to. My outdoor cushions are getting very faded. I’ve heard it works quite well–but not sure if anyone’s ever done an umbrella!

      Reply
      • Nan says

        March 25, 2014 at 9:29 pm

        I’m wondering, guessing that both the underside and top side of the umbrella will have to be done.I believe that I will tackle that 1st. Imagine this coming weekend I will just go for it and see how it turns out.

        Reply
        • Christy says

          March 27, 2014 at 11:05 am

          Nan, if you don’t mind, will you please comment back and let me know how it goes? Or, if you’d rather, you can post it on our Facebook page: https://www.facebook.com/11MagnoliaLane I’ll probably be doing my outdoor set in the next month (once the pollen stops raining down on us!). Thanks!

          Reply
  56. Dawn Marie says

    March 27, 2014 at 1:38 pm

    I really enjoyed reading your posts and think you have saved me from buying a new sofa! I have a perfect sofa but for one fact pet hair. We are pet lovers and have always allowed our persian cat and golden retriever to enjoy our home. Our dog has developed a condition that causes significant hair loss and his hair sticks to the sofa and is almost impossible to remove. Even a tape roller will not remove it easily. If painting causes stiffness It may fill the loops that trap his hair. What do you think?

    Reply
    • Christy says

      April 1, 2014 at 10:42 pm

      I think you are a good dog mom! The only thing I can say is that my cat has been sleeping on my chair and I just vacuum his hair off it it, and it seems to come off more easily than it does on other pieces of furniture. We have two goldens so I can sympathize about the fur! Good luck!

      Reply
  57. Trish says

    March 31, 2014 at 9:17 am

    Wow this chair looks amazing! I just purchased a used white glider and ottoman for my nursery. And there are some stains on it. I was going to get it Re upholstered but that’s gonna cost way to much. Do you think I can use the white paint to go over a white chair? Let me know what you think. Thanks so much. Your chair looks absolutely beautiful.

    Reply
    • Christy says

      April 1, 2014 at 10:43 pm

      Trish, I have seen other bloggers cover very dark or patterned fabrics with light paint, so I think you can do it. Just know going in that you’ll probably need 4-6 thin coats of paint. Good luck!

      Reply
  58. Melissa says

    April 1, 2014 at 3:51 am

    The chair looks divine 😉 I would love to try this on an old armchair I have. I live in Australia & our paints are non latex based! Do you know if this would still work with a non-latex based paint?

    Reply
    • Christy says

      April 1, 2014 at 10:44 pm

      It depends on what kind, Melissa. I used an acrylic paint on this project and it worked just fine. I think it should be okay as long as it’s water-based…oil-based would NOT work. Hope that helps!

      Reply
  59. Launa says

    April 1, 2014 at 6:02 pm

    I love this Chair. Beautiful! What a great idea!

    Reply
  60. Paige says

    May 27, 2014 at 5:23 am

    Beautiful result. Quite impressive. I’ve been researching painting fabric, and I discovered there’s another product out there, better than the Martha Stewart, because it leaves the upholstery fabric SOFT, not stiff or crunchy. I’ve not bought it yet but all of my online research has yielded nothing but raves about it.

    Reply
    • Christy says

      May 27, 2014 at 9:04 am

      Paige–I had read the reviews and priced the fabric spray paints out there before beginning this project, too. But at $10-12 PER CAN, I had to pass. I also wanted the control that using a brush gave me, since I had the wood trim to contend with, and of course I wanted to select the perfect color instead of choosing from a selection of spray paints. I did try a can on my outdoor cushions when I painted those and found the finish to be a little softer than this, but definitely not as soft as the original fabric. One can barely covered one side of a cushion, though. 🙁

      Reply
  61. Jennifer says

    May 27, 2014 at 2:13 pm

    Do you think this product would work going from dark fabric to light? I’m painting chocolate brown piping on a chair to a light tan color.

    Thank you!!

    Reply
    • Christy says

      June 1, 2014 at 6:59 pm

      Jennifer, I think it probably would. I answer that question (and all of the other ones I’ve gotten since I published this post), here: https://www.11magnolialane.com/2014/04/03/followup-on-my-painted-chair-tutorial-your-questions-and-my-answers/

      Reply
  62. Rebecca Jansen says

    June 18, 2014 at 11:15 am

    Has anyone tried going lighter with the fabric? I have a navy blue couch that I want to be tan

    Reply
    • Christy says

      June 19, 2014 at 10:32 am

      Rebecca–I used the same technique on my outdoor cushions and used white paint to cover a floral pattern. See it here: https://www.11magnolialane.com/2014/05/20/diy-painted-outdoor-cushions-and-a-paint-sprayer-giveaway/ It works fine; you just might need to use a few more coats of paint (be sure that they’re thin coats). Hope that helps!

      Reply
  63. Leona says

    July 3, 2014 at 3:20 pm

    Hi there! I am not experienced craft person but this sounds like a project I think I can handle. I bought a bench seat new, I love the lines, hate the color. I have two questions for you which I do not believe were answered in the blogs. Question #1 Did you send the fabric 1st? You mentioned something briefly about it but for me it was unclear. Question #2 U am aware that you did not use wax, but if I were to wax the piece, what kind would I use? There are a lot of different kind of waxes out there. And, in your opinion, what would he the best way to apply it? I truly haven’t got a clue. Thank you for you time.

    Reply
    • Christy says

      July 26, 2014 at 3:27 pm

      Leona–I did not have to sand the fabric. I believe that the other tutorials that I referenced did, though, but they were painted a fabric with a nap (like velvet). As for wax, I’m afraid I can’t really answer that except to say that it should (obviously) be clear wax. Maybe another blogger has written a post on using wax and could offer you some more specific help? Since I didn’t use it, I just don’t feel comfortable making a suggestion. Good luck with your piece!

      Reply
  64. Leona says

    July 3, 2014 at 3:23 pm

    *sand the fabric 1st

    Reply
  65. Erin says

    July 11, 2014 at 6:18 am

    That’s really quite amazing. I would have never thought of painting the upholstery on a chair before.

    Reply
  66. Melanie C. says

    July 25, 2014 at 2:48 pm

    Would you give me the ratio of paint to textile medium? Did you pour all 8 bottle of medium in a bucket and all the paint? Please advise.

    Reply
    • Christy says

      July 26, 2014 at 3:23 pm

      Sure, Melanie–here’s the section of the post that will help you:

      “I mixed a 1:1:1 solution of paint, fabric medium, and water and used that for the first coat, since that was what the other ladies recommended. Because my fabric wasn’t as thick and dense, though, it was a little too thin. I mixed my other coats 1:1:1/2 and the lower water content worked much better for me.”

      Hope that helps!

      Reply
  67. Gail Dolly says

    August 4, 2014 at 6:41 pm

    I saw the other site today (D in Dallas, I think) and I am simply amazed at you wonderful, creative women! Guess who’s gonna start painting very, very soon? Yep. I don’t think my Yorkies will like it but if Mamma ain’t happy ain’t nobody happy!

    Reply
    • Christy says

      August 5, 2014 at 12:29 pm

      The Yorkies will adapt; my Goldens did! 🙂 Happy painting, Gail!

      Reply
  68. Reema @ Uratex Hotel Mattress says

    August 12, 2014 at 2:42 am

    The chair is fabulous, I didn’t know that you paint it on your own. Thank you for sharing these wonderful ideas and tips, I hope to read a lot from you.

    Reply
  69. megan says

    August 29, 2014 at 9:37 pm

    I live in Alaska and can’t find the fabric medium. What is your amazon site that I can find it? thank you.

    Reply
    • Christy says

      August 30, 2014 at 8:08 am

      Hey Megan–Scroll up through the post, and right underneath the photo that’s labeled “fabric painting supplies” you’ll see a little Amazon box for the fabric medium. Click on it and it will take you directly to the exact kind that I used. I just clicked through and they’re currently sold out, but they will restock, I promise. You can enter your email and they’ll let you know when they get more. I hope that helps!

      Reply
  70. Darah says

    September 1, 2014 at 12:43 am

    Hi. I love how your chair turned out.. Its just what I had in mind for painting mine. Question, I see in most of your posts you say the chair is pretty stiff. I just got a free chair just like that and was looking to paint it and sell it. How do you think buyers are going to react to such a stiff chair? Do you think it would be better to just try the reupholstering

    Reply
    • Christy says

      September 2, 2014 at 8:45 pm

      I don’t think you could charge as much as you would for a reupholstered chair, but if the price was right and the end result was pretty, I’m sure someone would buy it. Plus, if you snap a chair up for $5 or $10 at a yardsale, what do you have to lose except a few hours’ of work? Let me know how it turns out!

      Reply
  71. Kathy says

    October 17, 2014 at 4:31 pm

    My daughter gave me a winged-back chair that is in perfect condition (don’t think it has ever been sat in), but it is the “old mauve/light rose” color and matches nothing in my house. After seeing your results on the beautiful chair above, I am going to try the painting it! My chair is the perfect model for this 1st time project, as it has no buttons, tufts, etc…just plain with cording. I accent my living room in reds (brown leather furniture), so I am thinking maybe a red (barn red; venetian red; etc.) and leave the legs the original wood since they are in perfection condition. Your thoughts on colors?? And what are your thoughts on a small sponge paint roller instead of a brush, except around the cording of course?

    Reply
    • Christy says

      October 20, 2014 at 8:49 am

      Your colors sounds great, Kathy. You could always add a little brass nailhead trim around the bottom for effect. As for the sponge roller, I find that they make a lot of bubbles when I’m using thinned paint, so you might want to start with that but then switch over to the brush if that happens for you. Good luck–let me know how it turns out!

      Reply
  72. Bernadette Boas says

    October 22, 2014 at 7:54 pm

    Christy… awesome job on the chair, as I am just learning about painting fabric at this very moment…as I have several pieces I want to update. One chair I just bought is Egyptian cotton (i am guessing)…. would fabric paint work on it, do you think?

    It requires a great amount of fabric to reupholster it… painting it would be great.

    Reply
    • Christy says

      October 26, 2014 at 1:34 pm

      Bernadette–Thank you! I think it’s worth a try to paint Egyptian cotton; after all, you could always remove it and reupholster it if it doesn’t work, and if it does, then you’ve saved a ton of money! If you give it a try, be sure to let us know how it works!

      Reply
  73. Sarah says

    November 9, 2014 at 10:58 pm

    I love this project, but am confused as to why you didn’t just use fabric paint, along with the fabric pant medium? I think I may use both of that. I am going to start on a pillow first. If the pillow lasts and feels comfortable then of course the couch will feel comfortable too, at least that is my hope. The chair is amazing. I’m hoping when I do this, it will look good.

    Reply
    • Christy says

      November 11, 2014 at 5:02 pm

      Thanks, Sarah. I think it’s smart to start on a pillow and give it a try. As for why I chose regular paint, when I did this project (and it’s been quite awhile since I did) there wasn’t a wide variety of colors to choose from with fabric paint. That’s probably changed since then. Can’t wait to hear how yours turns out!

      Reply
  74. Sue says

    November 13, 2014 at 6:35 pm

    Christy: I have a beautiful cornice board that no longer matches my bedroom colors. I’m thinking of trying a fabric paint job on it. What are your thoughts? Thanks very much — and I love your site!

    Reply
    • Christy says

      November 16, 2014 at 8:49 am

      Sue, I think you should definitely try to paint it. After all, the feel of the fabric on a cornice board isn’t important–just the look–and I think it will be a great way to refresh your space!

      Reply
  75. Hope says

    December 6, 2014 at 6:44 am

    WOW…trash to flash, I Looooove it. The bling looks so bouche’, can’t wait to imitate your lovely work.

    Reply
  76. Haley says

    December 7, 2014 at 3:05 pm

    Hi there! So I’m currently painting my chair now and had a quick question, if you don’t mind. 😉

    Are you spraying it down with water between each coat too? I have my first layer on and wasn’t quite sure if I wet it down for every coat…

    Thank you!

    Reply
    • Christy says

      December 9, 2014 at 9:52 am

      Hi, Haley–

      I did spray it down between each coat, but you’ll see that it becomes less and less absorbent as additional coats are added.

      Good luck with your chair!

      Reply
  77. Cynthia says

    December 8, 2014 at 9:57 pm

    My question for you is; can I use an air brush gun to paint the upholstery material? What do you think?

    Reply
    • Christy says

      December 9, 2014 at 9:56 am

      Cynthia, I’m not sure about an air brush gun, but I have used a paint sprayer on upholstery cushions. The post is here if you’d like to check it out: https://www.11magnolialane.com/2014/05/20/diy-painted-outdoor-cushions-and-a-paint-sprayer-giveaway/
      Thanks!

      Reply
  78. isaac says

    December 27, 2014 at 5:01 pm

    im in a similar situation, my living room is a similar pattern, but its beige and i want it to be dark grey but still have the pattern show through, what would you recomend doing??

    Reply
    • Christy says

      December 31, 2014 at 10:49 am

      Isaac, the pattern will continue to show through after several coats (you can see it on mine). It’s a damask and you can still see it and feel it. Hope that helps!

      Reply
  79. Katelyn says

    January 6, 2015 at 5:04 pm

    This is amazing! I just bought two couches from cragslist that could definitely be updated. Do you think going from a tan/creamy color to a medium grey will be to hard?

    Reply
  80. Anne says

    January 23, 2015 at 4:38 pm

    I tried this on a velvet love seat that was a dark cherry red. Disaster!! After 4 coats it is a very dark purple (supposed to be black and feels pretty crunchy. I’m exhausted from painting a love seat front and back and two large seat cushions 4 times not to mention the expense. If you are going to try this di it on a light colored item please and realize you may even need 5 coats. It can get expensive. I’m too tired to continue but not happy with the color either so it is a lose, lose for me on this project

    Reply
    • Christy says

      January 24, 2015 at 9:01 am

      Anne– I painted a velvet chair, too, and it was really crunchy when I finished. https://www.11magnolialane.com/2014/07/27/how-to-paint-upholstery-fabric-black-velvet-chair/ However, I was painting it black (from dark gold) and it covered well with just two coats. I wonder if the kind of paint makes a difference? I’m sorry your results were so disappointing–we’ve all had epic fails as DIY’ers and it’s never fun.

      Reply
  81. Wendy Harrington says

    March 9, 2015 at 1:46 am

    I have a chair i want to paint like you did but thew fabric is really lose woven and rough. was wondering if it will work with that also.

    Reply
    • Christy says

      March 9, 2015 at 10:47 am

      Thanks for writing. This post might help with some of your questions about painting fabric: https://www.11magnolialane.com/2014/04/03/followup-on-my-painted-chair-tutorial-your-questions-and-my-answers/

      I’ve also painted velvet and wrote about it here:
      https://www.11magnolialane.com/2014/07/27/how-to-paint-upholstery-fabric-black-velvet-chair/

      Good luck with your chair!

      Reply
  82. Susan says

    March 23, 2015 at 2:11 pm

    Do you think this technique would work on honeycomb window shades. I’ve just redone a bedroom from
    the “tuscan orange colors” and my shade is a golden/orange color…very expensive and custom ($400). It is in perfect condition, so if I could paint this an off-white color that would be amazing and save money so I would not have to purchase a new shade. Have you ever tried to paint cellular shades? Wondering if I could purchase the fabric medium, add very diluted latex paint the color of my walls, and try to spray it. Thanks for your answer!

    Reply
    • Rhoni Ann says

      August 22, 2015 at 8:23 am

      I too, am wondering if it would work on honeycomb cellular shades?

      Reply
      • Christy says

        August 23, 2015 at 3:50 pm

        You know, she never replied back to let us know if it worked or not. If you’re going to replace them anyway, it certainly doesn’t hurt to give it a try. Let us know if you do!

        Reply
        • Christy says

          August 25, 2015 at 1:55 pm

          Update from Rhoni Ann on painting shades:

          Not quite 24 hours but YES you can!! I’ve ran out of textile medium, not good since the nearest place that carries this is a 45 minute drive. I started with 2 bottles of Anita’s textile medium and wound up using my bathroom wall paint, not tan or brown, more of a real lite turquoise/teal. Just regular satin latex paint. 2oz bottle of medium to 2oz of wall paint, I forgot to spray the shade with water, but it worked fine. I did wind up taking the blind apart because I wanted to spray paint the metal top and bottom piece, plus whoever initially bought these measured them wrong. So I had to take the dremel to the metal and trim, horrible idea but it worked. And I trimmed the fabric as well, again I would not recommend. I am only doing one coat because of the way it is covering, very surprised and happy. I will wind up using 3 bottles of textile medium per blind.

          A couple of things to know, my blinds are Bali double honeycomb blackout, only doing the front the back color is white. They measure 45” long and 35” wide. It takes both hands, as there is so much memory in the blinds/shades that they just want to close up, for lack of a better word. I am searching Pinterest as to how to restring, only way to get the top off is untie the cords and pull out the cord. I have a long upholstery needle and thinking that might be the best bet.

          And with all this being said, use at your risk and don’t blame me or anyone else if it doesn’t come out the way you want!

          **Thanks for sharing that with our readers, Rhoni Ann! Christy

          Reply
  83. Jennifer says

    April 16, 2015 at 3:02 pm

    I accidentally bought a quart of oil-based paint last night and didn’t realize it until I opened the can. I went ahead and painted one coat on my microfiber dining chairs, but now am concerned that I shouldn’t proceed with the oil-based and should change to latex. In one of the comments above, you mention using oil-based would NOT work. Can you explain the drawbacks to using oil-based? I have searched online and nothing. 🙁

    Reply
  84. Cynthia Nickey says

    June 11, 2015 at 10:10 am

    Hi! I have a question for you. I recently painted a recliner with the same exact type of acrylic paint that you used, but instead of mixing in the “medium,” I put the type of hair conditioner in with it that makes your hair very fine to the point of being unmanageable. I think that helped some. My chair is a micro-suede fabric that has a leather-looking grain texture to it. The chair was gold and I made it navy to match a shiny navy LEATHER chair, and I matched the color well, but the material is not shiny like the real-leather chair. Do you know what I could put on the fabric to make it shiny, and that would also seal in the paint? It would then look like a faux-leather chair, which would go much better with the real-leather chair. Thank you very much for the advice.

    Reply
  85. cynthia says

    June 20, 2015 at 11:42 pm

    This will be my first project for painting fabric. I am painting my table that I have had for 20 years and I brought some chairs for cheap but the cushion is not the color I want. I brought some white paint at the store can I use the same paint or do I have to buy some fabric paint. I want the entire chair to be white.

    Reply
  86. Elle says

    July 10, 2015 at 6:11 pm

    I came across your blog while trying to find a make-it-yourself alternative to Simply Spray Fabric Paint. I’m trying to cover a couch and armchair that aren’t worth the hundreds of dollars that it would cost to use Simply Spray to cover them. I was hoping you had some thoughts about the best way to paint a microsuede (I think that’s what it’s called) fabric? Thanks!

    Reply
  87. Susan says

    July 15, 2015 at 6:15 am

    Hello,

    Great post. We just painted our table and chairs and did so when it was a little too warm. Although we did 3 light coats, it seems to have dried “rough”. We wanted a smooth finish and are not sure what to do in order to fix the obvious paint strokes. Sanding it didn’t seem to help much. What can we do?!

    Thanks,

    Reply
  88. Anna says

    July 20, 2015 at 12:29 pm

    The chair looks beautiful 🙂
    How is it holding up? I’m thinking of painting my sleeper sofa but I’m worried it won’t hold up because it gets so much use. Any ideas or feedback?

    Reply
  89. Sue says

    August 11, 2015 at 3:51 pm

    If I wanted to paint a wing-back chair, what quantity of paint and fabric or textile medium would I need to initially purchase? (Like 1 quart acrylic satin paint and ___ oz. textile medium?) And wax, I cannot visualize the reference to using wax when finished with the painting. It this paraffin, furniture spray on or paste wax, car wax, or floor wax? Whichever type of wax you use, how does on apply it? Thanks.

    Reply
    • Christy says

      August 13, 2015 at 2:51 pm

      Hi, Sue–

      It’s been awhile, so I looked back at the post and saw that I used ten 2 oz. bottles of paint (so 20 oz. total) and four 8 oz. bottles of fabric medium on this project. I’m assuming that a wing back chair would need a bit more depending on the height of the back, so maybe add another bottle or two. This is the fabric medium I used, if that helps.

      I did NOT use wax on this chair but the others who have used it are referring to Annie Sloan’s clear soft wax. I’m not sure about their application technique but I’m guessing they just apply it once the paint is completely try and rub it in with a clean rag or wax brush.

      Good luck with your project!

      Reply
  90. Snaps says

    September 2, 2015 at 10:34 pm

    Have you ever checked out the several wonderful varieties of actual upholstery paint ? It may have saved you time, money, effort/extra painting steps, possibly grief (lol); it requires no primer, no mixing, dries soft, dries very quickly, requires no heat-setting, and is totally permanent in 72 hours. It’s amazing stuff !! Your chair BTW is absolutely stunning !! I LOVE it !!

    Reply
  91. Mona says

    September 22, 2015 at 10:47 pm

    Hi- I a! New to all of this- I have some napkins that I am going to make pillows with but I want to fill in some of the hollow paisley pattern w\ a little color. Is that doable? I am pretty excited!

    Reply
  92. Elizabeth Carroll says

    December 3, 2015 at 11:37 am

    I recently attempted my first wingback chair upcycle from burgundy to white with chalk paint. HOWEVER, I forgot to spray the fabric first with water and have just now realized it after 4-5 coats of white chalk paint. The fabric is beyond stiff. Should I sand/wax? Is it even worth it? Or should I start again on a new chair? Any suggestions would be greatly appreciated as I have spent quite sometime on the project and hate to just throw away. Cheers

    Reply
  93. Victoria says

    March 26, 2016 at 3:47 pm

    I developed a different technique to paint my fabric ottoman. I combined one part latex paint (Behr) with 2.5 parts of liquid fabric softener (Snuggles as that is what I had on hand). You need to blend the two ingredients well and at first it looks like the paint is curdling but keep blending and it will become creamy smooth and almost frothy as a lot of small air bubbles are generated. I used my paint brush to blend. Fabric softener is a surfactant which helps disperse the pigments, Fabric softener also has a lot of water (a main ingredient) so no need to add water to thin the paint. I tested this method on an old cotton tea towel as it closely resembled the texture and weave of the cotton fabric on my ottoman. It works very well and the fabric stays fairly soft – like brand new stiff denim or outdoor cushion material. This saved me even more money as I didn’t need to buy the fabric medium. The fabric ottoman looks great and cost less then $4.00 for a sample jar of latex paint, as I had the fabric softener at home. Using this method the paint went a long way and I was able to cover a dark patterned ottoman with a light grey paint colour in 3 coats. I may have used 1/4 cup of paint or less for this project.

    Reply
    • Christy says

      March 27, 2016 at 9:53 pm

      What a great idea, Victoria, and so cost-effective! Thanks so much for sharing it with us.
      Christy

      Reply
  94. Bea says

    July 19, 2016 at 10:19 pm

    I would relaly like to have a copy of the whole house decor planning, but when I click where it says to receive a copy there is a message that the site is not available. Is is available? Thank you .
    B

    Reply
    • Christy says

      July 20, 2016 at 9:08 am

      Sorry it’s causing problems, Bea. I’ve emailed a copy to you!

      Reply
  95. Tyrone says

    August 16, 2016 at 3:42 pm

    This was great- short to the point! Not a bunch of blog writing ” talking to yourself” jibberish!
    Thank you– thank you!
    Beautiful chair(s)

    Reply
  96. Robin Stokjes says

    August 22, 2016 at 8:41 am

    Hi Christy,
    I am about to paint 2 wing chairs in our conservatory. They are burgundy colour. Do you think that a darkish green what cover it. Loved your chair so hoping for success.
    Robin (UK)

    Reply
    • Christy says

      August 23, 2016 at 1:50 pm

      I think so, Robin. Just use lots of thin coats and don’t give up when the first coat looks terrible. 🙂
      Let me know how it goes!
      Christy

      Reply
  97. Missy says

    October 16, 2016 at 1:37 am

    I am so glad that I stumbled upon your site because I was just getting ready to paint some dining room chairs. I first thought brown and then because I am decorating with a lime green and black and white checks, that maybe dk grey would look better. Now I will continue with that idea because I love yours so much. Thank you for the tutorial.

    Reply
    • Christy says

      October 17, 2016 at 9:16 pm

      You’re so welcome, Missy! I hope you love how they turn out!
      Take care,
      Christy

      Reply
  98. Ron Wade says

    October 25, 2016 at 12:57 pm

    looking for advice, I have a cloth black convertible top in good condition and i would like to change to color to brown. Is it a possible undertaking or would the brown not cover black. If it would cover. i presume I would have to seal it with some product made for that.
    thanks

    Reply
  99. Joan says

    October 25, 2016 at 1:42 pm

    Going to attempt to paint some dining room chairs. They have bronze upholstery studs/tacks all around the back and sides of seat. what is the best way to keep the paint off the studs? cover or wipe off. Going from light tan to chocolate brown in color.

    Reply
  100. Eddie says

    October 29, 2016 at 5:25 pm

    thank you for all your efforts that you have put in this.

    Very interesting information.

    Reply
  101. andrea says

    November 1, 2016 at 2:57 pm

    Hi, Your chair is beautiful. It has inspired me to paint an wing back chair I have in my living room. I have one question regarding the type of paint. When I buy the latex paint do I buy the flat, semi-gloss or eggshell? Thank you.

    Reply
  102. Susan ross says

    November 7, 2016 at 2:34 pm

    I recently acquired two hand me down chairs and saw this post and had to do the gray and white thing. But I wanted a silvery finish. So I purchased some upholstery fabric to try out several different methods and combinations of fabric medium paint and water. Plus I tried several brands of fabric spray paint. but they all turned out pretty stiff, too stiff. And the coverage was not very good with any of them. Then I saw a can of regular silver spray paint on my shelf – why not try it? The results were amazing! Soft as soft can be and great coverage. Now the question was is it color safe. I rubbed the fabric on my black pants and there was a a tiny bit of color that came off. I doubt anyone sitting in a chair would ever rub that hard. But I decided to try some scotch guard on it. That made it a little stiffer but still softer than any of these other methods. Plus regular spray paint is way cheaper than fabric medium or fabric spray paint- bonus!

    Reply
    • Christy says

      November 9, 2016 at 4:39 pm

      That’s great to hear, Susan! I’ve used black spray paint on outdoor cushions before, so this was great information to file away for later.

      I’m so glad you’re pleased with how your chairs turned out!
      Christy

      Reply
  103. Ashlee says

    November 8, 2016 at 4:20 pm

    Sooo I tried this and the first coat was super stiff… I guess I didn’t mix enough medium into it… my only idea… ANY idea how to soften it with more coats?! I don’t want the loose the chairs!!!!

    Reply
  104. Cathy Drakes says

    November 12, 2016 at 4:19 pm

    Christy,
    I was so excited to download your decorating guide but the link did not work is it no longer available?

    Cathy

    Reply
    • Christy says

      November 14, 2016 at 9:29 am

      Hi, Cathy–

      So sorry you had trouble. I’ll double check the link, but in the meantime, I’ve emailed you the whole house decorating planner.

      Thanks so much!
      Christy

      Reply
  105. Susan Ross says

    November 18, 2016 at 4:59 pm

    This chair inspired me to do my own with a couple of great grandmas chairs from yhe thirties. I went for silver though. I like it shiny. Wish I could post a pic. And FYI I used regular run of the mill spray paint followed by scotchguard. It is softer than any fabric spray or fabric medium I tried. And is covered in one coat. Plus it’s way cheaper than fabric spray – bonus!

    Reply
  106. carol lugashi says

    December 14, 2016 at 3:08 am

    Hi. Great chair! I was wondering if you had to spray the chair with water before every coat of paint or just on the first coat of paint?

    Reply
  107. teresa says

    February 18, 2017 at 12:08 pm

    Hi, your chair is just beautiful. you said you don’t use the chair much but i was wondering if the paint would rug off onto your clothes

    Reply
  108. Dawn says

    May 30, 2017 at 8:56 pm

    Thanks so much Christy now I think I’m ready to do my bench. And if it comes out like yours I’m doing my plaid couch also. Thanks for the encouragement.

    Reply
  109. alexandra mirnig says

    July 13, 2017 at 11:43 am

    have you tried simply srpay upholstery paint. its the origingal and works the best. easy, soft and last a very long time.

    Reply
  110. Carolyn says

    July 30, 2017 at 10:02 am

    Are you painting with the brush or thinning the paint and spraying it on? I have a beautuful boudoir chair with pleats around the bottom and would love to change its drab pink to something livelier. Your chair is gorgeous! Thank you.

    Reply
    • Christy says

      August 5, 2017 at 11:57 am

      The technique that I used was to spray lightly with water, then use the brush to paint. It’s been awhile, but I believe my ratio was 1:1:1 (water to paint to fabric medium). The post should give you the specific recipe. Hope that helps!
      Christy

      Reply
  111. Susan Piercy says

    November 6, 2017 at 4:35 pm

    What can i do about decorative nails on the furniture I want to paint?

    Reply
    • Christy says

      November 18, 2017 at 8:10 am

      I think the easiest thing would be to paint over them; however, if you want them to maintain their original color for contrast, you’re going to have to remove them and then put them back on after you paint. Sorry— I wish there was an easier way, too!

      Reply
  112. Glinda Self says

    December 9, 2017 at 4:26 pm

    I used Simply Spray upholstery paint (3 cans for a small chair) It looked pretty good except for being spotty because it appeared to need more paint. Then I sanded and waxed it and ruined it. The seat where I did this looks faded and flat. (The chair had a raised design) Now that it is waxed is there anyway I can saved it? It was ok now it really looks bad.

    Reply
  113. alexandra says

    January 21, 2018 at 11:55 am

    i always use simply spray upoholstery paint, have done 6 or 7 projects with simply spray. i just transformed a leather chair using their leather cote kit. its a 2 part primer then color but it was easy to use i saw a video from mix max on youtube . the chair looks incredible and easy to do

    Reply
  114. Sanja says

    February 19, 2018 at 7:36 am

    Hello, great job! I have a question for anyone who is following these posts: do you need to use any final touches ( a clear spray maybe?) to prevent the paint from transferring to your clothes when sitting down? I am planning to do a similar project this summer, to create a bride and groom chair for my daughter’s wedding. Since they are crazy expensive even to rent, I found two wing bACK CHAIRS THAT i WOULD LIKE TO TRANSFORM TO BRIDE AND GROOM CHAIRS AND NOT SPEND TOO MUCH money. THE FABRIC IS SOMEWHAT STIFF, LIKE REGULAR UPHOLSTERY FABRIC, SO i’M HOPING IT WILL LOOK GOOD. aLSO, I HAVE a couple of spray adhesive bottles, I’m wondering if I should use it as a final coat to ensure the paint is not staining the clothes? Thank you.

    Reply
    • Christy says

      February 19, 2018 at 4:16 pm

      Hey, Sanja–Once the paint has dried, you don’t have to worry about it getting on your clothes. Just like when you paint a wall, once it’s dry, it’s dry. I still use my chair daily (it’s been 4.5 years since I wrote this post) and it’s in perfect condition. You might enjoy this post I wrote to answer all the questions people have left in the comments over the years; yours is mentioned: https://www.11magnolialane.com/2014/04/03/followup-on-my-painted-chair-tutorial-your-questions-and-my-answers/

      Reply
  115. Gunnar says

    March 26, 2018 at 5:00 pm

    Hello! No idea why this is appearing all in caps, my “caps” key is off! I followed your instructions quite some time ago, and a period chair with carved arms, legs and stretchers (upholstered in an bland, beige fabric) now looks like it’s upholstered in brown leather. Totally surprised at how well the paint has held up. No craks whatsoever!

    Reply
    • Christy says

      March 27, 2018 at 9:58 am

      I’m so glad to hear that! I always love it when someone reports back to me on how their project turned out.
      Thanks for letting me know, and take care!
      Christy

      Reply
  116. Marianna says

    April 1, 2018 at 10:27 pm

    What can u do if the fabric was scotchgarded

    Reply
    • Christy says

      April 6, 2018 at 8:42 am

      Hey, Marianna–
      My best recommendation is to try a small area that’s not visible (the underside of a cushion, for example) to see if the paint will absorb. It really just depends on how much Scotchguard is on there and how impervious the fabric is to moisture. I’ve never painted Scotchguarded fabric before, so can’t really answer your question other than to guess. {This} post answers some of the many questions I’ve gotten on this project over the years; you might see something that helps you there.
      Best of luck to you with your project!

      Reply
  117. Dawna Mathews says

    April 4, 2018 at 9:20 pm

    We are thinking of using fabric paint on our church pews. They are bright blue, and were installed in 1977. They are very sturdy and made from fine wood. We can’t afford to replace them, so thought you could advise us on how to properly covered them with fabric paint (or something else), and be much less expensive. We priced reupholstering them, but it would cost at least $1000 a pew and we have 24 pews!! HELP!! Thank you for any input you may have.

    Reply
    • Christy says

      April 6, 2018 at 8:46 am

      You might also want to take a look at {this} post, or even the comments, as it might give you a little more information before you attempt to paint the pews. If you have to replace them anyway, it doesn’t hurt to try one to see what happens, right?

      Best of luck to you on your project!

      Reply
      • Colleen says

        May 1, 2018 at 8:04 pm

        How is the chair holding up years later?

        Reply
        • Christy says

          May 4, 2018 at 5:41 pm

          It’s perfect, Colleen! It’s in my bedroom office now and it still looks beautiful. You can see recent photos in this post.
          Hope that helps–
          Christy

          Reply
  118. Courtney Bishop says

    April 13, 2018 at 9:16 pm

    Wow! I wish I had known about this sooner. Thanks for the helpful tips 🙂 I’m feeling crafty now…

    Reply
  119. Sandra Silverberg says

    May 23, 2018 at 7:00 am

    Great blog!

    Reply
  120. Bella says

    July 14, 2018 at 10:20 am

    You said you used 4 8oz bottles but that brand only comes in 6oz? So should I get 5 bottles of the 6oz? Or was that just a typo?

    Reply
    • Christy says

      July 14, 2018 at 11:19 am

      Hey, Bella–
      So, you might have seen that I did the project five years ago! They might have changed their packaging since then. I would overestimate since it’s no fun to go back in the middle of the project to buy more materials, and you can always return what you don’t use. Amounts vary widely based on the size of the piece you’re doing, so just use mine as a jumping off point for mixing proportions. Good luck with your project!

      Reply
  121. Sandra says

    September 3, 2018 at 6:11 pm

    Hi,
    Love Your Chair! Wondering my sofa and recliner’s all have zippers, Should I remove the covers and paint them without the cushions? Would this help with the drying time. Also my recliners had some wear to them. Should I add fabric to the holes or just paint over them?
    Thank you kindly so glad I found you!
    Sandra, from Lancaster, Pa.

    Reply
    • Christy says

      September 6, 2018 at 3:33 pm

      Hey, Sandra–
      I would leave the covers on the cushions when you paint them. That way, if they shrink a little you won’t have to struggle to get them back on. Not all fabrics like to get wet, after all! As for the holes, it really depends on how big they are. While the paint will cover up smaller ones, it will probably still be noticeable with larger ones. Can you test on the back side of a cushion before you proceed with all of them?
      Good luck! Christy

      Reply
  122. Nikki Pitts says

    September 8, 2018 at 8:50 pm

    Beautiful!

    Reply
  123. Cheyenne says

    September 10, 2018 at 6:42 pm

    Do you sit on it often? I just bought two Wing chairs for my living room and they will be used often but I’m thinking about painting them. I’m just concerned about the durability

    Reply
  124. Emily says

    January 2, 2019 at 11:25 am

    Absolutely love this and about to tackle it…. did you do any prep before you started? “Clean” the upholstery Or something of the sort? I’m used to always sanding or degreasing my painting projects and have never tried fabric painting… yet. Thanks so much for your post and brilliant ideas!

    Reply
    • Christy says

      January 2, 2019 at 10:50 pm

      Hi, Emily-
      The fabric on my chair was relatively clean, so I just picked up a brush and started painting. From what others have told me, this technique will cover most stains. Of course, if there’s anything crusty on it I would take the time to clean it and let it dry before picking up a paintbrush. Good luck with your project!
      Christy

      Reply
  125. Milie says

    September 17, 2022 at 11:56 am

    I am doing the same chair and I find your style inspiring

    Reply

Leave a Reply Cancel reply

Your email address will not be published. Required fields are marked *

Recipe Rating


This site uses Akismet to reduce spam. Learn how your comment data is processed.

Primary Sidebar

Lowest prices. Straight Teeth,

•Don’t Miss A Thing!!•

•Do You Know Jesus?•

•Featured In•

Holiday Gift Ideas

Footer

  • Email
  • Facebook
  • Instagram
  • Pinterest

Copyright © 2023 · 11 Magnolia Lane· Blog Design by Little Blue Deer
Privacy Policy

11 MAGNOLIA LANE IS A PARTICIPANT IN THE AMAZON SERVICES LLC ASSOCIATES PROGRAM, AN AFFILIATE ADVERTISING PROGRAM DESIGNED TO PROVIDE A MEANS FOR US TO EARN ADVERTISING FEES BY ADVERTISING AND LINKING TO AMAZON.COM AND AFFILIATED SITES. AS AN AMAZON ASSOCIATE, WE EARN FROM QUALIFYING PURCHASES. WE ALSO PARTICIPATE IN SEVERAL OTHER AFFILIATE PROGRAMS; THIS INCOME ALLOWS US TO MAINTAIN THE QUALITY OF YOUR USER EXPERIENCE AND KEEPS OUR CONTENT FREE. WHEN YOU PURCHASE THROUGH ANY OF OUR AFFILIATE LINKS, WE EARN A SMALL COMMISSION AND YOU DON’T PAY A CENT MORE THAN YOU WOULD OTHERWISE; THAT WOULD BE TACKY!   READ OUR FULL PRIVACY AND DISCLOSURE POLICY {HERE}.
  ©11 Magnolia Lane 2019. Unauthorized use and/or duplication of this material without express and written permission from this blog’s authors and/or owners is strictly prohibited. Please email us at admin@11magnolialane.com for more information.

  • MEET CHRISTY & AMY
    • IF YOU’RE NEW HERE…
    • WORK WITH US
    • 11 MAGNOLIA LANE 101
    • DISCLOSURE + PRIVACY (the fine print)
    • BEST OF 11 MAGNOLIA LANE
    • Back
  • TOUR OUR HOMES
    • TOUR OUR HOMES
    • CHRISTY’S MAGNOLIA COTTAGE
    • CHRISTY’S MCC HOUSE
    • AMY’S NEW HOME BUILD
    • HOLIDAY HOME TOUR SERIES
    • SPRING HOME TOUR SERIES
    • Back
  • CELEBRATIONS
    • EVENTS + ENTERTAINING
    • GIFTS
    • HOLIDAYS
    • RECIPES
    • Back
  • HOME
    • CLEANING
    • DECORATING
    • ORGANIZING
    • ROOM BY ROOM
      • BATHROOMS
      • BEDROOMS
      • CLOSETS
      • CRAFT ROOMS + OFFICES
      • DINING ROOMS
      • KIDS’ ROOMS
      • KITCHENS
      • LAUNDRY ROOMS
      • LIVING + GREAT ROOMS
      • OTHER SPACES
      • PANTRIES
      • PLAYROOMS + BONUS ROOMS
      • PORCHES + OUTDOOR SPACES
      • Back
    • TIPS
    • Back
  • SHOP
    • SHOP OUR INSTAGRAM
    • SHOP OUR AMAZON STORE
    • FRIDAY FAVORITE FINDS
    • 11 ML ETSY SHOP
    • 11ML ORGANIZING SHOP
    • Back
  • PROJECTS
    • CRAFTS
    • DIY PROJECTS + TUTORIALS
    • FURNITURE
    • PRINTABLES
    • WINDOWS, DOORS, + WALLS
    • Back
  • LIFE
    • FRIDAY FREE FOR ALL
    • HEALTH
    • SIMPLY ON SUNDAY
    • TRAVEL
    • Back
  • CONTACT
    • Email
    • Facebook
    • Instagram
    • Pinterest
58800 shares
  • 1596