• Skip to primary navigation
  • Skip to main content
  • Skip to primary sidebar
  • Skip to footer
  • MEET CHRISTY & AMY
    • IF YOU’RE NEW HERE…
    • WORK WITH US
    • 11 MAGNOLIA LANE 101
    • DISCLOSURE + PRIVACY (the fine print)
    • BEST OF 11 MAGNOLIA LANE
  • TOUR OUR HOMES
    • TOUR OUR HOMES
    • CHRISTY’S MAGNOLIA COTTAGE
    • CHRISTY’S MCC HOUSE
    • Christy’s Stuttgart Flat
    • Amy’s Virginia Craftsman Home Tour
    • AMY’S VIRGINIA CRAFTSMAN Building Process
    • HOLIDAY HOME TOUR SERIES
  • CELEBRATIONS
    • EVENTS + ENTERTAINING
    • GIFTS
    • HOLIDAYS
    • RECIPES
  • HOME
    • CLEANING
    • DECORATING
    • ORGANIZING
    • ROOM BY ROOM
      • BATHROOMS
      • BEDROOMS
      • CLOSETS
      • CRAFT ROOMS + OFFICES
      • DINING ROOMS
      • KIDS’ ROOMS
      • KITCHENS
      • LAUNDRY ROOMS
      • LIVING + GREAT ROOMS
      • OTHER SPACES
      • PANTRIES
      • PLAYROOMS + BONUS ROOMS
      • PORCHES + OUTDOOR SPACES
    • TIPS
  • SHOP
    • SHOP OUR INSTAGRAM
    • SHOP OUR AMAZON STORE
    • FRIDAY FAVORITE FINDS
  • PROJECTS
    • CRAFTS
    • DIY PROJECTS + TUTORIALS
    • FURNITURE
    • PRINTABLES
    • WINDOWS, DOORS, + WALLS
  • LIFE
    • FRIDAY FREE FOR ALL
    • HEALTH
    • SIMPLY ON SUNDAY
  • TRAVEL
  • CONTACT
    • Email
    • Facebook
    • Instagram
    • Pinterest

11 Magnolia Lane

Sharing our easy DIYs, decorating, entertaining and more!

How to Remove the Carpet from Your Stairs

April 5, 2017 By Amy 5 Comments

This Post Contains Affiliate Links

848 shares
  • 17


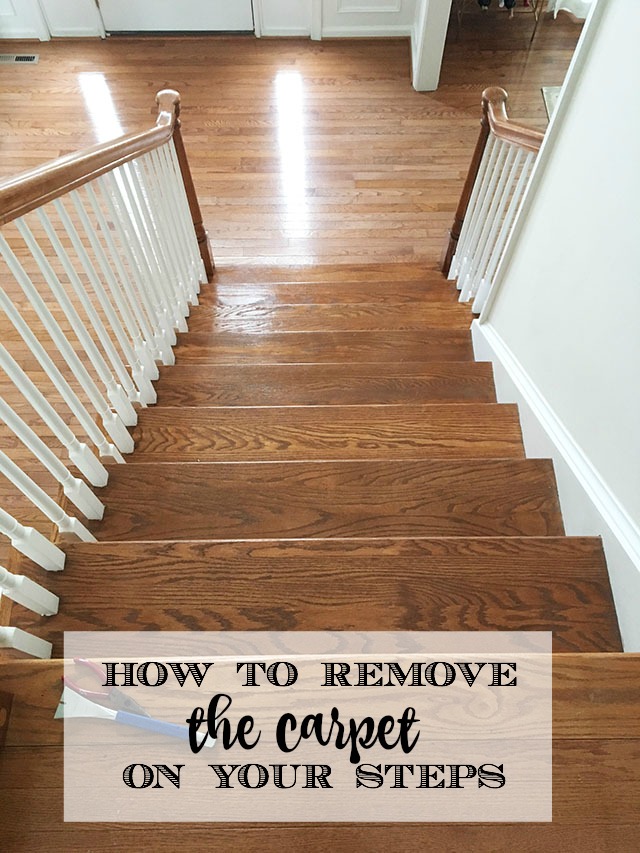
I have already showed some pictures of our mini stair makeover but I thought I’d circle back and talk a little bit more about the process of removing the carpet runner on our stairs. Not only was this fairly  simple to do but the stairs look so much better now. I can’t get over the difference ripping the carpet off made.


How to Remove the Carpet from your Stairs

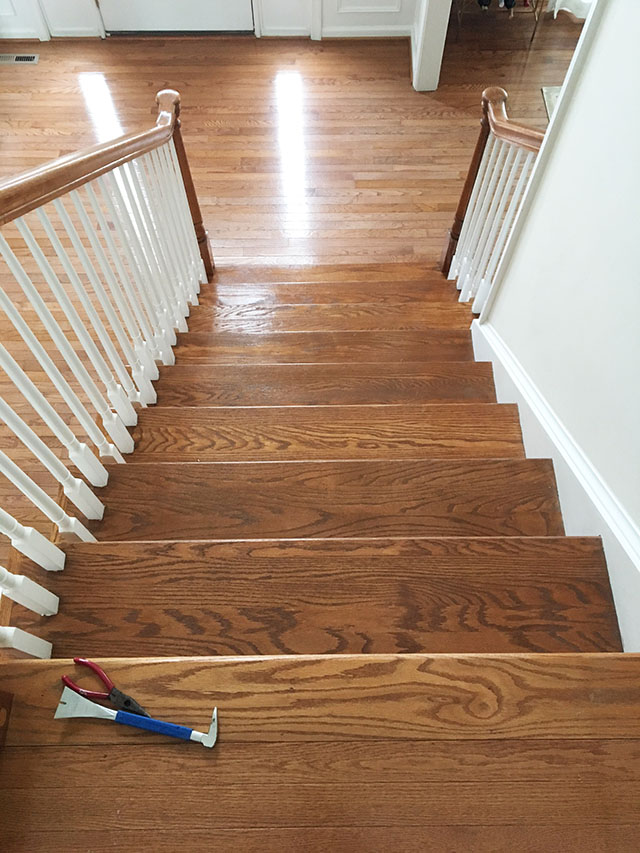
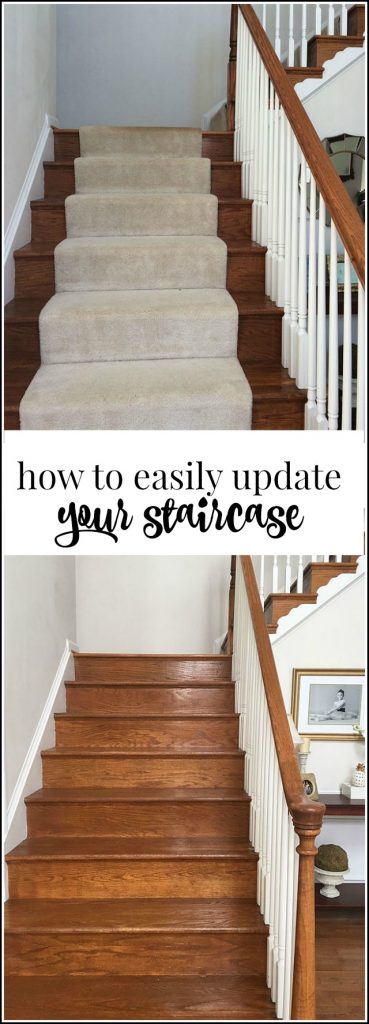
We had builder-grade runner that was showing its age {our house is 11 years old} with oak treads underneath.  {If you don’t have hardwood stairs under your carpet, we have a great tutorial on that process HERE.} The runner had over the years had gotten worn and dirty, and even though it was functional I just didn’t love how the carpet looked. The real wood underneath was prettier, so I figured I’d show it off.


I had consulted two flooring professionals before I started while we were getting some other hardwood estimates, and they both told me that I couldn’t just rip the carpet off. One said the floors would be too faded from the sun, the other said there would be too much damage from the tack strips.  I actually found neither of those issues to be the case. Maybe we were just lucky, but I think sometimes you just have to jump in a project and see what happens! The stairs aren’t 100% pristine, by any means, but I’ll take them over dirty carpet any day.


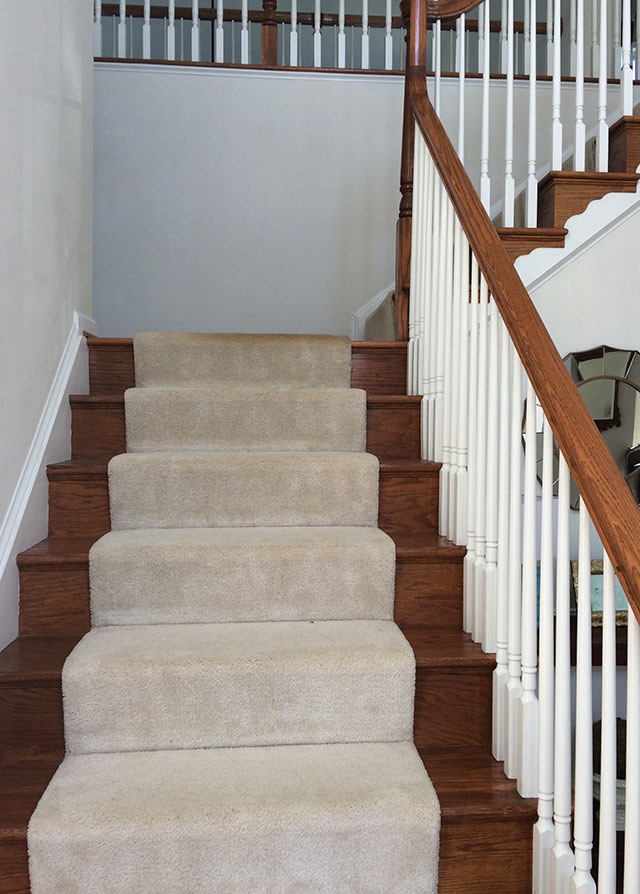
Our steps are divided, so the stairs you see above go down to our front door. Behind them we have a full set of stairs that goes into the back of our home toward the kitchen. We started with the carpet on the shorter front staircase first to see what would happen.


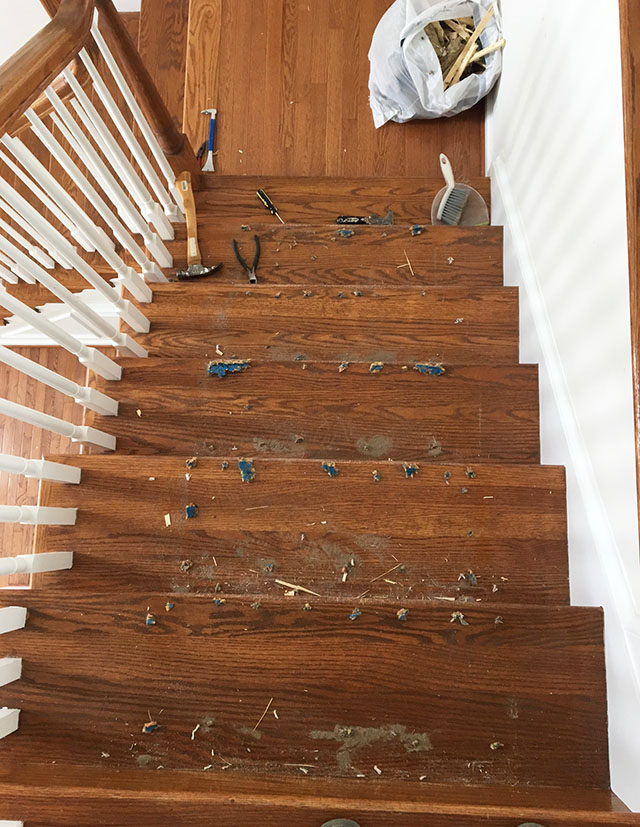
My teenage son and his nice strong arms were key to this project, pulling the carpet up with about 100 staples/nails definitely took a little muscle. He did that job and I went along behind him and pried up all the staples. I found the most useful tools were a small crowbar, a flathead screwdriver and this pointed putty knife. If you do this, be sure to wear eye protection and work gloves, as the little pieces can go flying and they are very sharp.


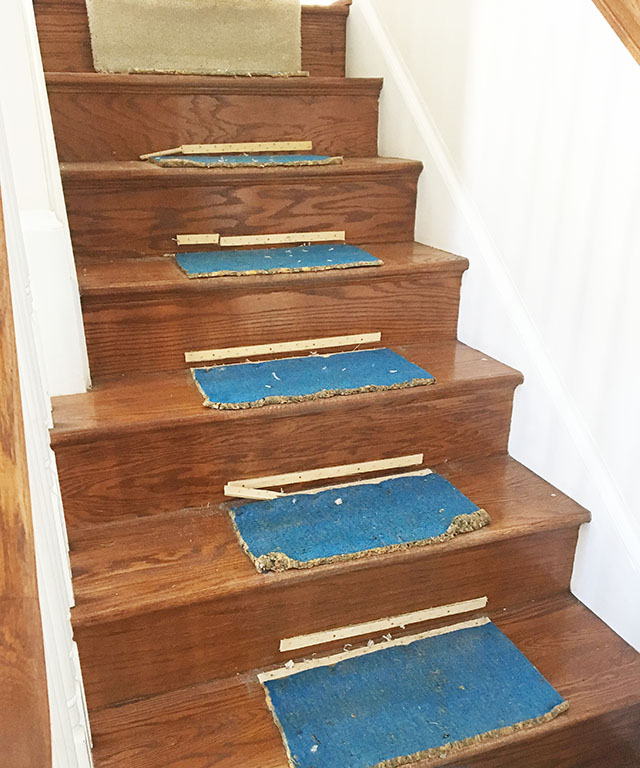
We found most of the damage to the stairs came from us digging too deep to get embedded staples out rather than from pulling off the strips or the carpet. For the most part, the staples popped out pretty easily. There were quite a few of them in each step but in the end, this wasn’t nearly as horrible as a job as I thought it would be.


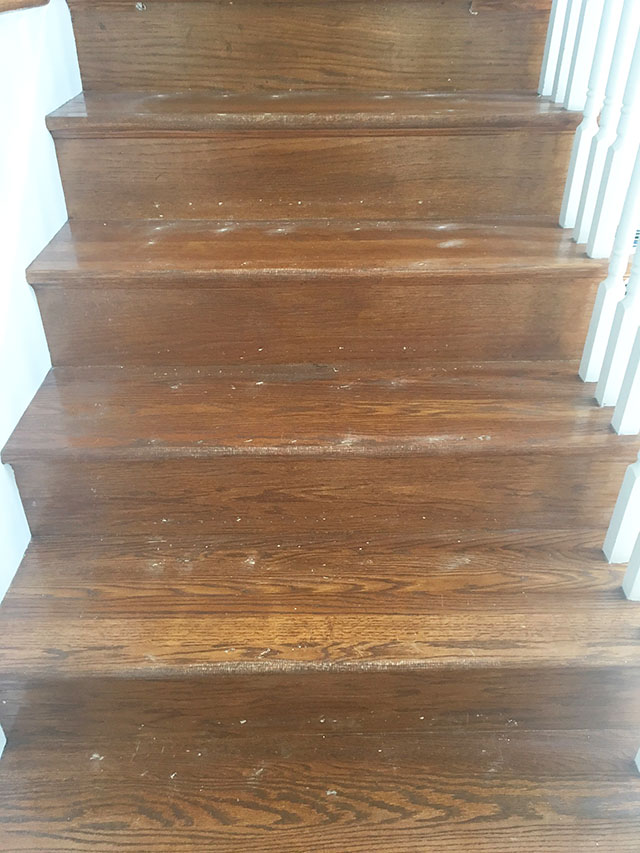
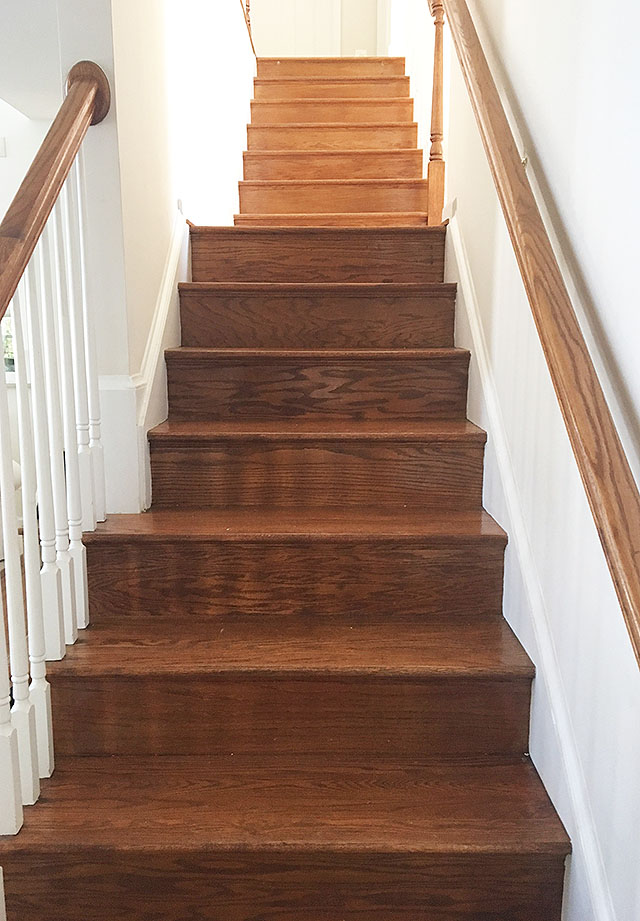
Once the carpet was removed and all the staples and nails pulled out I swept the stairs then gave them a good vacuuming. I was a little scared by the amount of dust had accumulated under the carpet, another reason to say good riddance to the carpet, yuck.  Then I gave each stair a good wipe down with a rag to clean them up further and to make sure I hadn’t missed any staples. The front steps only need a little touching up (I actually used a furniture touch up pen) and a quick polish with some furniture polish and they looked great at this point. The back steps had more damage {you can see them above}, it seemed the installers had put twice as many staples on them for some reason? For the back steps, I gave each stair and riser a quick sand, wiped them all down again, then I filled the nails holes in with some wood putty.  Once the putty was dry {and sanded down yet again} I used a rag and went over each step with a light coat of stain {our floors are MiniWax in Gunstock}. That was it! I did purchase some floor ‘polish’ which I may try to use to spiff them up further but for now I think they look great. So much better than with a dirty carpet runner.


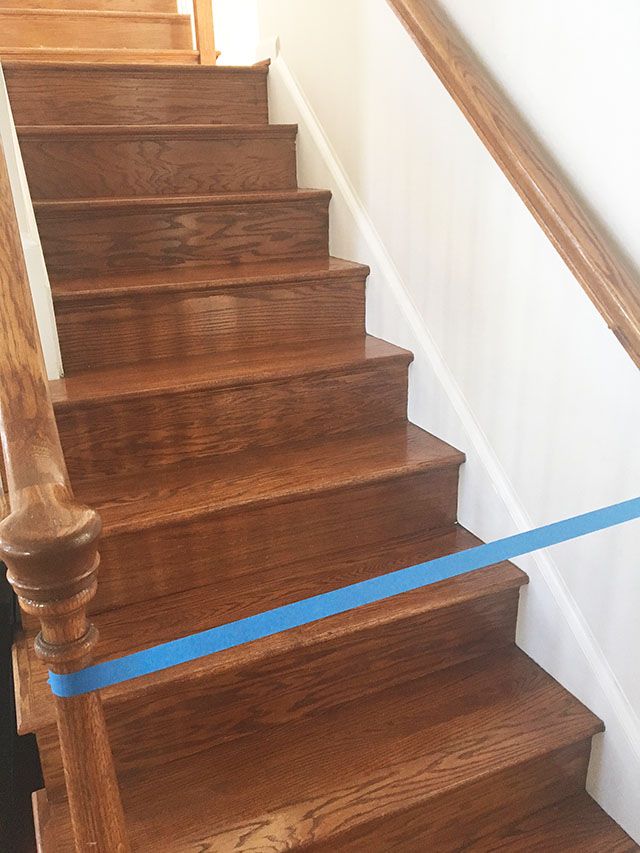
The tape kept our kids and dogs off them for a few hours until they dried. The only drawback is that now it sounds like the house is coming DOWN when our two large labradors bolt down the steps each morning for breakfast. They were a bit surprised the first time they hit the slippery surface 🙂 I still may add a runner on the back steps to help with some of that noise, I am not sure yet, I am considering this one and just stapling it down. Overall it just looks so much better I can’t believe I waited all this time to tackle this project.


If you would like to see more of our projects, you can see our post from last year with Two Years of Home Projects in a Builder Home.  I just realized we are almost to year three, I guess I should get to work on that post next :).

If you aren’t ready to tackle this project right now, here is an easy to pin image so you can remember it for later!

Have old carpet on your stairs? Removing it is easier then you think, see how to spiff up your steps in this easy tutorial.


We also removed our large, builder mirror as part of our bathroom makeover, you can see that post HERE. 

XO,


small-amy-new-headshot-summer-2016-2 copy
icon-facebook-1icon-instagram-1icon-pinterest-1icon-twitter-1NEW Google+
 

Our posts contain affiliate links.  If you make a purchase after clicking on these links, we will earn a small commission, which helps to keep our content free.  You don’t pay a cent more than you would otherwise, since that would be tacky! Please see our full disclosure policy here.


Filed Under: Cleaning, DIY/Projects/Tutorials Tagged With: DIY project, hallway, stair makeover, stairs

Reader Interactions

Comments

  1. Wood Stairs Manufacturers says

    January 2, 2019 at 1:10 am

    Wow nicely done looks like its done by professionals

    Reply
  2. Hazel says

    March 14, 2020 at 10:03 pm

    What grit sand paper did you use? Awesome job by the way

    Reply
    • Amy says

      March 19, 2020 at 12:36 pm

      I can’t remember for sure, nothing that would scratch too much and I just went over it very lightly. Thanks, Amy

      Reply
  3. Patty hein says

    September 4, 2021 at 8:51 am

    I have a 1832 home and had a ugly carpet runner on stairs, decided to pull but was scared to death of what was under, low and behold they are beautiful. Thank you for the inspiration!!!!!

    Reply
    • Amy says

      September 9, 2021 at 10:20 am

      I am so glad you found this helpful! Exciting that you found beautiful floors, thanks for sharing! XO, Amy

      Reply

Leave a Reply Cancel reply

Your email address will not be published. Required fields are marked *

Recipe Rating


This site uses Akismet to reduce spam. Learn how your comment data is processed.

Primary Sidebar

Lowest prices. Straight Teeth,

•Don’t Miss A Thing!!•

•Do You Know Jesus?•

•Featured In•

Footer

  • Email
  • Facebook
  • Instagram
  • Pinterest

Copyright © 2022 · 11 Magnolia Lane· Blog Design by Little Blue Deer
Privacy Policy

11 MAGNOLIA LANE IS A PARTICIPANT IN THE AMAZON SERVICES LLC ASSOCIATES PROGRAM, AN AFFILIATE ADVERTISING PROGRAM DESIGNED TO PROVIDE A MEANS FOR US TO EARN ADVERTISING FEES BY ADVERTISING AND LINKING TO AMAZON.COM AND AFFILIATED SITES. AS AN AMAZON ASSOCIATE, WE EARN FROM QUALIFYING PURCHASES. WE ALSO PARTICIPATE IN SEVERAL OTHER AFFILIATE PROGRAMS; THIS INCOME ALLOWS US TO MAINTAIN THE QUALITY OF YOUR USER EXPERIENCE AND KEEPS OUR CONTENT FREE. WHEN YOU PURCHASE THROUGH ANY OF OUR AFFILIATE LINKS, WE EARN A SMALL COMMISSION AND YOU DON’T PAY A CENT MORE THAN YOU WOULD OTHERWISE; THAT WOULD BE TACKY!   READ OUR FULL PRIVACY AND DISCLOSURE POLICY {HERE}.
  ©11 Magnolia Lane 2019. Unauthorized use and/or duplication of this material without express and written permission from this blog’s authors and/or owners is strictly prohibited. Please email us at admin@11magnolialane.com for more information.

  • MEET CHRISTY & AMY
    • IF YOU’RE NEW HERE…
    • WORK WITH US
    • 11 MAGNOLIA LANE 101
    • DISCLOSURE + PRIVACY (the fine print)
    • BEST OF 11 MAGNOLIA LANE
    • Back
  • TOUR OUR HOMES
    • TOUR OUR HOMES
    • CHRISTY’S MAGNOLIA COTTAGE
    • CHRISTY’S MCC HOUSE
    • AMY’S NEW HOME BUILD
    • HOLIDAY HOME TOUR SERIES
    • SPRING HOME TOUR SERIES
    • Back
  • CELEBRATIONS
    • EVENTS + ENTERTAINING
    • GIFTS
    • HOLIDAYS
    • RECIPES
    • Back
  • HOME
    • CLEANING
    • DECORATING
    • ORGANIZING
    • ROOM BY ROOM
      • BATHROOMS
      • BEDROOMS
      • CLOSETS
      • CRAFT ROOMS + OFFICES
      • DINING ROOMS
      • KIDS’ ROOMS
      • KITCHENS
      • LAUNDRY ROOMS
      • LIVING + GREAT ROOMS
      • OTHER SPACES
      • PANTRIES
      • PLAYROOMS + BONUS ROOMS
      • PORCHES + OUTDOOR SPACES
      • Back
    • TIPS
    • Back
  • SHOP
    • SHOP OUR INSTAGRAM
    • SHOP OUR AMAZON STORE
    • FRIDAY FAVORITE FINDS
    • 11 ML ETSY SHOP
    • 11ML ORGANIZING SHOP
    • Back
  • PROJECTS
    • CRAFTS
    • DIY PROJECTS + TUTORIALS
    • FURNITURE
    • PRINTABLES
    • WINDOWS, DOORS, + WALLS
    • Back
  • LIFE
    • FRIDAY FREE FOR ALL
    • HEALTH
    • SIMPLY ON SUNDAY
    • TRAVEL
    • Back
  • CONTACT
    • Email
    • Facebook
    • Instagram
    • Pinterest
848 shares
  • 17