• Skip to primary navigation
  • Skip to main content
  • Skip to primary sidebar
  • Skip to footer
  • MEET CHRISTY & AMY
    • IF YOU’RE NEW HERE…
    • WORK WITH US
    • 11 MAGNOLIA LANE 101
    • DISCLOSURE + PRIVACY (the fine print)
    • BEST OF 11 MAGNOLIA LANE
  • TOUR OUR HOMES
    • TOUR OUR HOMES
    • CHRISTY’S MAGNOLIA COTTAGE
    • CHRISTY’S MCC HOUSE
    • Christy’s Stuttgart Flat
    • Amy’s Virginia Craftsman Home Tour
    • AMY’S VIRGINIA CRAFTSMAN Building Process
    • HOLIDAY HOME TOUR SERIES
  • CELEBRATIONS
    • EVENTS + ENTERTAINING
    • GIFTS
    • HOLIDAYS
    • RECIPES
  • HOME
    • CLEANING
    • DECORATING
    • ORGANIZING
    • ROOM BY ROOM
      • BATHROOMS
      • BEDROOMS
      • CLOSETS
      • CRAFT ROOMS + OFFICES
      • DINING ROOMS
      • KIDS’ ROOMS
      • KITCHENS
      • LAUNDRY ROOMS
      • LIVING + GREAT ROOMS
      • OTHER SPACES
      • PANTRIES
      • PLAYROOMS + BONUS ROOMS
      • PORCHES + OUTDOOR SPACES
    • TIPS
  • SHOP
    • SHOP OUR INSTAGRAM
    • SHOP OUR AMAZON STORE
    • FRIDAY FAVORITE FINDS
  • PROJECTS
    • CRAFTS
    • DIY PROJECTS + TUTORIALS
    • FURNITURE
    • PRINTABLES
    • WINDOWS, DOORS, + WALLS
  • LIFE
    • FRIDAY FREE FOR ALL
    • HEALTH
    • SIMPLY ON SUNDAY
  • TRAVEL
  • CONTACT
    • Email
    • Facebook
    • Instagram
    • Pinterest

11 Magnolia Lane

Sharing our easy DIYs, decorating, entertaining and more!

Built-in Bookshelves from IKEA Billy Bookcases–How to do it

May 18, 2015 By Amy 95 Comments

This Post Contains Affiliate Links

197633 shares
  • 466

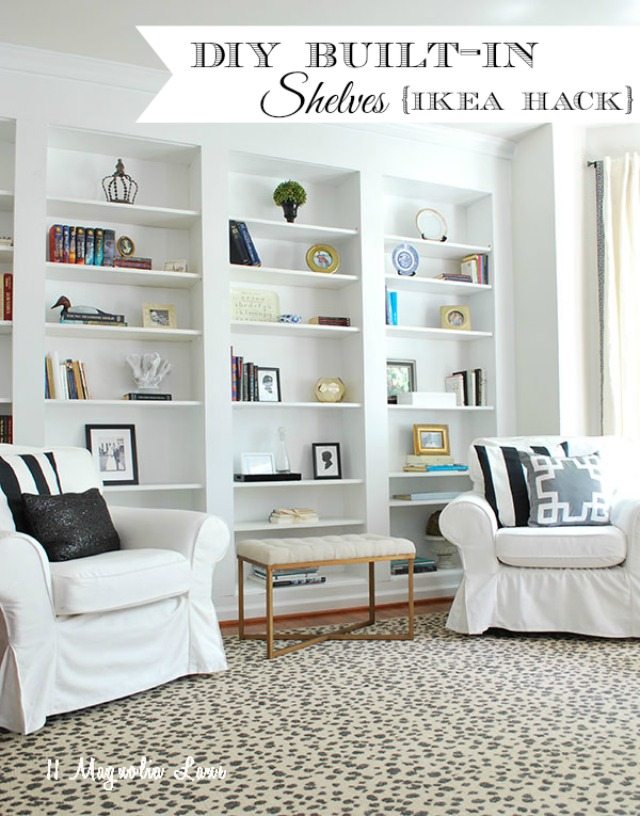
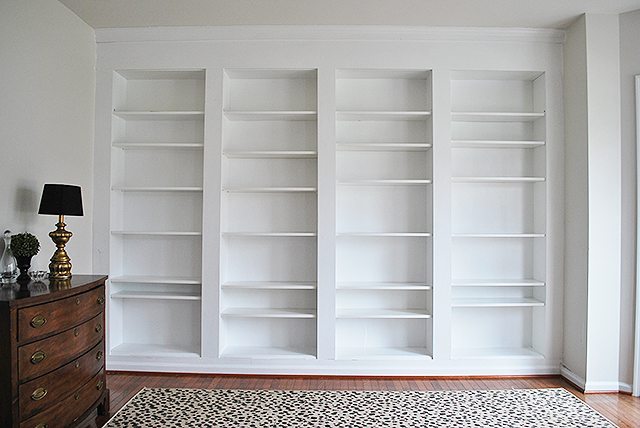
I showed off these fabulous IKEA bookshelves my Dad recently built for us in this post HERE...If you missed it, this was just a blank wall in our living room. This post has the step by step tutorial of how to build these bookshelves using IKEA Billy Bookcases (or similar inexpensive bookcases). They look just like built-ins and provide great storage!

diy-easy-built-in-shelves-using-billy-ikea-bookcases-how-to-build-bookcases

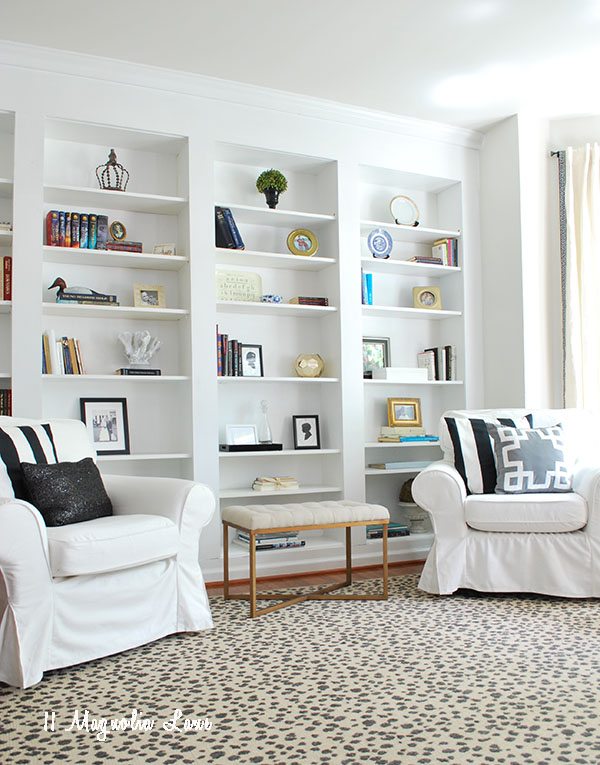
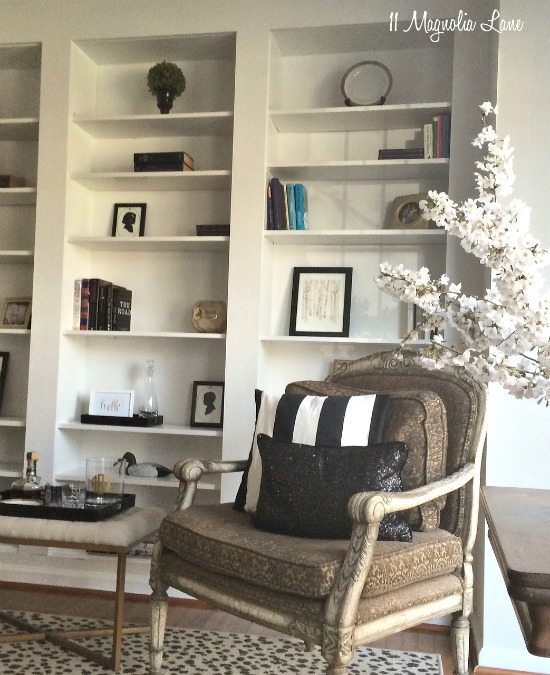
After they were built, I decorated and styled them and I showed them off in this post HERE. 

New-Ikea-Billy-Built-In-Shelves-Header

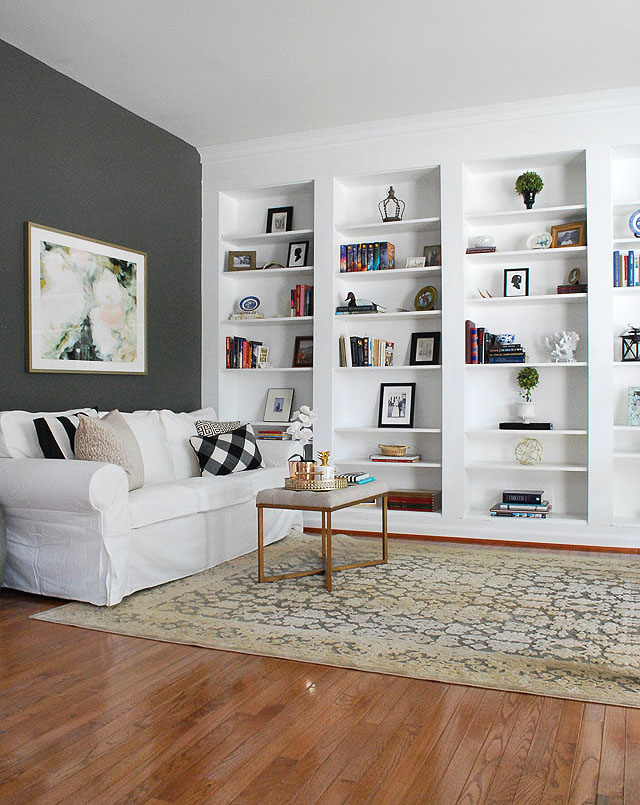
A year or so later, I painted the room a darker color and now the shelves really pop. You can read about that update HERE.

bookshelves-corner

 Since I didn’t actually do most of the hands-on work, I suppose it is easy for me to say how simple this is, but this project is certainly simple compared to building a wall of shelves from scratch.

A quick recap if you missed the first post: I’d been dreaming about building these shelves since we moved in our new home. At one point last year, I showed my Dad a picture of some shelves that were similar and asked if he could help me with the harder parts of construction. He basically showed up one day with the lumber and did the entire project for me himself; I sure am one lucky girl!

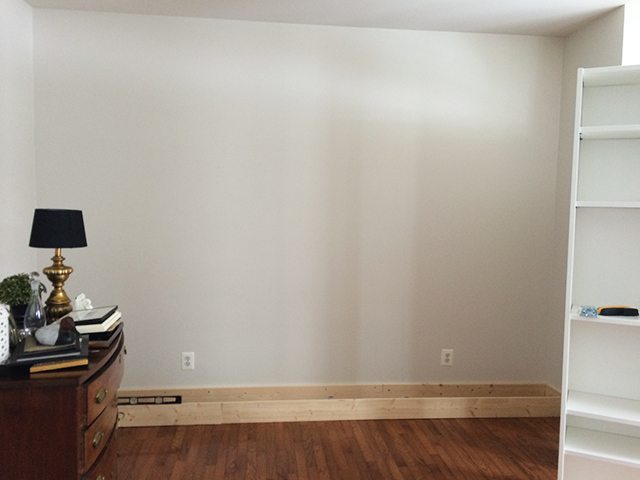
Here is the space I started with. This picture is from our move-in day before we had the room painted pale gray. This is the home’s formal living room just inside the front door, we use it more as a quiet reading/library space since formal entertaining isn’t high on our list these days.

Sources are linked throughout and listed at the end of the post.

before-library-shelves

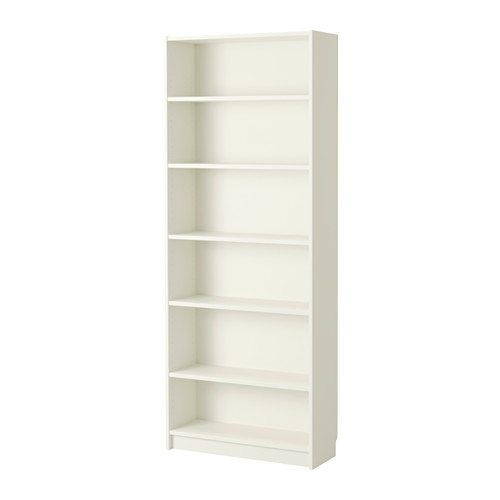
What is nice about the space, which is open to our foyer, is that the walls already created the perfect “niche” to put shelves in. I had two shelves already from my former home office so I picked up two more tall Billy bookshelves from IKEA.

How to Build Built-In Bookcases from IKEA Billy Bookshelves

To figure out how to best use the space, the picture below shows how we did the math. I measured the space in between the walls, in our case it was almost exactly 12 feet, or 144 inches, then I subtracted out the width of the bookcases which are 31″ each, or a total of 124 inches. That left me with 20 inches of open space to cover over with trim, so I knew we would need five 5″ boards on the ends and in between each shelf.

shelves-before-extension-measure

Once I had that calculated, I just had to figure out the top part of the shelves. I knew I wanted to go as close to the ceiling as I could, and as luck would have it I found out you can purchase Billy Shelf Extenders  from IKEA to make the standard bookshelves taller.

billy-height-extension-unit-white__0252393_PE391191_S4

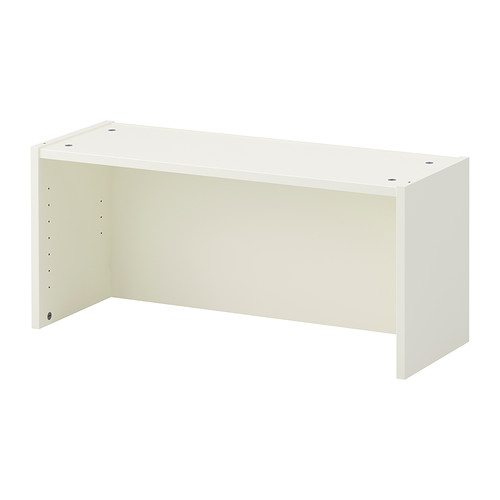
This is the shelf we used (four of them) in case you aren’t familiar with them.  If you don’t live near an IKEA, these are a good online substitute, but check your measurements!

billy-bookcase-white__0252367_PE391149_S4

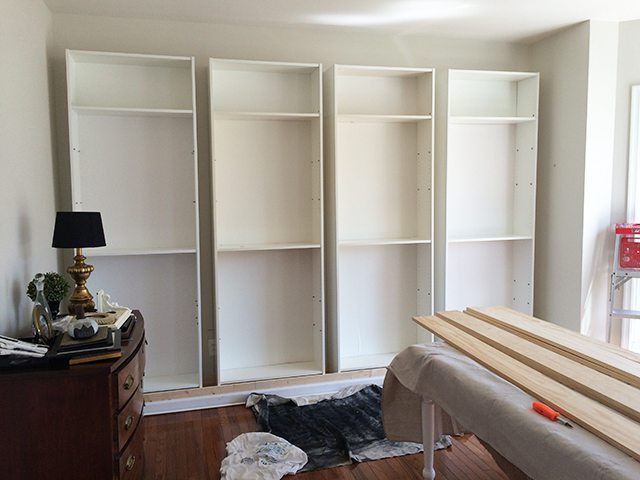
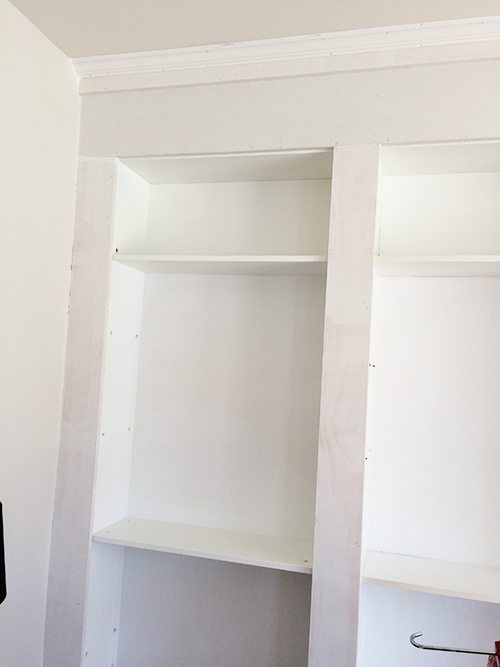
We added them to the top of each shelf which added another 14″ to the height of the shelves and made such a huge difference. You can see them below with the additional height, which got them much closer to the ceiling.

shelves 1

Here is how we {by we, I mean my Dad} built them.

I should add that to do this job, a mitre saw and a nail compressor are helpful in addition to other basic tools and painting equipment.

He started by building essentially a rectangular box to set the shelves in to keep them steady and in place.

shelf base

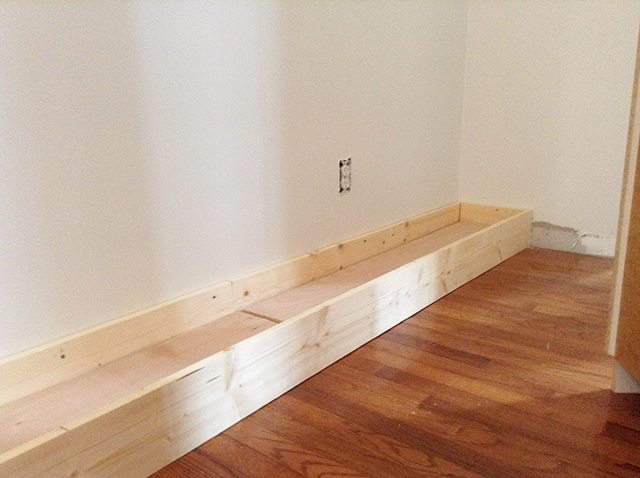
We also pulled the molding off the wall, then saved it to use again once we were done.

We did not cut a hole in the back of the bookshelves for the outlets, although you certainly could.

shelf-base-full

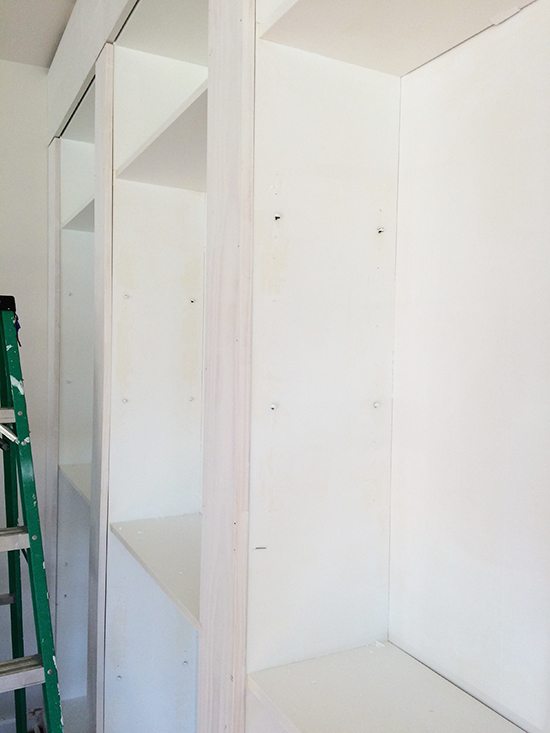
From there, he set the shelves in the base, spaced evenly, and then secured them to the wall.

secure to wall

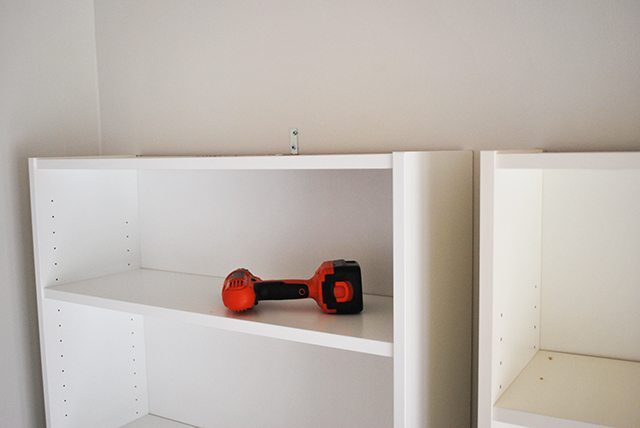
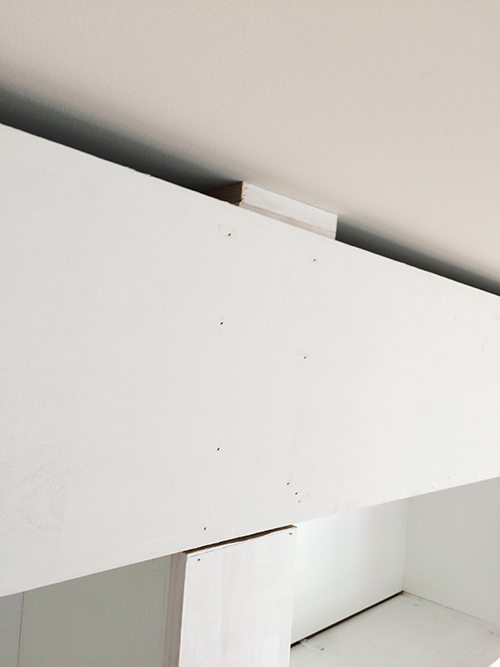
Once they were secured, he cut and painted the boards to “build” them into the walls. All the boards came from the molding and trim section at Home Depot. Below shows how he secured the large top board to the ceiling and the bookcases. This front board was later covered with more molding so the gap above it didn’t show.

securing-shelves-to-top

Just a quick note in here about why you don’t see lights along the top of these shelves as was my original intention. My father, who spent his career as a Fire Chief, was not going to let me drop extension cords behind the shelves to run power to the lighting along the top!

Before we started building, we hired an electrician to come out to place a new outlet at the ceiling on top of the shelves so we could plug the cords into it directly. However, our home was built during the early 2000’s building boom, and our builder used a construction technique rare in single-family homes known as “pre-cast” construction. Essentially our house doesn’t have traditional studs, but rather our exterior walls are solid concrete. It’s nice for our heating bills, but it makes it pretty much impossible to run a wire up the wall behind the drywall.

After about 100 holes in the wall and a hefty electrician bill, we gave up on the lighting idea. I think they look nice enough without it.

Here is a closer shot with the molding boards tacked on. He gave everything a coat of paint prior to nailing it up, then everything got another coat of paint at the very end. (Tip: you can take one of the shelves in to the store and have them tint your white paint to match  exactly)

boards on shelves

After all the construction was done, we caulked the gaps, then I spent an evening spackling all the little tiny holes in the sides of the bookshelves. The spackle will pop out if I want to arrange the shelves differently but it just made them look much more finished.

spackling-shelves

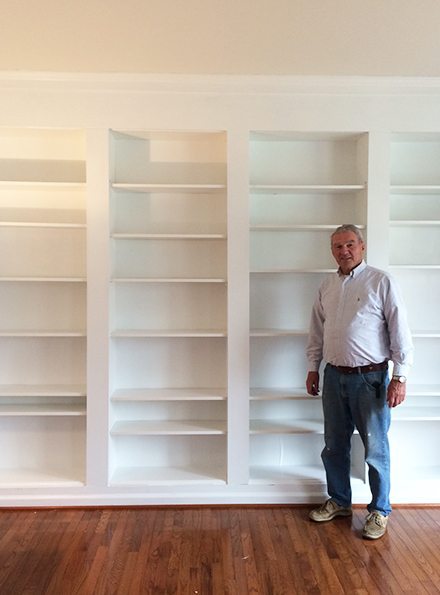
Here is a “finished” shot of them {minus some touch-up areas}. Aren’t they beautiful?

shelves-complete

And again, here is my Dad who gets all the credit for this project. I bet he’ll run for the golf course or the baseball field for sure the next time I say “So Dad, I was thinking about doing this project– would you like to help?” 🙂  but in the meantime, I am so grateful that he did this for us. If you have questions, please leave them in the comments, and I’ll ask ‘the man.’

dad-new-library-shelves

library-fall-home-tour

Bookshelves

Update: More recently we painted and restyled the room, you can see how it currently looks in this post HERE.

Sources

See the other posts on this project : The How To Build Them and The Final “Styled” Reveal!

Header-library-bookshelves-ikea-hack-wide copy

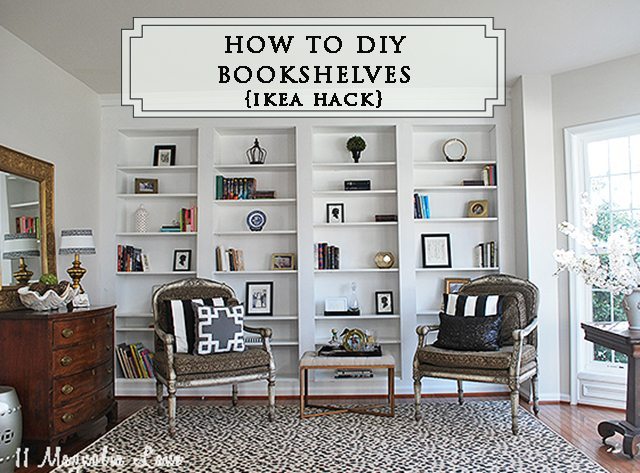
Here is an easy-to-pin image so you can remember this project for your next open weekend!

How to easily DIY built-in bookcases from IKEA Billy book shelves, and easy IKEA hack you can do in a weekend.

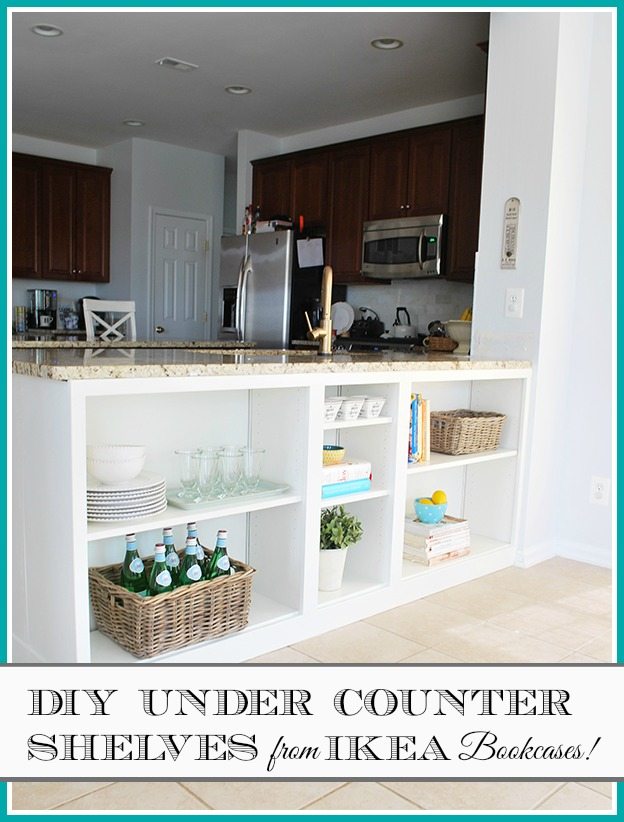
You can also see how I used Billy bookcases to build additional shelving under the counter in our kitchen HERE.

header-under-counter-shelves-complete-600x800

plain-ikea-hack-shelves-done-billy

If you would like to see more of our home, here are some other posts:

Our Complete Home Tour

2 Years of Projects {Recap} Updating a Builder Home

Holiday Home Tour

DIY Mudroom from a Coat Closet

{You can follow more of our DIY projects via the buttons under my photo!}

Organize your home decor with our Whole House Home Decor Planner

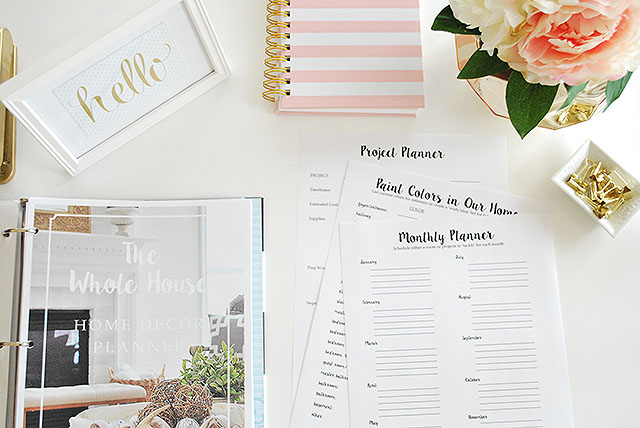
We also offer a FREE Printable Whole House Home Decor Planner to help you organize and simplify your home decorating process. Simply click HERE for more information or to receive your free printable planner.

XO,

small-amy-new-headshot-summer-2016-2 copy
icon-facebook-1icon-instagram-1icon-pinterest-1icon-twitter-1

We promise to never sell your email information. Our posts contain affiliate links.  If you make a purchase after clicking on these links, we will earn a small commission, which helps to keep our content free.  You don’t pay a cent more than you would otherwise, since that would be tacky! Please see our full disclosure policy here.

Click here to subscribe

SaveSave

SaveSave

SaveSave

SaveSave

SaveSave

YOU MIGHT ALSO LIKE THESE POSTS... :

Kathie's Living Room Mini-Tour
Becky's North Carolina House
Mary's Texas Home Tour: Part 2
Mary's Texas Home Tour: Part 1

Filed Under: DIY/Projects/Tutorials, HOME DECOR, Living/Great Rooms, PROJECTS, Wall & Door Decor Tagged With: bookshelves, Home Tour, how to build, library, shelves

Reader Interactions

Comments

  1. Sherry @ No Minimalist Here says

    May 18, 2015 at 1:18 pm

    I love the bookcases and your dad did an amazing job!

    Reply
  2. Jessica says

    May 18, 2015 at 2:24 pm

    This is amazing! Your dad did a fabulous job and you styled them perfectly–love it!

    Reply
  3. brett says

    May 19, 2015 at 9:39 am

    So smart to use pre-made shelving – I bet this saved a ton of time and effort! Your dad is a sweet, sweet man for taking on this project with you! xx, b

    Reply
  4. julia says

    June 8, 2015 at 6:02 pm

    hi – do you remember your costs for supplies on top of the shelves? looking to do something similar and it looks awesome!

    Reply
    • Craig Smith says

      November 9, 2017 at 3:35 pm

      Thanks a lot Amy, because of you i have another project to do at my daughters house, your dad and I need to get together for some Dad time so we can relax, I love the finished project, looks great Dad, I’ll let you know how mine turns out.

      Reply
      • Amy says

        November 13, 2017 at 9:03 am

        Your daughter is lucky to have you to help! I can’t wait to hear how they turn out. We appreciate ours (and the guy who built them!) tremendously 🙂 Good luck! Thanks for sharing, Amy

        Reply
  5. Valerie says

    December 19, 2015 at 10:59 am

    Did you paint bookcases themselves or just trim?

    Reply
  6. Valerie says

    December 19, 2015 at 11:01 am

    Did you paint Billy’s and trim? Otherwise wouldn’t the fill for the holes show?

    Reply
  7. meredith says

    May 23, 2016 at 2:22 pm

    Hey! I was also wondering if you painted both the bookcases and the trim so they would match? Which paint color did you use?
    Thanks so much!

    Reply
    • Amy says

      May 24, 2016 at 9:25 am

      Yes–we painted all the bookcases and trim, just an off the shelf white. In another project I used BM White Dove and it was a close match to the white of IKEA Billy bookcases–you could try that. Amy

      Reply
      • Byron M. says

        June 14, 2017 at 3:56 pm

        Looks great! I noticed in some of the early pics your dad removed the electrical outlet plates. Did he cut openings for those on the book case? If so, what instructions do you have for that part? Thanks!

        Reply
      • Byron McKinney says

        June 29, 2017 at 4:54 pm

        What did you do for the electrical outlets on the wall? Did you plug anything into them, or cut a hole in the back of the bookshelf to be able to plug into the outlets?

        Reply
        • Amy says

          July 2, 2017 at 6:37 pm

          Hi Byron, sorry for the delay in my response! We just covered the outlets up in the end with the IKEA shelf backing. We didn’t need them, so they are behind the shelves. Hope that is helpful! Amy

          Reply
      • Sara says

        August 19, 2017 at 10:41 pm

        Did you sand the shelving before painting?

        Reply
        • Amy says

          August 21, 2017 at 3:23 pm

          No Sara, I really didn’t sand the shelving. Just where we filled in holes. Thanks! Amy

          Reply
      • Rebecca says

        June 28, 2020 at 7:37 am

        Did you have to prime the bookcases before painting or is it ok to apply paint directly to them?

        Reply
        • Amy says

          June 29, 2020 at 8:50 am

          I did not prime them, just painted right on! XO, Amy

          Reply
  8. Hord says

    May 30, 2016 at 6:37 am

    Wow! Well done to your dad! It looks amazing and so professional!

    Reply
  9. Amanda says

    June 12, 2016 at 9:08 am

    What size wood did you use to make the supporting box? Was it 2″x8″ or 1″x8″?
    looks so pretty. thank you

    Reply
    • Amy says

      June 13, 2016 at 2:58 pm

      Hi Amanda, they are 1×8’s. I hope that helps!
      Amy

      Reply
  10. Sam says

    June 18, 2016 at 12:20 am

    amazing job. Ypur dad did a great job. I have always wanted a bookshelves built ins and in our next house we are def doing this. My question is, the area where we want the bookcases has an ac vent on the floor, any suggestions how to work,with that situation? Also now sure why these are all in caps, didnt mean to, seems like the keyboard hasma mind of it’s own, lo, thanks

    Reply
    • Amy says

      June 19, 2016 at 2:24 pm

      Hi Sam–I would suggest cutting a hole with a jigsaw and using a vent so that the air can escape under the shelves, you can paint the vent to match. I hope that helps, you may want to put in two if you are doing 4 bookcases like we have so you don’t limit your air flow.

      Good luck!
      Amy

      Reply
  11. Joyce says

    August 21, 2016 at 8:18 pm

    Hi Amy, thanks so much for posting this. looks amazing! we have almost the exact same wall dimensions (148″ across) but a much shorter ceiling (93″ high). We were thinking of foregoing the billy extensions but wanted to still have roughly the same distance separating ceiling and floor from the shelves that you do. Do you mind letting me know what this is? any additional pics or dimensions of the box frame your dad made would also be greatly appreciated! thanks!

    Reply
    • Amy says

      August 25, 2016 at 8:44 am

      Hi Joyce, it is just short of a foot from the top of the bookcase to the ceiling so if you skip the extensions that should work well! Good luck with your project 🙂

      Amy

      Reply
    • BIANCA says

      September 23, 2019 at 8:04 pm

      Hi there, I am a little late to the party. This was so helpful and a lovely job. I definitely would want the lights as i feel that bookshelves are never completed without it, but you did amazing job decorating. I wonder if billy bookcases are good for the long term?

      Reply
  12. Carmen says

    November 5, 2016 at 8:07 pm

    Oh my, this is just beautiful! Thank you for sharing this with everybody. I love the picture of your dad, he looks really proud as he should be!
    i will definitely follow you as i’m starting to do some little things around the house.
    carmen

    Reply
    • Amy says

      November 6, 2016 at 1:10 pm

      Good luck with your projects Carmen! Thanks for your sweet comments 🙂 XO, Amy

      Reply
  13. Sabrina says

    December 30, 2016 at 11:46 am

    This looks amazing! I’m hoping this post inspires my husband!

    Reply
  14. JASON says

    January 20, 2017 at 9:43 pm

    THERE ARE MANY BILLY BOOKSHELF “HACKS” OUT THERE WHERE PEOPLE HAVE USED THEM TO BUILD “BUILT-IN” WALLS…AND YOURS IS BY FAR THE BEST LOOKING! DID YOU USE THE TRI-FOLD BACKING THAT CAME WITH THE BOOKSHELVES? I CAN’T SEE FROM THE PICS, BUT I’M NERVOUS ABOUT SEEING THE LINES FROM THE FOLDS. I’D LOVE TO KNOW YOUR THOUGHTS ON THIS. DID YOUR DAD PAINT THE BACK ALSO? DID THAT HIDE THEM?

    Reply
    • Amy says

      January 21, 2017 at 9:01 am

      Thank you so much for the compliment! We really LOVE our shelves 🙂 Yes, we did use the backers for stability. We just painted over them with the same paint. If you get up very close you can see the lines but I don’t think anyone would ever notice them. Good luck with your project!

      Amy

      Reply
      • Sara says

        August 19, 2017 at 10:36 pm

        Did you sand before you painted?

        Reply
  15. Sue says

    January 29, 2017 at 10:32 am

    Love these bookcases. I have similar wall that I’d love to add these to. When you set the bookcases in the supporting box, it looked like there would be a gap between the book cases and the wall that you needed to fill with something to be able to secure the book cases to the wall?

    Reply
  16. Becky says

    February 26, 2017 at 8:39 am

    This is the best hack yet! The idea of the support box solves my concern for stability. I am putting my “built-ins” on top of 2 lateral files with an open area between at the bottom. Good idea Dad, thanks!!! Did you secure the bookcases only at the top and bottom and the 2 walls or did you also put some L brackets on sides between the cases as well? The other thought I had was securing them to each other. Not sure which would be best.

    Reply
    • Amy says

      March 1, 2017 at 12:50 pm

      Hi Becky–Ah, sorry I thought I answered you. I guess I didn’t! No we only secured the top and the bottom, it is very stable especially with the boards fronting them. Hope that helps!
      Thanks 🙂

      Amy

      Reply
  17. Ns25 says

    March 3, 2017 at 5:54 pm

    Incredible job and thank you for the step by step guide.

    Reply
    • Amy says

      March 6, 2017 at 1:57 pm

      Thank you!!!
      XO,
      Amy

      Reply
  18. L. Natarus says

    April 24, 2017 at 5:00 pm

    They are absolutely beautiful ! I bet your dad is a really cool dad . ?I would love more info on this if you could contact me on Facebook or here. Especially the size of the box he made to put it in and what he used to secure it to the wall & ceiling . Thanks

    Reply
  19. Byron McKinney says

    June 29, 2017 at 4:55 pm

    What did you do for the electrical outlets on the wall? Did you plug anything into them, or cut a hole in the back of the bookshelf to be able to plug into the outlets?

    Reply
  20. Patricia says

    July 9, 2017 at 12:35 pm

    this is my next project in my home renovation. Do I really need the box on the floor? I as planning to anchor the shelves to the wall. I also plan to use the doors with solid bottoms and glass on top, as I need storage. Thank you for the specific directions that I can show my handyman

    Reply
    • Amy says

      July 12, 2017 at 8:13 pm

      Hi Patricia, I don’t know that you would have to have the box. You can probably anchor them to the wall then add the trim in the front? I’d ask your handyman to weigh in to be sure. Good luck with your project! XO, Amy

      Reply
  21. Joe says

    July 15, 2017 at 7:02 pm

    Can you provide the dimensions of the platform and the bottom floor of the platform? Did you place the wood on the bottom of the platform 4 inches deep?

    Reply
  22. Pathrina Watson says

    August 7, 2017 at 8:51 pm

    Hi Amy this is just perfect and what I am planning for a reading room. just one question. what did you fill the shelf holes with? and did you paint them then??

    Reply
    • Amy says

      August 10, 2017 at 2:28 pm

      Just regular spackle, and then yes I sanded them and gave them a good coat of paint! XO, Amy

      Reply
  23. Chelsey says

    August 8, 2017 at 12:05 pm

    When you say you caulked all the gaps, where exactly are you talking about? Thanks!

    Reply
    • Amy says

      August 10, 2017 at 2:27 pm

      Hi Chelsey, we caulked all the gaps between the molding and the bookcases, then painted it all. It looks more finished that way. Thanks! Amy

      Reply
  24. Stacie says

    September 3, 2017 at 5:21 pm

    Hi Amy! I am so glad I found your post on these DIY shelves! It is exactly what I have been looking to do in our “nook”, and your plan is easy to understand and looks beautiful! Do you have an idea how much the over all cost was to complete this project? Just trying to get a rough estimate 🙂

    Thank you!

    Stacie

    Reply
    • Amy says

      September 8, 2017 at 9:13 am

      That is hard to answer because my labor was free 🙂 I’d figure out the cost of the shelves (I already had 2 of those) and the wood trim, if you plan to do it yourself outside of the paint and caulk costs that would be all you have to worry about. XO, Amy

      Reply
  25. Jessica says

    September 18, 2017 at 9:45 am

    Hey Amy! What did you use to fill in the gaps between the bottom of the bookcases and the board that runs along the front? I am working on my built ins using the billy bookcase, however I noticed the gap between the bookcase front and the molding is substantial. Did you use anything else other than caulking?

    Reply
    • Amy says

      September 18, 2017 at 10:55 am

      We just used caulk! Good luck with your project 🙂 Amy

      Reply
  26. Sa says

    October 19, 2017 at 11:28 am

    Love this! We are looking to create something similar. Thank you for the step by step.

    Reply
  27. Hilari says

    January 1, 2018 at 9:42 pm

    Hi! I love the way your shelves turned out! I am dying to do this project in my own home. I do have a question that maybe you can answer. Do you think this project would work over carpet? Or would it not be level enough?

    Reply
    • Amy says

      January 8, 2018 at 4:21 pm

      Hi Hilari, so sorry for the delay in response, we have been moving. I think it would be fine over carpet, you will be securing the bookcases to the wall, so they should be very stable. Good luck! Amy

      Reply
    • Shae says

      March 19, 2019 at 9:56 pm

      Hi hilari.

      How did ypur bookcases go being built.on carpet??

      Reply
  28. Maria says

    January 8, 2018 at 9:06 am

    Hi Amy, I’m about to embark on a project like this myself and I’m in awe of how perfect your ‘built-in’ looks. My wall accommodates 4 3/4 billys (we are using 4 wide Billys, 1 narrow Billy and a Gnedby). I really don’t like seams and noticed that the top board (the one covering the empty space between the bookcases and the ceiling) looks flawless. Would you mind telling me how you hid the seam? Or did you use a board that is longer than the standard 8′? Thanks for your time and congratulations of your beautiful job!

    Reply
    • Amy says

      January 8, 2018 at 4:17 pm

      Hi Maria, we did use a longer board, I believe it was closer to 12′. If you can’t get one that size, just use caulk the seam then paint over and it should be fine. Good luck with your project! Amy

      Reply
      • Maria says

        January 9, 2018 at 9:14 am

        Thanks for your prompt reply! Have a wonderful New Year.

        Reply
  29. Jess says

    January 21, 2018 at 5:26 pm

    Hi there 🙂 ….I am a newbie DIY-er, and my hubby and I have purchased an IKEA system to use in our MA closet. But it is NOT the well-known PAX closet system….we are using the BESTA components and making it work for us.
    BUT I’ve been combing Pinterest all day for good instructional posts on adding trim and moulding to such “Ikea hacks.” Your BILLY built-ins turned out great! But I am desperate to know more about how your dad – as you described the photo to show – “secured the large top board to the ceiling….”
    Don’t get me wrong – it’s a great photo, LOL – but I can’t tell by looking exactly how he attached that sucker, particularly to the ceiling. So I know this question is a couple years later – but any way you could ask “the man?” 😀 Thank you!! Blessings!

    Reply
    • Anne says

      May 23, 2018 at 1:23 pm

      Just checking in about the same question as Jess. How did he attach the bookcase to the ceiling?

      Reply
  30. Phyllis Statham says

    February 3, 2018 at 5:19 am

    YOU HAVE ONE AMAZING DAD! iF HE EVER FANCIES A TRIP TO lONDON LET ME KNOW. i AM COVETING THOSE BOOKSHELVES, AND I ALREADY HAVE SOME BILLY BOOKCASES HERE AND THERE IN THE HOUSE. BUT FEEL ANOTHER TRIP TO IKEA COMING ON! ONE QUESTION FOR YOU–HOW DID YOU FINISH THE SIDE EDGES OF THE BOARDS THAT RUN VERTICALLY INBETWEEN THE UNITS? JUST SANDED AND PAINTED, OR DID YOU HAVE TO FILL THE EDGES AS WELL?

    Reply
    • Amy says

      February 11, 2018 at 11:30 am

      Hi PHyllis, I believe we did caulk any gaps, then painted. Thanks, Amy

      Reply
  31. eMILY says

    June 17, 2018 at 6:44 am

    Hi Amy,

    LOVELY PROJECT. i DO HAVE A QUICK QUESTION. DID THE BOOKSHELVES FIT IN THE FRAME OR REST ON TOP OF IT?

    tHANKS. `

    Reply
  32. Allison B Rhodes says

    August 4, 2018 at 10:05 am

    In case you’re still looking at adding lights, you can install “puck Lights” with a remote control inside of a traditional light rather than wiring it and using a bulb.

    Reply
    • Amy says

      August 10, 2018 at 8:38 am

      That is a great idea! Thanks for sharing. Amy

      Reply
  33. Zan says

    September 5, 2018 at 7:58 am

    Your Dad is AMAZING ? Bless him forever more xxx

    Reply
  34. Patty says

    September 16, 2018 at 9:09 pm

    Well done post and bookcases! Hoping to do this in our home this winter! One question and one idea.
    First, how long did this project take for dad, once all supplies we’re assembled? Hoping to do as a surprise for my husband, will have a couple friends to help. Minus final painting and detailing, wondering if the basic structure could go up in a day??
    Comment, I am also hoping to add lights at the top, because we have scallped ceiling that I don’t want to build into (sorry, dad, I promise to keep it safe) I found this post that seems to have a reasonably safe idea.
    https://www.viewalongtheway.com/2012/01/let-there-be-fancy-low-watt-high-tech-light/
    At any rate, I think we’ll give it a go at least at the top. Thanks again for the inspiration!

    Reply
  35. Katarzyna Misiaszek says

    October 17, 2018 at 11:57 pm

    Kudos to your Dad! thank you for sharing!

    Reply
  36. JESS SINGH says

    November 19, 2018 at 2:21 pm

    OMG I love it! I have a quick question: DID YOU PLACE THE BOOKSHELVES ON TOP OF THE BASE SO THAT THE BASE WAS ESSENTIALLY ON THE INSIDE, OR ON TOP OF IT SO THAT IT SAT ON TOP OF THE EDGES OF THE BASE? tHANKS!

    Reply
    • Jessica Singh says

      November 19, 2018 at 8:18 pm

      Nevermind i went back and re-read!!

      Reply
  37. Shani Binstock says

    November 25, 2018 at 5:20 pm

    Love love this!! Was stressing over how to fit the billys i need to look finished , now ive got it!! Thank you!

    Reply
  38. Kate says

    January 9, 2019 at 10:23 pm

    Did you attach some sort of board along the left and right wall so that the vertical board along the left and right sides had something to nail into?

    Reply
    • Amy says

      January 10, 2019 at 6:09 pm

      Hi Kate, if I remember they were just secured to the bookcase and flush with the wall? You could do that though for more support. Best, Amy

      Reply
  39. Catherine says

    January 12, 2019 at 8:43 am

    Your dad is very talented! How long did the entire project take?
    Also how did you cover the spackling you did of the holes inside the bookcases?
    Did you end up painting the interiors of all the bookshelves?

    Reply
    • Amy says

      January 14, 2019 at 2:55 pm

      He did the project as his schedule permitted so it probably took a couple of days all in all. We had the shelves all put together beforehand. The spackling blended into the shelves (it was also white) so that wasn’t an issue. I did not paint the inside of the shelves, I just used the backs that came with the bookcases. Hope that helps! Amy

      Reply
  40. Megan says

    January 21, 2019 at 4:51 pm

    These look so great! Well done! Quick question- did you just paint the front facing of the shelves or the shelves themselves as well? If you just prayed the front, does the pranked section look different than the ikea shelving since it comes prefab?

    Reply
    • Amy says

      January 22, 2019 at 8:24 am

      We painted the front trim but didn’t really need to paint the shelves, however you could if you really wanted a perfectly cohesive look. I just didn’t feel like they really needed it. Good luck! Amy

      Reply
  41. Ava says

    January 24, 2019 at 2:52 pm

    Love your bookcases. My husband is going to make them for our new home but he would like to know the dimensions of the box on the floor that the bookshelf went into. Also do the bookshelves touch the wall or are they away from it the depth of the wood used in the box. Thanks so much. Ava

    Reply
    • Amy says

      January 26, 2019 at 1:27 pm

      I am sorry, I don’t have any specific dimensions as we’ve since moved from this home. The box was just large enough to hold the bookcases and we used the IKEA ones. I can tell you that some of this just happened as we went along! It all worked out fine and they were very secure 🙂

      Amy

      Reply
  42. Rob Bonner says

    January 25, 2019 at 12:01 pm

    Well done, and thanks for posting. Interesting, only caps allowed. (not meaning to shout)

    On the trim, curious if you tacked the trim directly into the shelfs or did you add any spacer wood between to serve as anchor points?

    Reply
    • Amy says

      January 26, 2019 at 1:25 pm

      I believe it was tacked directly into the shelves as well as secured to the end pieces. Sorry not to be more helpful but it’s been a few years and we’ve moved from this home. Good luck! Amy

      Reply
      • Bill says

        October 7, 2020 at 5:42 am

        Hello,
        Love these bookcases and I’m going to try the same. When you say , tacked the molding to the front, do you know what kind of nails? Was the molding around 1/2 or 3/4” thick? And also, how did you cover up the nail heads or holes so it looked smooth afterwards ? Thanks!

        Reply
  43. Mallory Pultz says

    February 23, 2019 at 2:46 pm

    WHERe IS THAT CHEETAH RUG FROM?! I must know….soooo gorgeous!!!!

    Reply
  44. Katie says

    March 28, 2019 at 12:50 am

    Love these! How tall are they? My ceilings are pretty high. Do you know if you can add multiple extenders? Thanks!

    Reply
    • Amy says

      April 9, 2019 at 3:47 pm

      Sorry for the delay–I would think you can add more extenders, you just might have to drill some extra holes? Our ceilings were 9′ in this house if that helps. I had one extender on top of the regular Billy’s. I am so glad we did it that way. Good luck with your project! XO, Amy

      Reply
  45. Jill says

    July 13, 2019 at 11:28 pm

    Soooo good! Darling photo at end with dad. What kind of caulking did he use? Thanks!

    Reply
    • Amy says

      July 15, 2019 at 9:43 am

      Thank you! I don’t remember specifically but it wasn’t anything special–just off the shelf white caulk! Sorry not to be more helpful. Amy

      Reply
  46. Tina says

    September 12, 2019 at 8:29 am

    Thank you so much for posting this! My husband and I just used your instructions to do built-in shelves in a library for my daughter. it made the process so much easier. I thought this project would end up taking a while but thanks to your help, it only took a couple days. Thank you so much!! (sorry if this posts in all caps, I’m not trying to shout and my caps lock is not on, it just won’t type anything but all caps.)

    Reply
    • Amy says

      September 14, 2019 at 2:10 pm

      I am so glad it worked out for you! It really is an easy project, so much easier than starting from scratch and building! The caps lock is a strange blog formatting thing, no worries! Enjoy your new shelves.
      XO,
      Amy

      Reply
  47. Alyssa says

    October 29, 2019 at 4:36 pm

    Could you let us know how you secured the trim on the front between each of the bookcases? Love this!

    Reply
  48. Stacie says

    January 14, 2020 at 4:55 pm

    Beautiful! What color paint did you use? It matches perfectly.

    Reply
  49. Shecelle Bugg says

    April 20, 2020 at 4:19 pm

    Really super job! I was just wondering how you secured the top board to the ceiling and side walls.

    Reply
    • Amy says

      April 20, 2020 at 6:55 pm

      I believe small nails and maybe some L brackets? Thanks, Amy

      Reply
  50. Frank Barlett says

    August 4, 2020 at 10:58 pm

    3 stars
    Why is the bookshelf not filled with.. uhh books.
    Super sad

    Reply
  51. sam says

    September 25, 2020 at 8:49 am

    Love this tutorial including all the detailed pictures. I’m looking at starting a tiny retail store and looking for an inexpensive display which looks amazing and just might be it. Thank you

    Reply
  52. Josie says

    September 13, 2021 at 8:56 am

    Hey just wondering if you could explain a little better how the top board is attached to the ceiling and how they are attached to the front since the book cases can’t really be nailed into. Are they glued? I see nail holes tho…

    Reply
  53. Joanna Ciccarello says

    April 19, 2022 at 9:31 pm

    I want to do this in our living room but have an air vent on the side wall RIGHT next to the corner. Any thoughts on a work around for that? We need a desk area, so I was thinking of having bookcases til about 3 ft from the air vent wall, and then just making a simple desk on the end so the air has room to move. Thoughts?

    Reply

Leave a Reply to Chelsey Cancel reply

Your email address will not be published. Required fields are marked *

Recipe Rating


This site uses Akismet to reduce spam. Learn how your comment data is processed.

Primary Sidebar

Lowest prices. Straight Teeth,

•Don’t Miss A Thing!!•

•Do You Know Jesus?•

•Featured In•

Holiday Gift Ideas

Footer

  • Email
  • Facebook
  • Instagram
  • Pinterest

Copyright © 2023 · 11 Magnolia Lane· Blog Design by Little Blue Deer
Privacy Policy

11 MAGNOLIA LANE IS A PARTICIPANT IN THE AMAZON SERVICES LLC ASSOCIATES PROGRAM, AN AFFILIATE ADVERTISING PROGRAM DESIGNED TO PROVIDE A MEANS FOR US TO EARN ADVERTISING FEES BY ADVERTISING AND LINKING TO AMAZON.COM AND AFFILIATED SITES. AS AN AMAZON ASSOCIATE, WE EARN FROM QUALIFYING PURCHASES. WE ALSO PARTICIPATE IN SEVERAL OTHER AFFILIATE PROGRAMS; THIS INCOME ALLOWS US TO MAINTAIN THE QUALITY OF YOUR USER EXPERIENCE AND KEEPS OUR CONTENT FREE. WHEN YOU PURCHASE THROUGH ANY OF OUR AFFILIATE LINKS, WE EARN A SMALL COMMISSION AND YOU DON’T PAY A CENT MORE THAN YOU WOULD OTHERWISE; THAT WOULD BE TACKY!   READ OUR FULL PRIVACY AND DISCLOSURE POLICY {HERE}.
  ©11 Magnolia Lane 2019. Unauthorized use and/or duplication of this material without express and written permission from this blog’s authors and/or owners is strictly prohibited. Please email us at admin@11magnolialane.com for more information.

  • MEET CHRISTY & AMY
    • IF YOU’RE NEW HERE…
    • WORK WITH US
    • 11 MAGNOLIA LANE 101
    • DISCLOSURE + PRIVACY (the fine print)
    • BEST OF 11 MAGNOLIA LANE
    • Back
  • TOUR OUR HOMES
    • TOUR OUR HOMES
    • CHRISTY’S MAGNOLIA COTTAGE
    • CHRISTY’S MCC HOUSE
    • AMY’S NEW HOME BUILD
    • HOLIDAY HOME TOUR SERIES
    • SPRING HOME TOUR SERIES
    • Back
  • CELEBRATIONS
    • EVENTS + ENTERTAINING
    • GIFTS
    • HOLIDAYS
    • RECIPES
    • Back
  • HOME
    • CLEANING
    • DECORATING
    • ORGANIZING
    • ROOM BY ROOM
      • BATHROOMS
      • BEDROOMS
      • CLOSETS
      • CRAFT ROOMS + OFFICES
      • DINING ROOMS
      • KIDS’ ROOMS
      • KITCHENS
      • LAUNDRY ROOMS
      • LIVING + GREAT ROOMS
      • OTHER SPACES
      • PANTRIES
      • PLAYROOMS + BONUS ROOMS
      • PORCHES + OUTDOOR SPACES
      • Back
    • TIPS
    • Back
  • SHOP
    • SHOP OUR INSTAGRAM
    • SHOP OUR AMAZON STORE
    • FRIDAY FAVORITE FINDS
    • 11 ML ETSY SHOP
    • 11ML ORGANIZING SHOP
    • Back
  • PROJECTS
    • CRAFTS
    • DIY PROJECTS + TUTORIALS
    • FURNITURE
    • PRINTABLES
    • WINDOWS, DOORS, + WALLS
    • Back
  • LIFE
    • FRIDAY FREE FOR ALL
    • HEALTH
    • SIMPLY ON SUNDAY
    • TRAVEL
    • Back
  • CONTACT
    • Email
    • Facebook
    • Instagram
    • Pinterest
197633 shares
  • 466