• Skip to primary navigation
  • Skip to main content
  • Skip to primary sidebar
  • Skip to footer
  • MEET CHRISTY & AMY
    • IF YOU’RE NEW HERE…
    • WORK WITH US
    • 11 MAGNOLIA LANE 101
    • DISCLOSURE + PRIVACY (the fine print)
    • BEST OF 11 MAGNOLIA LANE
  • TOUR OUR HOMES
    • TOUR OUR HOMES
    • CHRISTY’S MAGNOLIA COTTAGE
    • CHRISTY’S MCC HOUSE
    • Christy’s Stuttgart Flat
    • Amy’s Virginia Craftsman Home Tour
    • AMY’S VIRGINIA CRAFTSMAN Building Process
    • HOLIDAY HOME TOUR SERIES
  • CELEBRATIONS
    • EVENTS + ENTERTAINING
    • GIFTS
    • HOLIDAYS
    • RECIPES
  • HOME
    • CLEANING
    • DECORATING
    • ORGANIZING
    • ROOM BY ROOM
      • BATHROOMS
      • BEDROOMS
      • CLOSETS
      • CRAFT ROOMS + OFFICES
      • DINING ROOMS
      • KIDS’ ROOMS
      • KITCHENS
      • LAUNDRY ROOMS
      • LIVING + GREAT ROOMS
      • OTHER SPACES
      • PANTRIES
      • PLAYROOMS + BONUS ROOMS
      • PORCHES + OUTDOOR SPACES
    • TIPS
  • SHOP
    • SHOP OUR INSTAGRAM
    • SHOP OUR AMAZON STORE
    • FRIDAY FAVORITE FINDS
  • PROJECTS
    • CRAFTS
    • DIY PROJECTS + TUTORIALS
    • FURNITURE
    • PRINTABLES
    • WINDOWS, DOORS, + WALLS
  • LIFE
    • FRIDAY FREE FOR ALL
    • HEALTH
    • SIMPLY ON SUNDAY
  • TRAVEL
  • CONTACT
    • Email
    • Facebook
    • Instagram
    • Pinterest

11 Magnolia Lane

Sharing our easy DIYs, decorating, entertaining and more!

Kitchen Redo Reveal–From Darkness to Light!

December 4, 2011 By Christy 44 Comments

This Post Contains Affiliate Links

3536 shares
  • 13

DIY white kitchen redo

{Full source list at the end of the post}

So, I finished this project in August, but I’m just now writing about it.  I think it’s because the project itself wore me out so much that I didn’t even want to think about it anymore, much less write about it.  It’s still not completely finished, either, and that’s probably part of my reluctance to reveal since I consider it a job undone.  I’ll tell you all about what I still need to do at the end of the post…you’ll get full disclosure here!  Prepare yourselves, though, because this is of necessity a long post, with lots of pictures.

The background info is that we moved in June, from North Carolina to Tennessee.  My husband is in the military, so moving is something that we do often and well.  However, since we were living in my *dream house* in North Carolina, this was a harder move than usual.  (FYI: If you’ve been following us for any amount of time, all of my pre-June 2011 posts will feature the old house)  In hindsight, I realize full well that I was completely spoiled and that all other houses will be second-rate from this point forward.  My husband didn’t quite have to drag me out of there by my fingernails, but a few tears were shed!
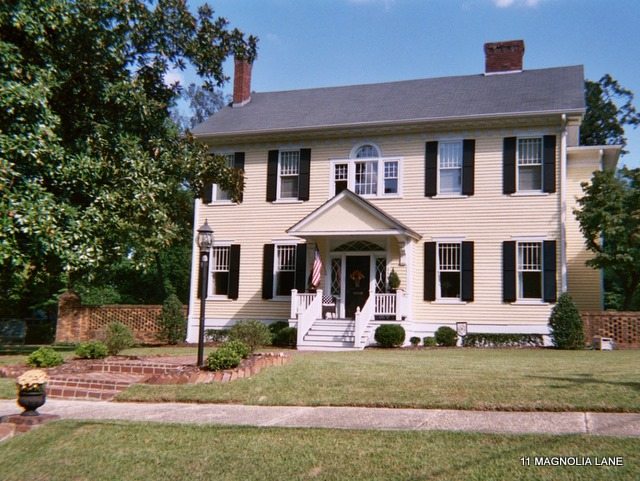
colonial revival home

I miss you, Old House!

Our new house is just fine.  It’s about 90 years newer and while it’s not my “forever house,” I realize that we are incredibly fortunate and blessed to have such a lovely place to live.  I’ve spent the last few months beginning to make it our own.

Our new house–slowly but surely we’re making it home.

OK, here’s where we get to the deal-breaker.  Again, I was spoiled, but here are a couple of pictures of my OLD kitchen:
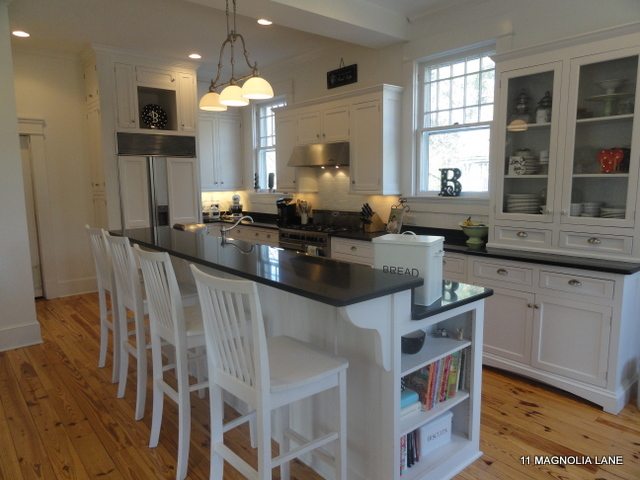
The kitchen in our old house was my dream kitchen.
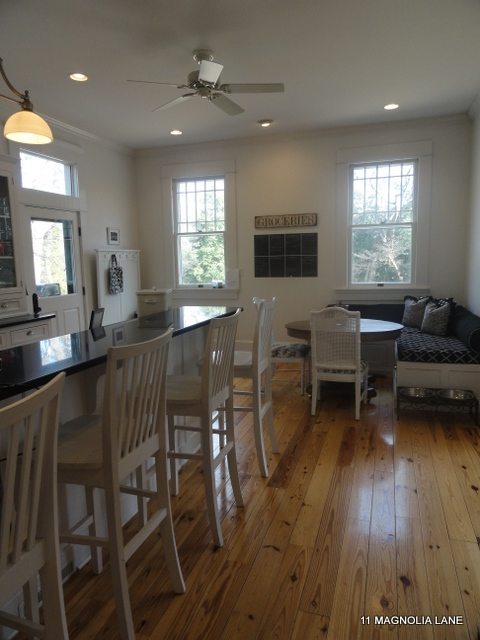
white kitchen black granite counters

We loved the built in banquette around the eating area.
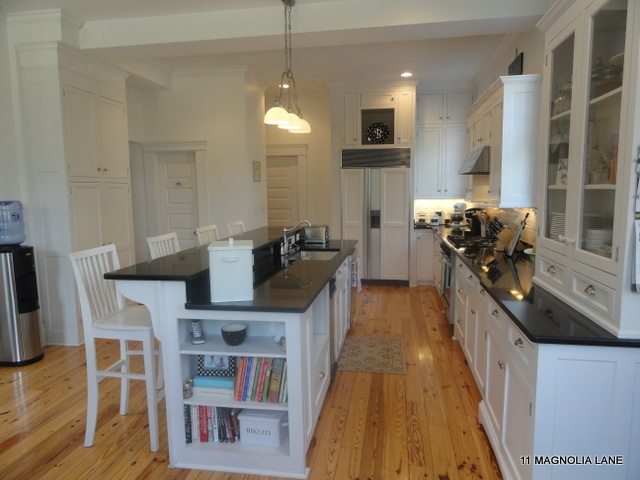
sub-zero refrigerator and white cabinets

The Sub-Zero fridge was kind of nice, too (sigh).

I’m missing the pictures of the beautiful French doors out onto the screened porch, but I have to stop here, or I’m going to get misty!  Again, I was spoiled.  This was NOT a contractor-grade kitchen, by any stretch of the imagination.  Now, let me show you the photos of the kitchen in our NEW house, and you’ll understand why I had to take immediate action!
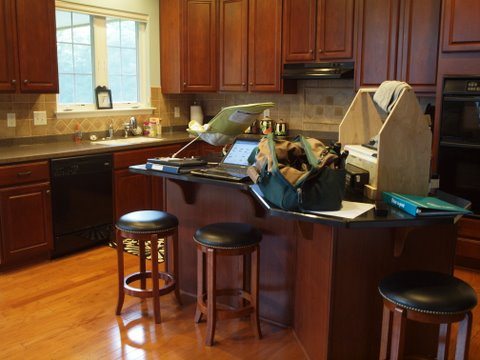
Forgive the mess on the island; the home inspector was here that day.
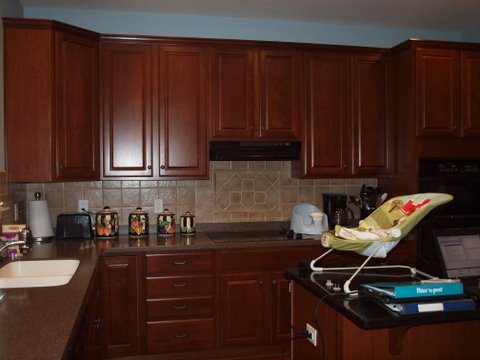
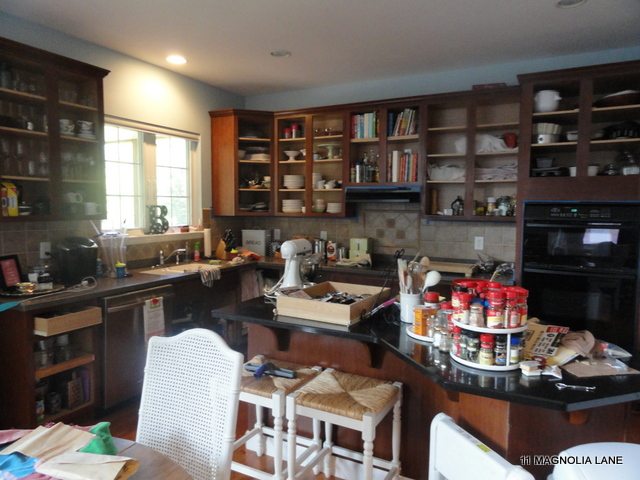
Dark, dreary, and dated–what else could you want? (this is the previous owner’s decor)
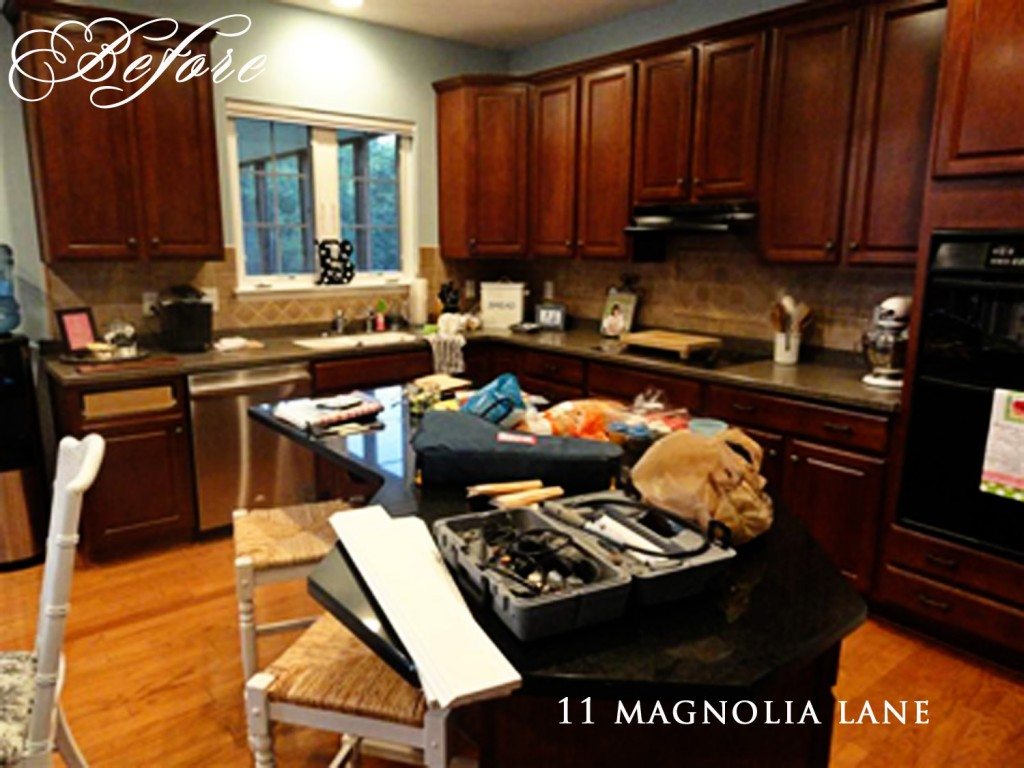
I liked the rest of the house, but I hated the kitchen.  I like everything to be bright, white, and light-filled.  I hated the dark cherry cabinets (I know, some people like them, but they’re just not my thing), the tons of potlights (not even a chandelier over the breakfast nook), the black appliances, and the backsplash.  I did like the countertops (Corian and granite) and the hardwood floors, though.

{Our posts contain affiliate links.  If you make a purchase after clicking on these links, we will earn a small commission, which helps to keep our content free.  You don’t pay a cent more than you would otherwise, since that would be tacky!}

So, I knew that I was going to paint the kitchen cabinets, and I also knew it was going to be a really hard job.  I didn’t give you a 360-degree view of the kitchen, but there are cabinets around the fridge area and in the island, as well as a built-in desk.  All told, I have 27 cabinet doors and 20 drawers.  I figured this wouldn’t be a weekend project, and wow, was I right.  It took me five weeks!  Oh, and Amy and her kids came to visit for a week and half in the middle.  Only a very, very good friend would put up with the kind of mess we had around here, and she even helped me sand!

I am so Type A that even looking at this picture makes my teeth hurt!

There are tons of great tutorials out there on how to paint your kitchen cabinets, so I won’t go into great detail, other than to say that I read them all first and I didn’t cut any corners.  I used Zinsser’s oil based primer (in the gold can) to prime and Benjamin Moore’s Satin Impervo oil paint in Dove White (two coats) for the cabinets, and I’m really pleased with those choices.  I brushed the cabinets rather than spraying them since I don’t know how to use a sprayer and I was born holding a paintbrush, but in hindsight I’d probably pay someone to spray the doors.  Mine look good, but it would have saved me days. I also thought about glazing them (and still might, one day, once I’ve recovered) but haven’t yet.  (Update:  I have since learned the ways of the paint sprayers, young Padawans, and I own THIS sprayer and would use it in a heartbeat to paint my cabinets, the next time I move into a house that needs to a paint job!)
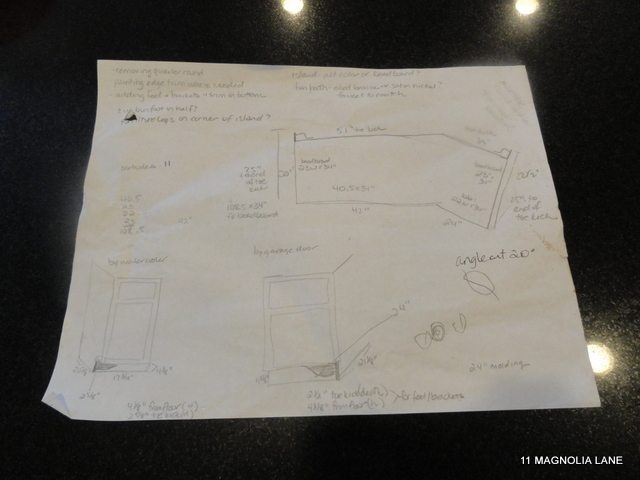
Failure to plan is planning to fail! 🙂

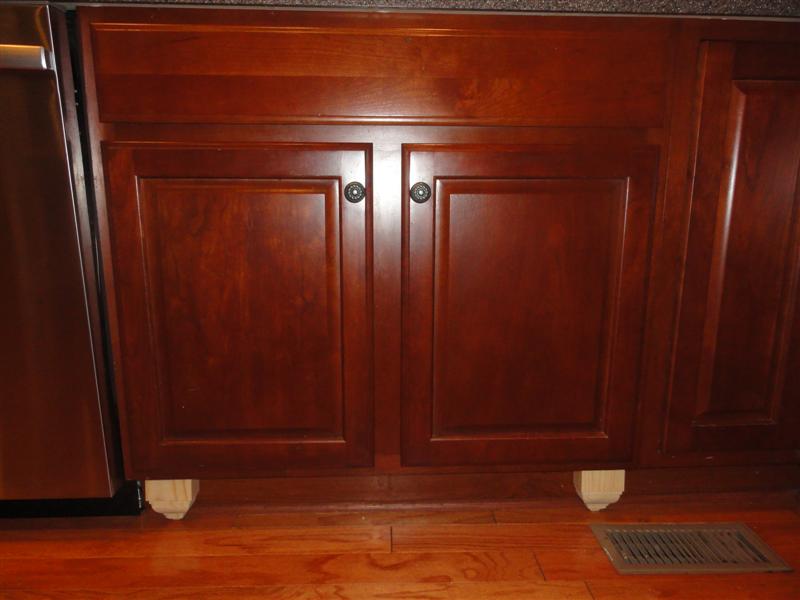
I also came up with a plan ahead of time, since one thing I wanted to do was add trim, molding, and feet to make my cabinets look more custom and built in.  I used my miter saw heavily for this project, and this blog post by Diane at In My Own Style was so helpful in my planning.  I trimmed all around my island and at both end cabinets on my walls, and added feet under the sink and the cooktop.
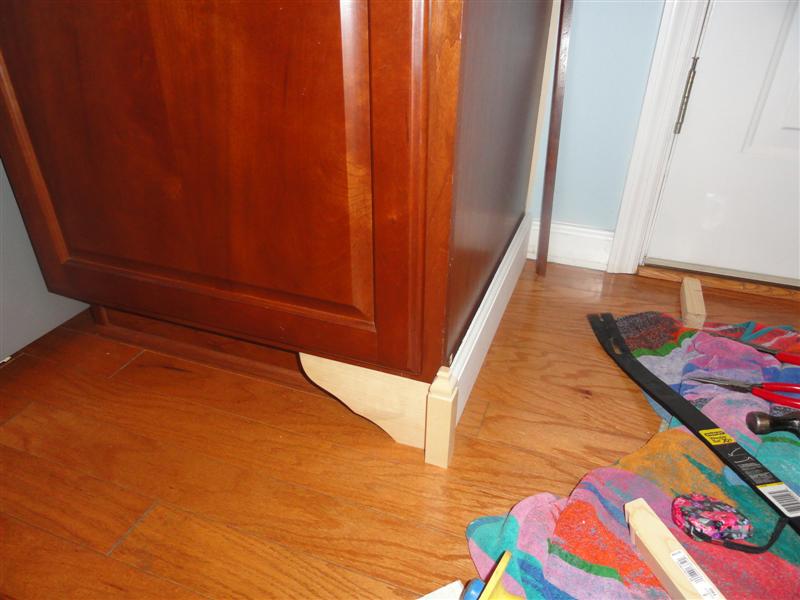
I bought all of the trim at Home Depot, and the “feet” aren’t really feet.  They’re in the no-miter molding section, which is funny because I cut miters all through this kitchen but still bought the no-trim pieces just because they’re decorative.  I used Liquid Nails and finish nails to hold everything in place, and I painted the trim and feet before I put them into place.

Once all the hardware is off, you remove the cabinet doors (label them so you know which ones are which) and wash everything down.  Then you sand, wipe down again, prime, sand, wipe down again, paint, sand, wipe down again, and finally–paint again!  I put my doors on cans but obviously they took a LONG time, since they have to dry thoroughly before you can flip them and paint the other side.  My family is so needy, too–they expected me to cook and feed them during the month that this was going on! 🙂  Once you’ve rehung the doors and drawers, you just have to put on the hardware and caulk (I used two tubes of caulk–you can see every gap when your cabinets are white!).
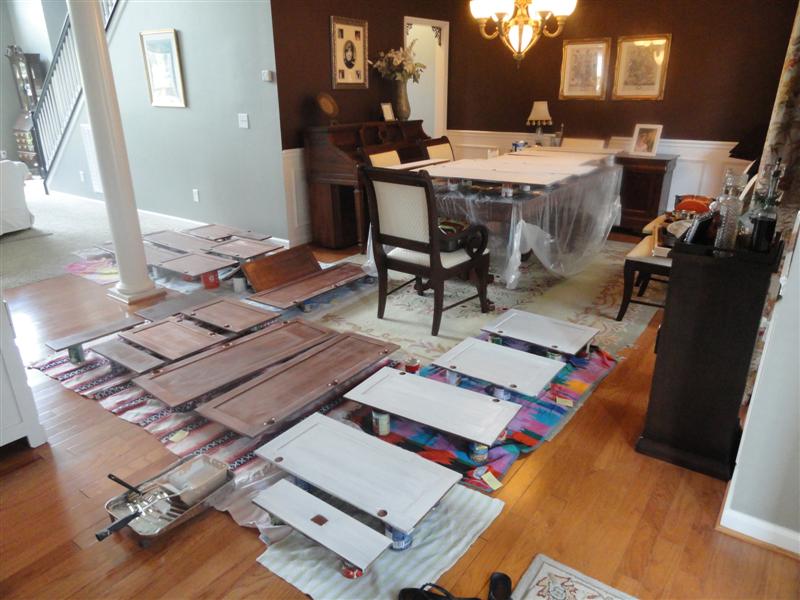
The dining room is a great workshop!

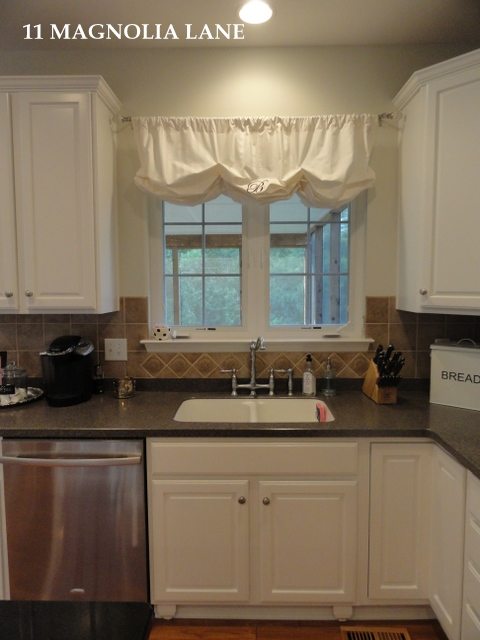
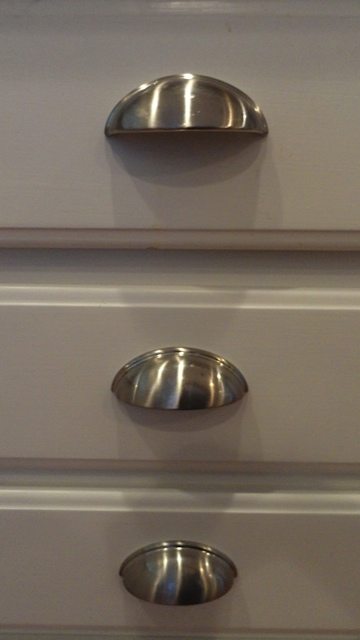
I ordered new hardware from Amazon (brushed nickel knobs and pin pulls) and sold the old ones on Craigslist.  The hardware was incredibly reasonable on Amazon, plus I got free shipping, and no tax, which is a big deal in Tennessee where sales tax is 10%.  I also bought a new bridge faucet on Amazon for under $200 and threw the old one away (contractor-grade with a nasty big water filter thing stuck on it).  We had a devil of a time getting the old faucet off, for some reason, but once the new one was on, I was thrilled.  Ignore the backsplash, it’s going away soon  (Update:  see my painted tile backsplash, and how it’s held up, HERE).
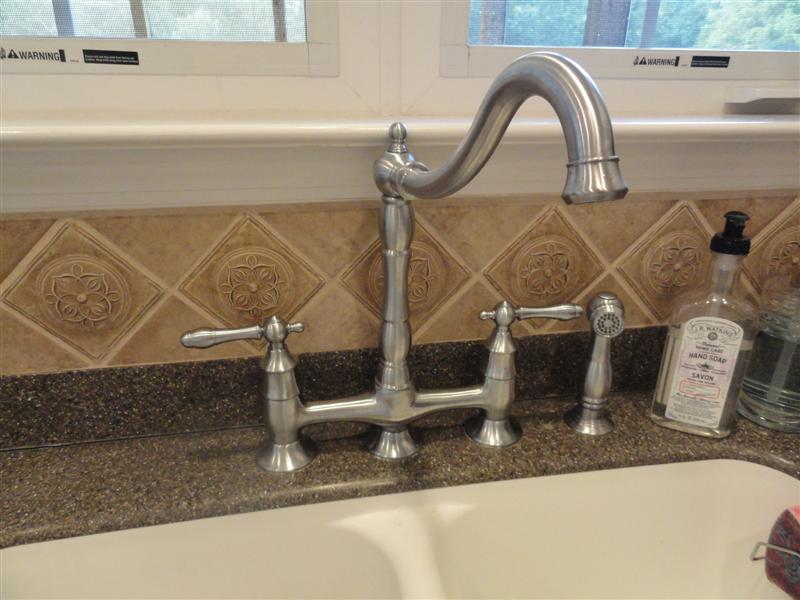
Brushed nickel bridge faucet

Brushed nickel bridge faucet

Brushed nickel bin drawer pulls

Brushed nickel bin pulls

We also sprung for a new French-door stainless steel refrigerator and a new stainless steel dishwasher.  We sold the old appliances on Craigslist and probably covered the cost of all that Satin Impervo paint I used!  That stuff is expensive, by the way.  Good, but expensive.

I also painted the walls.  They were blue, and while I like the color and kept it in my laundry room, I wanted to continue to brighten up this room.  The screened porch is right off the kitchen and blocks a lot of the light, so I wanted to help it along any way I could.  I painted the walls Old Prairie by Benjamin Moore (I used their Aura paint and it gave me single-coat coverage over the blue without primer), but I think I’m going to repaint them in BM’s Camouflage when I have the time (see the update here).

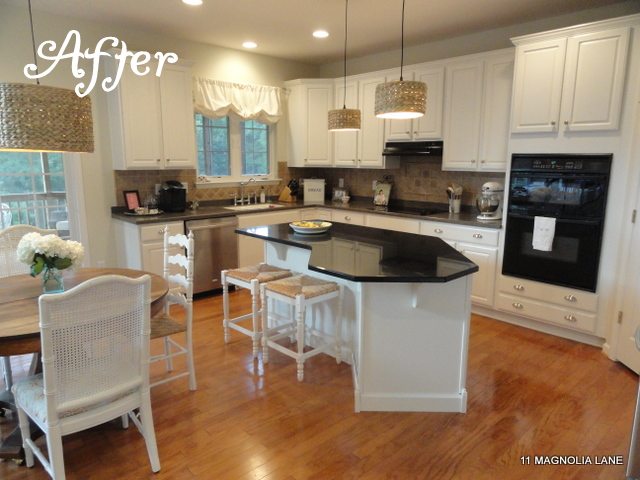
Last, but not least, I ordered three of the recessed-to-pendant light adapters  to put over the island and the table to define those spaces.  I chose the seagrass drum shades to add a little texture, plus I thought they’d coordinate with the rush seats on the counter stools.  I also hung a balloon shade that I already had over the sink.  So, drumroll please, here is the reveal:
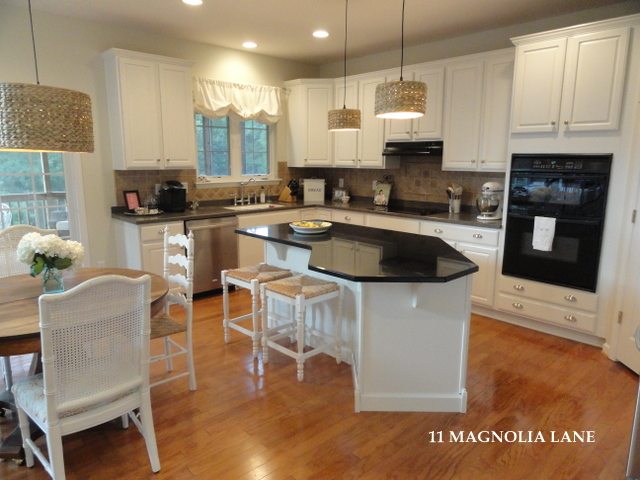
white kitchen redo after

Ahh, much better!

The counter stools are from Amazon, and were a little less than Ballard was charging for pretty much the exact same ones.  My four mismatched kitchen chairs are from Goodwill; I painted them a few houses ago so they’d all “match.”  The antique oak pedestal table is off Craigslist–my grandmother had one just like and it weighs a ton.
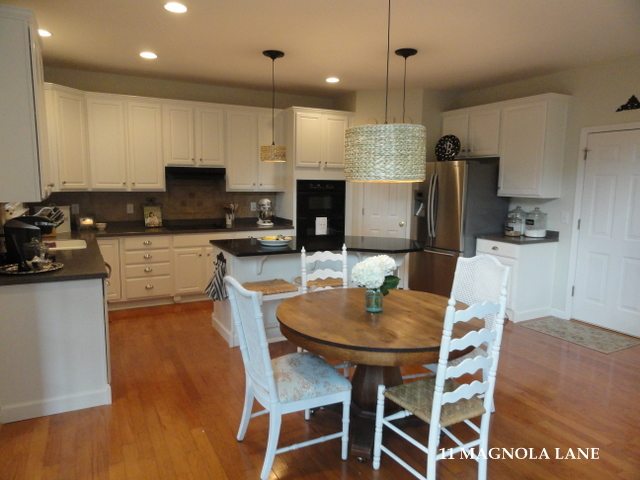
white kitchen redo after oak pedestal table

The hooks on the island are from Hobby Lobby.  I was tempted to add beadboard around the island, but realized I’d probably have to buy a table saw to get that job done, so I bagged it (for now).
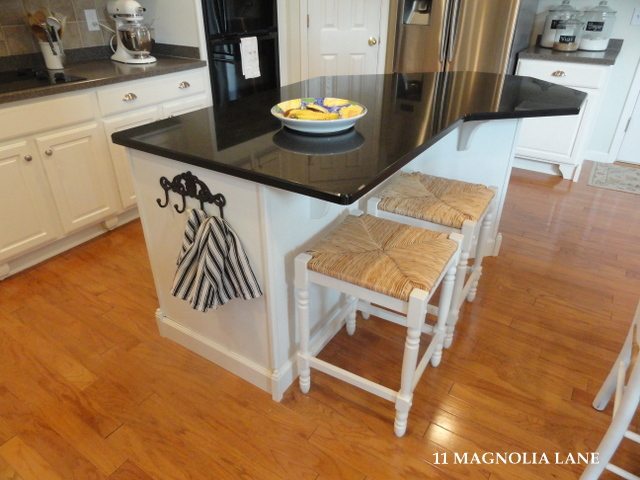
white kitchen redo

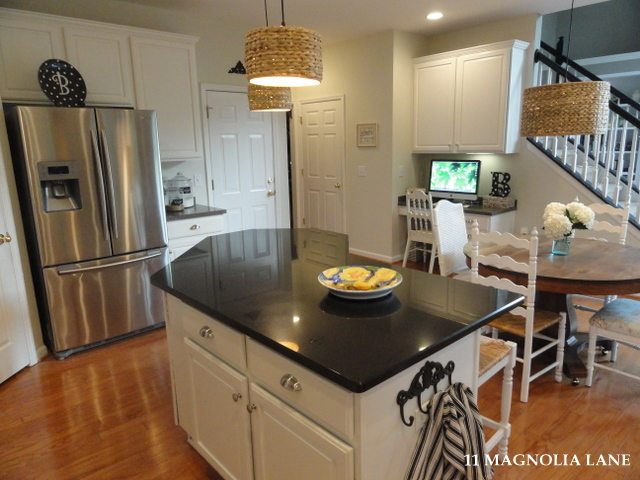
The island–topped with black granite.

You can see the completed trim work on the end cabinet below–not bad, if I do say so myself!
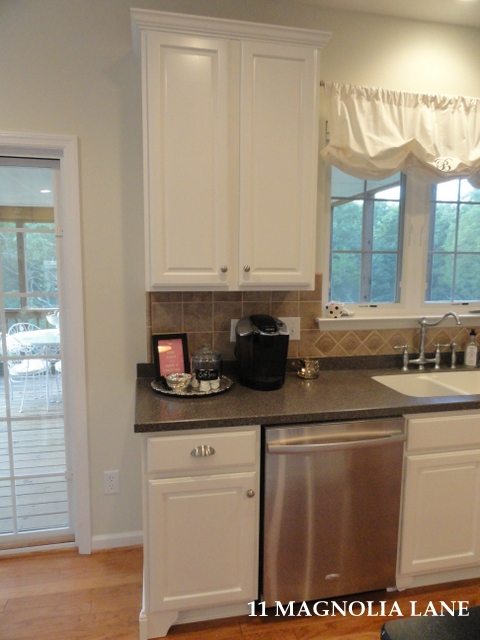
white kitchen redo

I added “feet” under the sink and the cooktop areas.
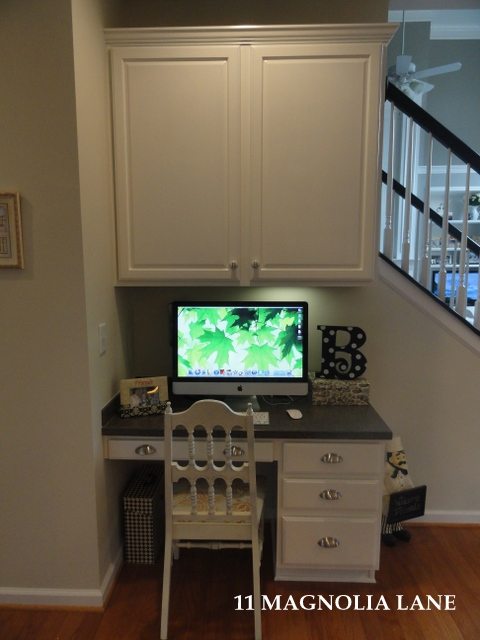
I decided to mix the hardware up a bit in the desk area, so I put up these “B” knobs that I found at Hobby Lobby a few years ago (but they still have them if you’re in the market).  They move with us!
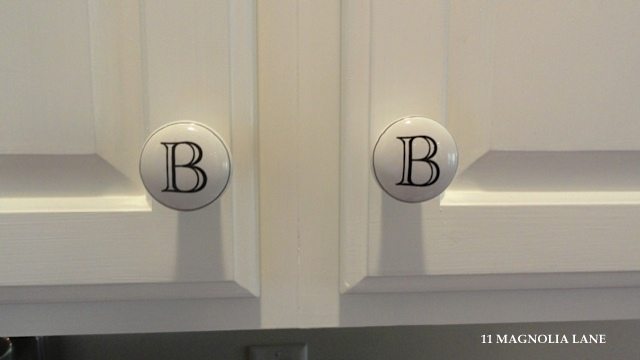
I’ve never met a “B” I didn’t like!
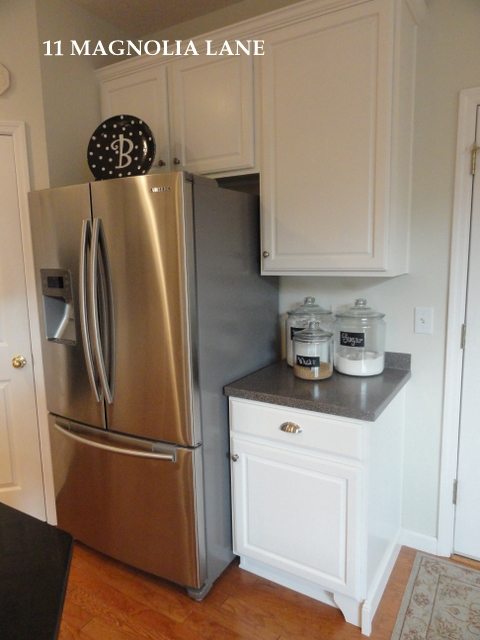
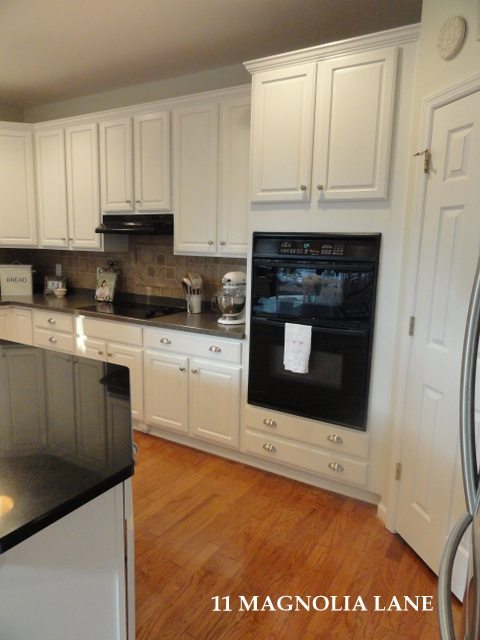
So there it is–my new kitchen, otherwise known as “what I did for my entire summer vacation.”  I mentioned that I still have things to do, because of course, it’s never really done.  Here’s the short (haha) list: get the pantry organized and awesome like in our old house (read about that here), repaint the walls in Benjamin Moore’s Camouflage, figure out a window treatment for the sliding doors that lead out to the screened porch, replace the black wall ovens with stainless (as soon as I find $2500 sitting around), run a gas line to the kitchen and change out the ceramic cooktop for a gas one, take down the ugly black exhaust hood (that isn’t even vented to the outside even though it’s on an exterior wall–grrr!) and replace it was a really cool custom one, put glass panels in a couple of cabinet doors, add under-cabinet lighting, find a wine fridge on Craigslist that fits next to the desk, and, last but not least, take down the backsplash and replace it with something white (subway tile?  marble?  pressed tin?).  Do you see why I consider it only half done, with a to-do list that long?

Thanks for sticking with me through such a hideously long post.  I feel much better now that I’ve gotten it all out, though, and I hope you’ll hang around through the rest of the updates.  I have to hurry–we’ll be moving in another year and a half!

Thanks for stopping by!

{Edit: I have since painted the walls, the tile backsplash and the vent hood–read my PART 2 post to see my latest changes, and click {here} to read about the magazine feature for this kitchen}

Sources:

Paint Colors:  Benjamin Moore’s Old Prairie (wall), BM White Dove (cabinets)

Stools: Amazon

Bridge Faucet: Amazon

Cup pulls and cabinet knobs:  Amazon (and the best price by far that I’ve seen!)

Pedestal table and chairs: vintage

icon-facebook-1icon-instagram-1icon-mail-1icon-pinterest-1icon-twitter-1

YOU MIGHT ALSO LIKE THESE POSTS... :

The Story of Our New Kitchen Table + Chairs
How We Added Cabinets in our Breakfast Room
DIY Custom Plate Rack (For $40!)
Fall Baking, Colorful Touches in Our New Kitc...

Filed Under: Kitchens, Room Makeovers Tagged With: bin pulls, bright, cabinets, diy, enamel paint, french country, kitchen, painted, painted cabinets, redo, shabby chic, white

Reader Interactions

Comments

  1. Terry Moore says

    December 4, 2011 at 10:28 pm

    Wow, this is a beautiful kitchen. I am looking for new barstools, where did you find yours?

    Reply
    • Christy says

      December 4, 2011 at 10:59 pm

      Glad you like it, Terry! The barstools are from Amazon.com. They’re the Hawthorne counter stools by Carolina Cottage. Ballard Designs sells a similar design but they’re more expensive. Thanks for stopping by!

      Reply
  2. Shannon says

    December 5, 2011 at 12:44 am

    The new kitchen is amazing. I can imagine how hard it was to leave the other one though. We had to do the same thing, it does get easier. Promise. You did such a beautiful job updating this one and making it your own. It has so may pretty design details now. Enjoy your fabulous space. Happy Holidays.
    Shannon

    Reply
    • Christy says

      December 10, 2011 at 12:29 am

      Thanks for your kind words, Shannon. And you’re right–it does get easier. Perfect houses aren’t that much fun because there’s nothing to fix up, right?! 🙂

      Reply
  3. janet metzger says

    December 5, 2011 at 7:29 am

    I totally get how much work this was…just redid my oak kitchen to a white one this year also. What a difference white paint can make…it’s always amazes me!

    Love everything about your ‘new’ space. I bet you smile every time you walk into it
    ;->

    Well done Christy

    Janet xox
    htp://theemptynest-janet.blogspot.com/

    Reply
    • Christy says

      December 10, 2011 at 12:28 am

      Thanks so much, Janet. I’ll be over to see you for some chalk paint right after I get Christmas taken care of!

      Reply
  4. Linda @ it all started with paint says

    December 6, 2011 at 4:10 pm

    Stopping by from The DIY Showoff. I feel your pain — I painted my cabinets too, but ended up going dark. Your kitchen looks so nice that I’m tempted to pull all the doors down again and go white!

    Reply
  5. Sarah says

    December 8, 2011 at 12:25 pm

    Wow, gorgeous!

    Reply
  6. JJ says

    December 10, 2011 at 3:55 pm

    WOW! I agree with you that your old kitchen was to die for. I am amazed at what you’ve done with the new one. That was a lot of work! I like it so much better. I agree with you on the dark cabinetry. I know a lot of people who insist on the dark stain but to me it sure does make a dark hole of the kitchen. Good job on all your work!

    Reply
  7. Ellie says

    December 10, 2011 at 10:49 pm

    Wow! That’s a lot of work, but the results are beautiful. Good for you for doing it yourself! I’m curious to know how it turns out!

    Reply
  8. shannon says

    December 11, 2011 at 11:50 am

    I love your kitchen! I have the same colored cabinets you had in the before and dark granite as well and I’ve been wanting to paint the cabinets for the past 3 years we’ve been here. It’s just so much work! I think after seeing these pictures I have to get it done, it will be worth it 🙂
    You did such a great job on them.
    I am a new follower, found you through Serenity Nows site.

    Reply
    • Christy says

      December 12, 2011 at 9:00 am

      I think you should go for it. It is a huge amount of work, but it was completely worth it. We spend so much time in our kitchens that we have to love how they look! Thanks for stopping by and following. ~Christy

      Reply
  9. Emily says

    December 11, 2011 at 7:49 pm

    Wow! You are a DIY inspiration. Your kitchen is beautiful! And WHERE did you find those seagrass drumshades?? I love them! Thanks for sharing your gorgeous kitchen. 🙂

    Reply
  10. Andrea says

    December 12, 2011 at 9:31 pm

    Love your kitchen. I usually go for dark cabinets but seeing transformations like yours almost makes me re-think some things.

    Reply
  11. Holly says

    December 12, 2011 at 10:21 pm

    WOW! That is a lot of work. Nice and Bright.

    Reply
  12. Sharon says

    December 13, 2011 at 1:24 am

    Wow! This is one impressive remodel. You did a good job of recapturing the look and feel of your former kitchen. I know you have more on your to-do list ( a little less judging from you update which I can’t wait to see), but it really is beautiful.

    Sharon

    Reply
  13. brooke adkins says

    December 13, 2011 at 10:40 am

    Christy,

    I found your blog on the home stories link party , your kitchen is my favorite I have seen I want so badly to paint my green cabinets white but Big (hubby) says no way that it is to big of a job for us with having 3 little boys in the house 🙁

    I would love for you to show off your skills to my readers on my new link party
    http://www.getouttamyheadplease.com/2011/12/show-it-off-link-party-2.html

    Reply
  14. samaa @ Honey Sweet Home says

    December 13, 2011 at 1:08 pm

    Wow, that is one incredible transformation! It may not be your dream house but I think it is mine now 🙂 The dark cabinets had a certain warmth to them, but the white is so bright and light, it looks amazing! Fabulous job 🙂

    Reply
  15. Rhiannon says

    December 13, 2011 at 3:44 pm

    it looks absolutely fab!! please please come help me with mine!! 🙂

    Reply
  16. Andrea says

    December 13, 2011 at 4:21 pm

    Beautiful! What a stunning kitchen!

    Reply
  17. Mariaelena says

    December 15, 2011 at 6:11 am

    OMG!!OMG!!OMG!!….WOW!!!…I LOVE it!!…I’m with you about brightening it all up…white is such a happy color…you did a fabulous job…magazine worthy!!…I can totally relate, because we are just completing our kitchen redo…painted our 10 year old solid maple cabinets…lots of peeps thought we were crazy…I’m loving it though…please come over and see…the final reveal is soon….new quartz countertops coming today!!…I love what you did with the pot lights…I was thinking of possible doing the same thing….Enjoy your gorgeous space and pls come visit…also, check our an older post of our beach house kitchen…you will love it…reminds me of your new look!!….nice chatting…Mariaelena

    Reply
  18. Shary says

    December 19, 2011 at 1:28 pm

    I love your kitchen!! Very similar to what I’m wanting to do to mine. I just painted the island (because it was the worst) but the cabinets will have to wait until warmer weather. Hubby and I also wrapped the island in bead board and it was not hard at all. We had Home Depot do the cuts for us so no table saw was necessary! Thanks for sharing.

    Reply
  19. antiquechase says

    December 19, 2011 at 2:49 pm

    I can soooo relate. Last house I painted my kitchen by myself… My friend came over and told me she had just done it and I could do it in “a few day”… seeing that she is not a liar, I decided, what the heck, I have two days!….. OMG, it took me 3 weeks! I sanded, primed with oil base, sanded, painted… again and again and it was a small kitchen… 3 weeks, a full time job! But it seriously was amazing afterwards and I loved it. Yours looks great and enjoy!! My new kitchen is darker with new cabinets and there is no way I am doing it again… I’m just learning to appreciate dark… at least that’s what I’m telling myself! New follower!! Come see me me when you can 🙂

    Reply
  20. SJ @ Homemaker On A Dime says

    December 20, 2011 at 2:08 am

    Love it so I pinned this on Pinterest 🙂 Hope you can swing by and join my Creative Bloggers’ Party & Hop.

    Reply
  21. Kim says

    December 22, 2011 at 3:30 pm

    Gorgeous transformation. I know it had to be hard leaving your dream house and kitchen, but you have truly improved this one to enjoy however long you live there.

    Reply
  22. Scribbler says

    December 22, 2011 at 3:35 pm

    I read this with great interest because I have been through the same thing. You did a great job, and if you got this done in five weeks, “Congratulations!” That’s great. It took me nearly seven months. Of course, I am older than you, and probably needed my head examined for tackling this with my bad knees. The ladder is my worst enemy!

    I am now following your blog.

    Reply
    • Christy says

      April 23, 2012 at 7:40 pm

      I’m sorry I’m so slow in responding…I’m glad you’re following, and phew! at least you’re done with your cabinets!

      Reply
  23. Lisa says

    April 22, 2012 at 8:19 pm

    Christy, your kitchen looks great. I’m attempting to paint my cabinets but I’m having a problem spreading that oil paint. Could you offer any tips.
    Thanks
    Lisa

    Reply
    • Christy says

      April 23, 2012 at 7:19 pm

      Lisa–it is a pain to paint with oil! I would pour some out into a bucket (just the amount you plan to use that day) and add a capful or two of mineral spirits and another capful or two of Penetrol. Mix it up and paint. I also cleaned my brush pretty frequently with mineral spirits so it didn’t start to dry on the brush and get gloppy. Good luck! Oh, and paint the doors last…your technique will be improved by then and that’s the most important part. Hope that helps…Christy

      Reply
  24. Lisa G says

    April 27, 2012 at 12:03 pm

    Love the kitchen. I think I died a little when I saw those pendant shades lol. I was pretty sure I had viewed every single product at Ballard but somehow I missed these! They are gorgeous and I added them to my list for when my kitchen gets done!

    Reply
    • Christy says

      April 30, 2012 at 7:44 am

      Glad to provide a few ideas! Thanks for stopping by!

      Reply
  25. Jo Lynn says

    April 29, 2012 at 1:40 pm

    Hi Christy!
    Love, love the kitchen. I am in the planning phase of doing the same thing. Question about painting the cabinets…did you paint the inside of the cabinets?

    Reply
    • Christy says

      April 30, 2012 at 7:43 am

      Hi Jo Lynn–
      I didn’t paint the inside of the cabinets. They are a lighter (maple?) color and so they were already a different color than the cherry I had on the outside. I did, however, paint the bottom (underside) of my upper cabinets, that are also the same maple color. Now the exterior is all white. Good luck with your project!
      ~Christy

      Reply
  26. Mike McGarry says

    April 14, 2013 at 5:10 pm

    Hi christy, remember me from Langhorne, pa – the guy with the dark, hand-made cabinets? I just re-read your post and you did mention spraying the doors. I had asked you about your take on taking all the doors to Maaco [or another shop] and having them spray them after I prime them. Or, I may even spray them in my basement. I wrote down the types of paint, too. Thanks again for the inspiration and I will send before and after pics. Mike

    Reply
    • Christy says

      April 15, 2013 at 9:41 am

      Yes, Mike, of course I remember you, and I was about to answer your email. I would definitely spray the doors–but it’s up to you whether you’d rather do it yourself or pay to have Maaco do them. I think you said you’re pretty handy with the sprayer. If that’s the case, then you can probably handle this no problem. Keep me posted on how they turn out!

      Reply
  27. Melissa says

    December 18, 2013 at 3:36 pm

    Hi- What a beautiful transformation! I am pretty set on doing a similar tranformation myself including painting the cabinets and installing trim work. Would you suggest I invest in a miter saw?

    Reply
    • Christy says

      December 20, 2013 at 9:50 pm

      Melissa–If you’re going to add molding or trim, then yes, I’d buy one. They also make straight cuts so you’ll find one useful for other projects. I love mine! Good luck with your redo~Christy

      Reply
  28. Rachel says

    February 15, 2014 at 12:02 pm

    Christy-
    Your amazing cabinet redo has motivated me to finally turn our “dark, dreary” kitchen into what I have always wanted! You did a beautiful job!! One question I have : did you wipe the cabinets down before sanding with a degreaser? If so, which one? Thank you so much!

    Reply
    • Christy says

      February 16, 2014 at 9:15 am

      I used soap and water, although I’ve read that TSP is the degreaser of choice. My cabinets were not thick with grease, or I would have used TSP or rubbing alcohol to cut it. Good luck with your kitchen!

      Reply
  29. Lauren says

    March 28, 2014 at 10:20 am

    I want to paint my dark cherry Cabinets, but I’ve got white appliances….would a light grey-ish color work? too much white?

    Reply
    • Christy says

      April 1, 2014 at 10:49 pm

      I don’t mind white cabinets with white appliances, Lauren. Check out Jones Design Company’s kitchen; last I checked, her appliances were white and it’s gorgeous. But yes, light gray would be lovely, too.

      Reply
  30. Cherie says

    August 2, 2015 at 9:58 am

    Hi! I’m getting ready to take on to project! Wish me luck! But was wondering if you sealed the cabinets afterward?

    Reply
  31. Lauren says

    January 8, 2016 at 9:57 am

    Did you hand sand or use a tool?

    Reply
    • Christy says

      January 10, 2016 at 11:45 am

      I used a small handheld Black & Decker sander for the larger areas, but I did need to hand sand some of the detail work.
      Hope that helps!

      Reply

Leave a Reply Cancel reply

Your email address will not be published. Required fields are marked *

Recipe Rating


This site uses Akismet to reduce spam. Learn how your comment data is processed.

Primary Sidebar

Lowest prices. Straight Teeth,

•Don’t Miss A Thing!!•

•Do You Know Jesus?•

•Featured In•

Holiday Gift Ideas

Footer

  • Email
  • Facebook
  • Instagram
  • Pinterest

Copyright © 2023 · 11 Magnolia Lane· Blog Design by Little Blue Deer
Privacy Policy

11 MAGNOLIA LANE IS A PARTICIPANT IN THE AMAZON SERVICES LLC ASSOCIATES PROGRAM, AN AFFILIATE ADVERTISING PROGRAM DESIGNED TO PROVIDE A MEANS FOR US TO EARN ADVERTISING FEES BY ADVERTISING AND LINKING TO AMAZON.COM AND AFFILIATED SITES. AS AN AMAZON ASSOCIATE, WE EARN FROM QUALIFYING PURCHASES. WE ALSO PARTICIPATE IN SEVERAL OTHER AFFILIATE PROGRAMS; THIS INCOME ALLOWS US TO MAINTAIN THE QUALITY OF YOUR USER EXPERIENCE AND KEEPS OUR CONTENT FREE. WHEN YOU PURCHASE THROUGH ANY OF OUR AFFILIATE LINKS, WE EARN A SMALL COMMISSION AND YOU DON’T PAY A CENT MORE THAN YOU WOULD OTHERWISE; THAT WOULD BE TACKY!   READ OUR FULL PRIVACY AND DISCLOSURE POLICY {HERE}.
  ©11 Magnolia Lane 2019. Unauthorized use and/or duplication of this material without express and written permission from this blog’s authors and/or owners is strictly prohibited. Please email us at admin@11magnolialane.com for more information.

  • MEET CHRISTY & AMY
    • IF YOU’RE NEW HERE…
    • WORK WITH US
    • 11 MAGNOLIA LANE 101
    • DISCLOSURE + PRIVACY (the fine print)
    • BEST OF 11 MAGNOLIA LANE
    • Back
  • TOUR OUR HOMES
    • TOUR OUR HOMES
    • CHRISTY’S MAGNOLIA COTTAGE
    • CHRISTY’S MCC HOUSE
    • AMY’S NEW HOME BUILD
    • HOLIDAY HOME TOUR SERIES
    • SPRING HOME TOUR SERIES
    • Back
  • CELEBRATIONS
    • EVENTS + ENTERTAINING
    • GIFTS
    • HOLIDAYS
    • RECIPES
    • Back
  • HOME
    • CLEANING
    • DECORATING
    • ORGANIZING
    • ROOM BY ROOM
      • BATHROOMS
      • BEDROOMS
      • CLOSETS
      • CRAFT ROOMS + OFFICES
      • DINING ROOMS
      • KIDS’ ROOMS
      • KITCHENS
      • LAUNDRY ROOMS
      • LIVING + GREAT ROOMS
      • OTHER SPACES
      • PANTRIES
      • PLAYROOMS + BONUS ROOMS
      • PORCHES + OUTDOOR SPACES
      • Back
    • TIPS
    • Back
  • SHOP
    • SHOP OUR INSTAGRAM
    • SHOP OUR AMAZON STORE
    • FRIDAY FAVORITE FINDS
    • 11 ML ETSY SHOP
    • 11ML ORGANIZING SHOP
    • Back
  • PROJECTS
    • CRAFTS
    • DIY PROJECTS + TUTORIALS
    • FURNITURE
    • PRINTABLES
    • WINDOWS, DOORS, + WALLS
    • Back
  • LIFE
    • FRIDAY FREE FOR ALL
    • HEALTH
    • SIMPLY ON SUNDAY
    • TRAVEL
    • Back
  • CONTACT
    • Email
    • Facebook
    • Instagram
    • Pinterest
3536 shares
  • 13