• Skip to primary navigation
  • Skip to main content
  • Skip to primary sidebar
  • Skip to footer
  • MEET CHRISTY & AMY
    • IF YOU’RE NEW HERE…
    • WORK WITH US
    • 11 MAGNOLIA LANE 101
    • DISCLOSURE + PRIVACY (the fine print)
    • BEST OF 11 MAGNOLIA LANE
  • TOUR OUR HOMES
    • TOUR OUR HOMES
    • CHRISTY’S MAGNOLIA COTTAGE
    • CHRISTY’S MCC HOUSE
    • Christy’s Stuttgart Flat
    • Amy’s Virginia Craftsman Home Tour
    • AMY’S VIRGINIA CRAFTSMAN Building Process
    • HOLIDAY HOME TOUR SERIES
  • CELEBRATIONS
    • EVENTS + ENTERTAINING
    • GIFTS
    • HOLIDAYS
    • RECIPES
  • HOME
    • CLEANING
    • DECORATING
    • ORGANIZING
    • ROOM BY ROOM
      • BATHROOMS
      • BEDROOMS
      • CLOSETS
      • CRAFT ROOMS + OFFICES
      • DINING ROOMS
      • KIDS’ ROOMS
      • KITCHENS
      • LAUNDRY ROOMS
      • LIVING + GREAT ROOMS
      • OTHER SPACES
      • PANTRIES
      • PLAYROOMS + BONUS ROOMS
      • PORCHES + OUTDOOR SPACES
    • TIPS
  • SHOP
    • SHOP OUR INSTAGRAM
    • SHOP OUR AMAZON STORE
    • FRIDAY FAVORITE FINDS
  • PROJECTS
    • CRAFTS
    • DIY PROJECTS + TUTORIALS
    • FURNITURE
    • PRINTABLES
    • WINDOWS, DOORS, + WALLS
  • LIFE
    • FRIDAY FREE FOR ALL
    • HEALTH
    • SIMPLY ON SUNDAY
  • TRAVEL
  • CONTACT
    • Email
    • Facebook
    • Instagram
    • Pinterest

11 Magnolia Lane

Sharing our easy DIYs, decorating, entertaining and more!

How to Paint Your Kitchen Cabinets–Tips & Tricks for a Smooth Finish

August 14, 2015 By Amy 60 Comments

This Post Contains Affiliate Links

2678 shares
  • 68

painted-cabinets-header-marked
 

I am back with more progress in our “Kitchen Makeover”and it’s probably our biggest improvement so far! Today I am going to talk all about painting kitchen cabinets, which is a HUGE job but also one with a tremendous reward. Tackling this project takes time, energy and a few useful tools but in the end a lighter and brighter kitchen is definitely worth it. I am in love with the change our lighter cabinets make in the space, I promise all the effort is worth it.

This is Part 1 of my kitchen makeover–our project is still going on. It’s a huge undertaking and we have a large kitchen. I will link up all our in-progress posts at the end so you can catch up if you missed anything. I’ll be back with Part 2, the full reveal but for now, I wanted to dig into how I painted our formerly cherry cabinets and got a beautiful ultra-smooth finish.

painted-cabinets-3


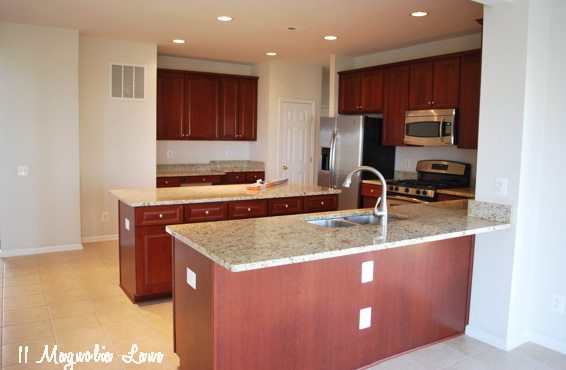
Just for the sake of a “how far we’ve come” here is the before picture of our kitchen, dark, reddish and shadowy for sure.


kitchen before
 

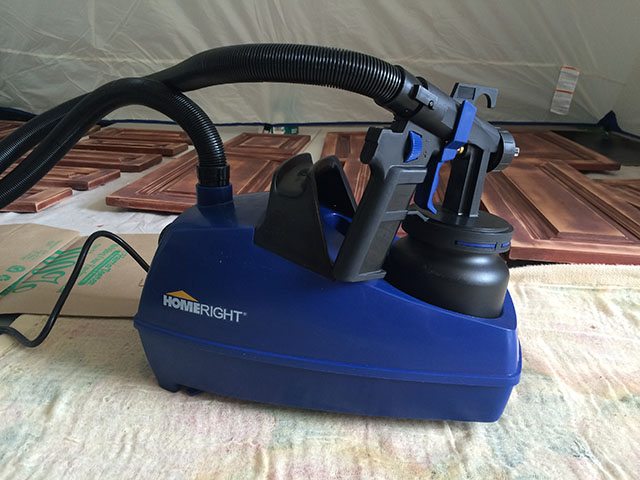
If there is one lesson my Dad taught me it’s always to have the right tool for the job. You can certainly tackle this project with nothing more than a can of paint and a paint brush but it’s going to take you a LONG time and you may not get factory-finish results. Since paying someone to paint a kitchen this size would cost in the thousands, it’s a small investment to purchase a few useful tools to make it much easier and give great results. Since we work with HomeRight, using their Spray Shelter and the Finish Max Pro sprayer was a no-brainer, and the results were impressive.

How to paint kitchen cabinets using a paint sprayer:

| Follow us on YouTube |

 
Here is a list of what I used:

A drill {to remove the cabinet doors, and hardware}

Paint {Sherwin-Williams Pro Classic for Doors and Trim in Decorator’s White, read that story HERE}

Primer {Kilz in the gold can}

Sandpaper in various grits

A good quality paint brush, I used this small angled trim brush

Ryobi Corner Cat Sander and several packages of refills (150 grit)

Dewalt Random Orbit Palm Sander {or similar} and refills

HomeRight Spray Shelter

HomeRight FinishMax Pro Fine Finish Sprayer  (This is the latest and greatest model)

Mineral Spirits and rags

Face Mask designed for painting

I would also highly recommend small domes to raise your cabinets off the ground {you can get them HERE} and cloth drop cloths you can get at the hardware stores–I didn’t have them to cover my garage floor but wish I had. I don’t recommend the plastic especially if you paint in the summer–they can stick to the paint as it dries {lesson learned 🙁 }.

Tips and Tricks for Painting Cabinets

The process will go so much faster if you assemble everything you need ahead of time and set up a work station as I did in my garage.  I broke up our kitchen into four sections (lower cabinets, upper cabinets, island and desk area} then I completed the entire process for each section before moving on to the next, that way we didn’t have to live with chaos for too long.

Along those lines, if you need motivation to start your kitchen cabinet painting, just take the doors off! If you are as Type A as I am, you won’t be able to live with your cabinets like this for too long, this mess will get you started!


cabinets-open


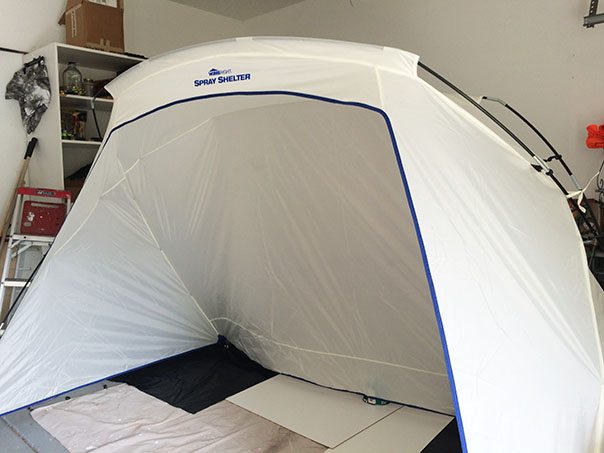
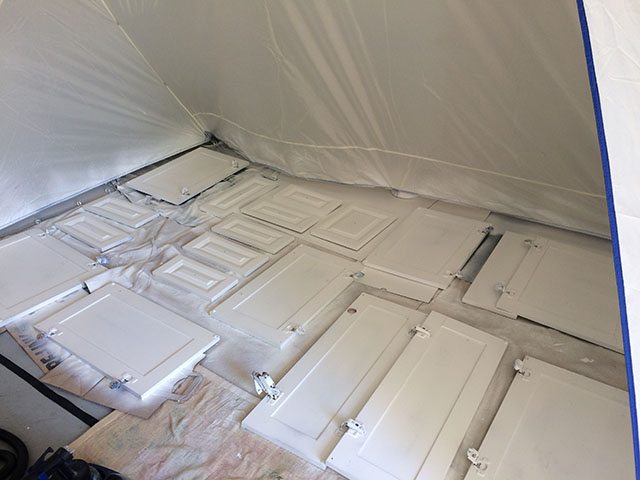
I started by assembling my spray shelter in my garage. It’s hot here at this time of year and I knew it was going to be up for awhile. You can purchase a Spray Shelter HERE and it will keep the paint overspray from getting in the garage and keep dust and dirt off the wet paint, which is important. Be sure to watch this video HERE to see how to set it up easily.


homeright-spray-shelter
 

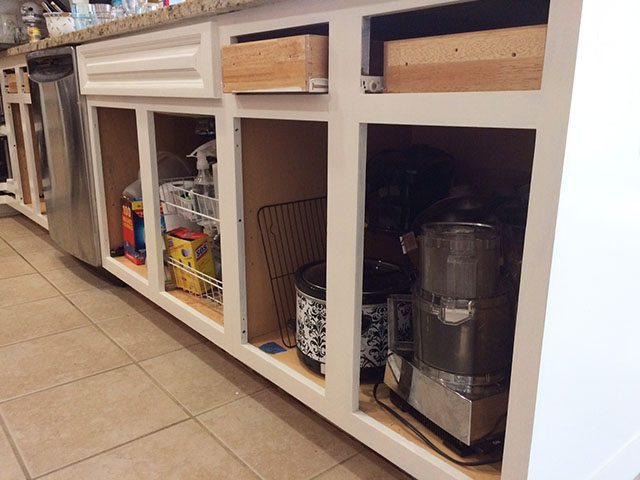
I first removed all my cabinet drawers, fortunately, I could just unscrew all the fronts so I didn’t have to empty them all.  I saved the hardware in a plastic bag and left it right in the drawer which made reattaching the fronts super simple. Then I detached all the cabinet doors, I did go to the trouble of labeling each one but later found that I had to remove the label to paint them so that was a waste of time. Again, working in small sections will make putting everything back on go more smoothly, your doors won’t get all mixed up.

Next, I spent quite a bit of time prepping the doors and in all honesty, this may be the hardest part.  I sanded the fronts and doors very well, my goal was to remove all the shiny gloss so the paint would adhere as best it could. While the palm sander made quick work of the flat panels, the most useful tool I had to sand was the Ryobi Corner Cat. I definitely went through quite a few sandpaper refills but getting into all the grooves of my cabinet doors was tedious, I would have completely lost my mind trying to do it with just a sheet of sandpaper.


cabinets-sanded-before
 

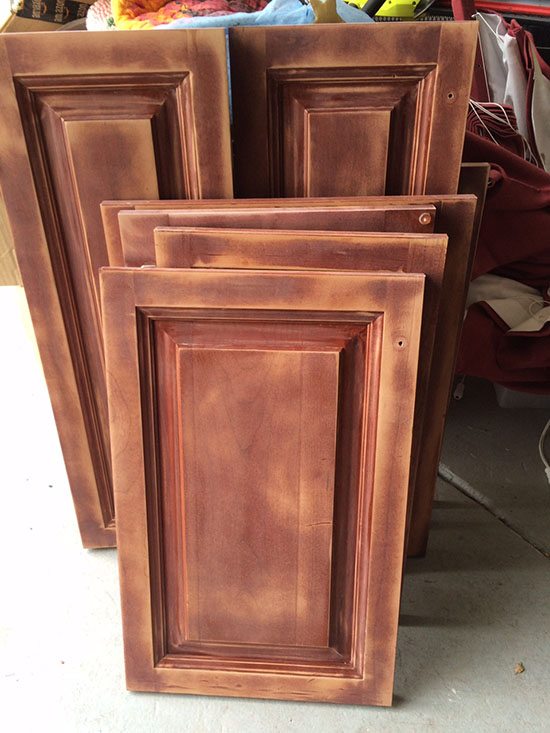
After all the sanding was done {and don’t forget to do the sides}, I wiped everything down well with a rag, then wiped them again with another rag coated in mineral spirits to get every little bit of dust I could off before the painting process began.

I started by spraying on a coat of primer with the FinishMax Pro, which took no time at all. Unfortunately, our humidity was high that day so it took longer than usual to dry, and I had to wait a full day to flip them and spray the backs. At this point, I went inside and sanded, primed and painted the cabinets inside {I just used a brush to paint inside}.


primer-cabinet-sprayed

cabinet-backs-sprayed

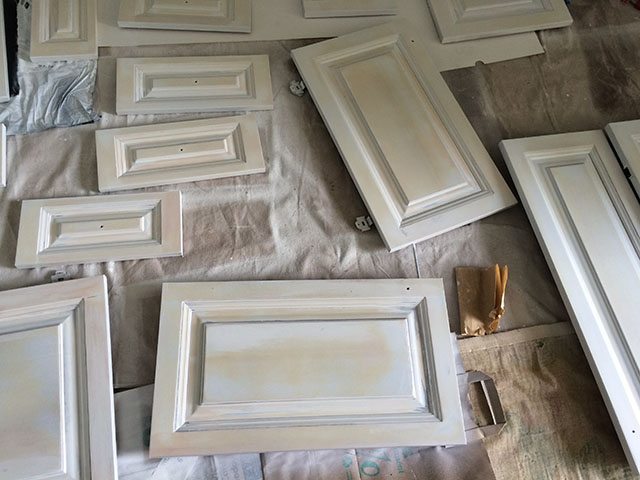
After the primer was dry, I began the painting process. There are very easy to follow instructions that come with the sprayer, it’s simple to use.  I found that diluting the paint by about half with water worked perfectly, but that will vary based on conditions and the paint you use. I also recommend you use a face mask with the sprayer, there is very little over spray but you always want to be safe rather than sorry.

Luckily the humidity dropped the next day and things moved along faster once I started the painting. After two coats, front and back, the doors were done. I let them dry overnight and then brought them in and reattached them.

close-up-drawers-painted
 

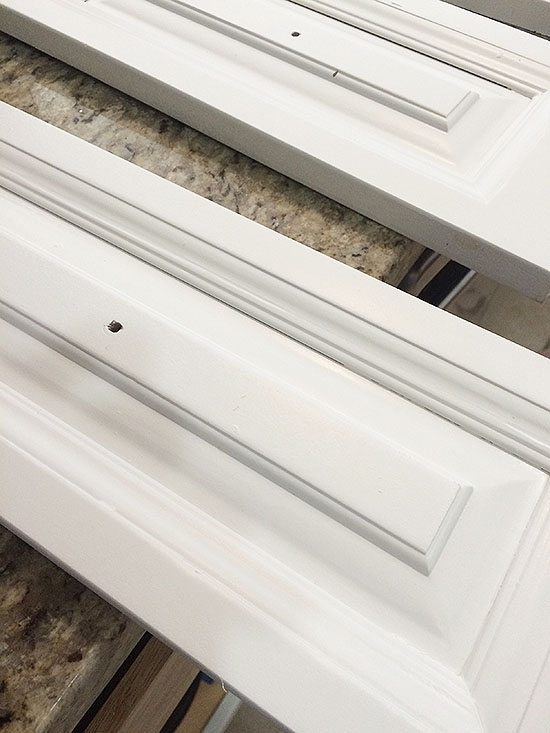
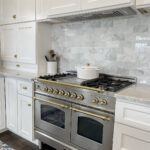
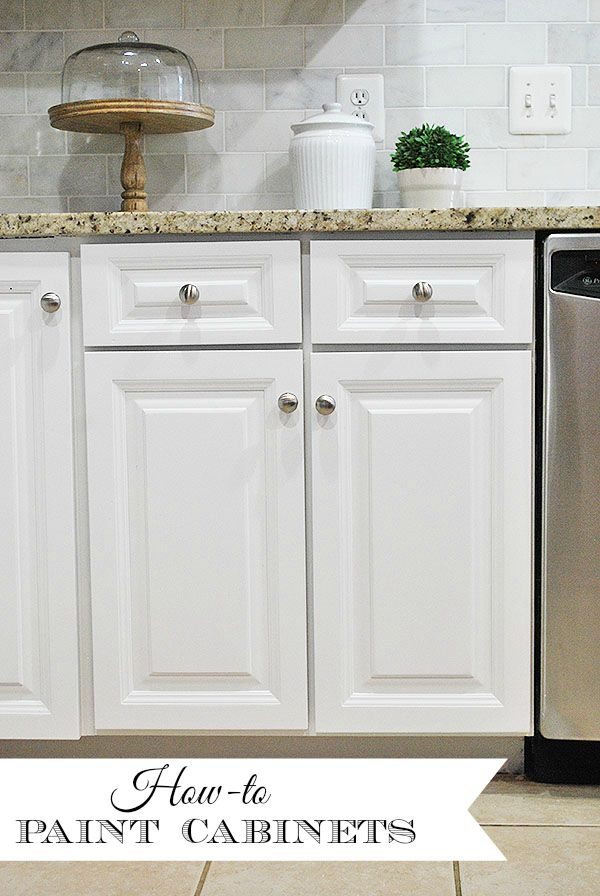
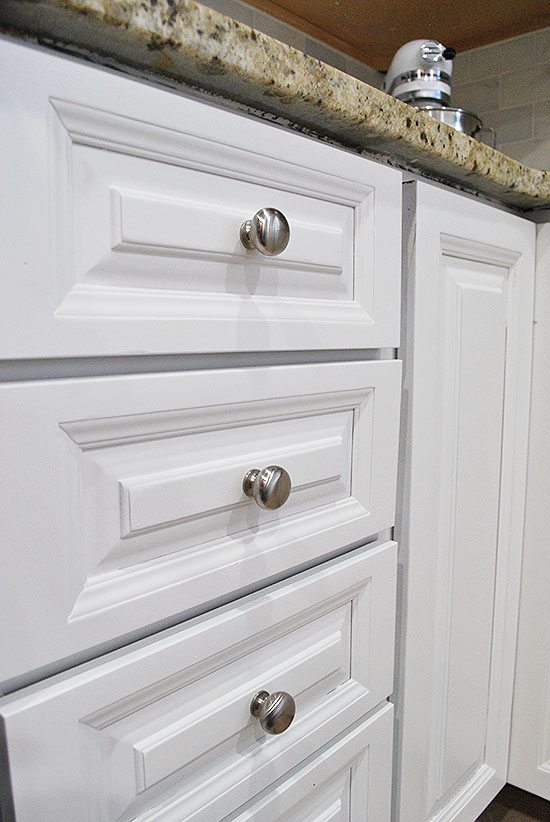
You can see in this picture above about how perfect the finish is. No brush marks, air bubbles or streaking, it’s amazing. The Finish Max is very easy to use, I have mentioned before that I used to be afraid that I was not an experienced enough painter to use a paint sprayer but trust me, that’s unfounded. Not only does it make quick work of a painting project but it is super lightweight and easy to clean. Part 2 of this project will have a detailed video about using the FinishMax to paint cabinets so be sure to check back.

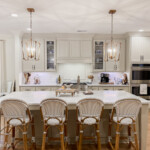
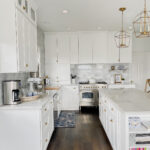
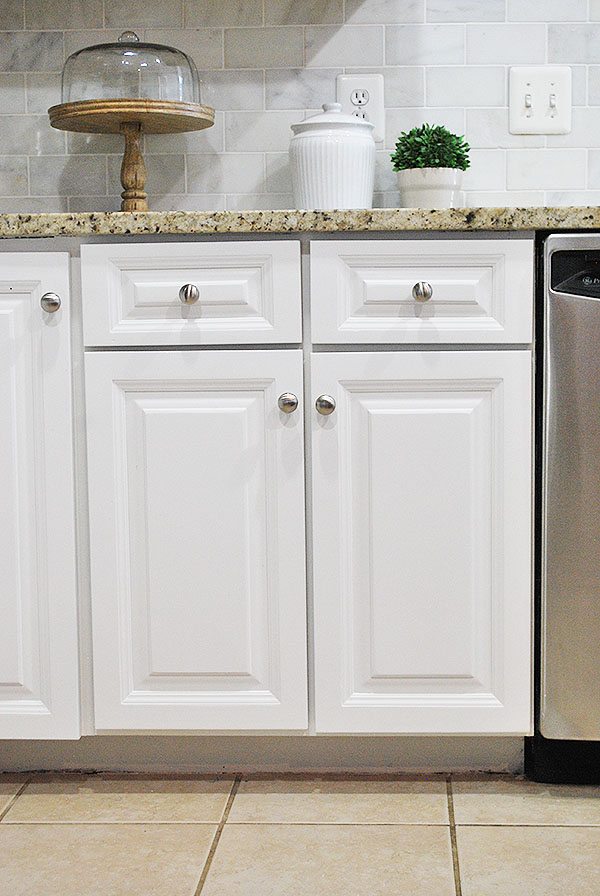
I can’t get over the difference the lighter cabinets make in our kitchen…


island-painted-kitchen


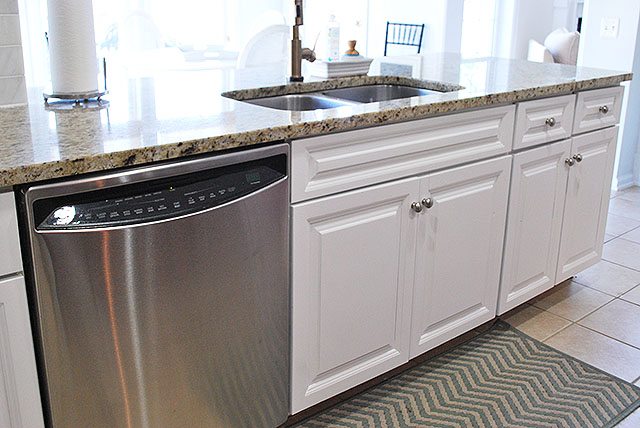
Even our granite, which we aren’t at all crazy about is less obtrusive against the white. Everything looks much cleaner and updated now, and I think our marble backsplash looks amazing.


painted-cabinets-after-2


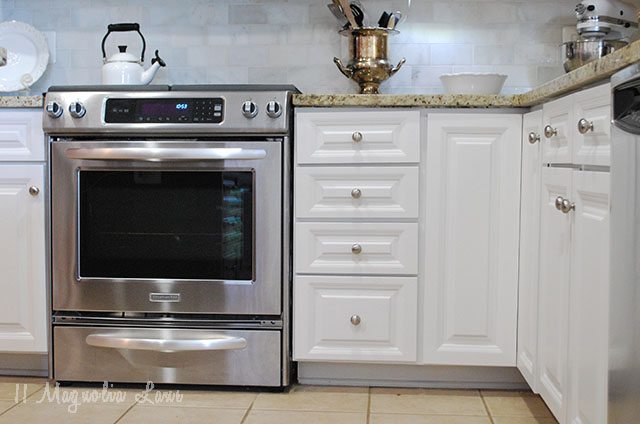
Friends have told me what a challenging time they had getting a smooth finish when they painted their cabinets with a brush or a roller and I know that can be the case. As you can see, these look pretty much like they came this way.


close-up-drawers-painted-2


We’re finishing up the other sections and I can’t wait to show off the island–I think that is going to make a big impact on how the kitchen looks. It’s not a small process or an overnight makeover, so thanks for your patience. It will be fun to show it off once everything is done and I’ll have a whole video detailing the process so stay tuned!


painted-cabinets-header


homeright-finish-max-sprayer

Note: We have linked to the newer (and less expensive!) paint sprayer then then one shown here, it is available here.

One of the hardest parts of the cabinet painting project is selecting a paint color, you can see my post on making that choice HERE.

To see all sorts of other projects you can do with a HomeRight FinishMax click {here} to see our Pinterest Board.

See more about my kitchen makeover:

Breakfast Room Reveal

Kitchen/Breakfast Room Paint Color {my favorite color ever!}

The marble backsplash

The DIY Open Shelving

The DIY Under Counter Shelves {IKEA hack}

The Kitchen Makeover Plan

and…drumroll!

The Final Kitchen Reveal

The Other Side of Our Kitchen

There is still much to come with this project–including new hardware, lighting, shelving and more. It’s a journey for sure! Please leave any questions in comments, I’ll be sure to try to answer them for you.

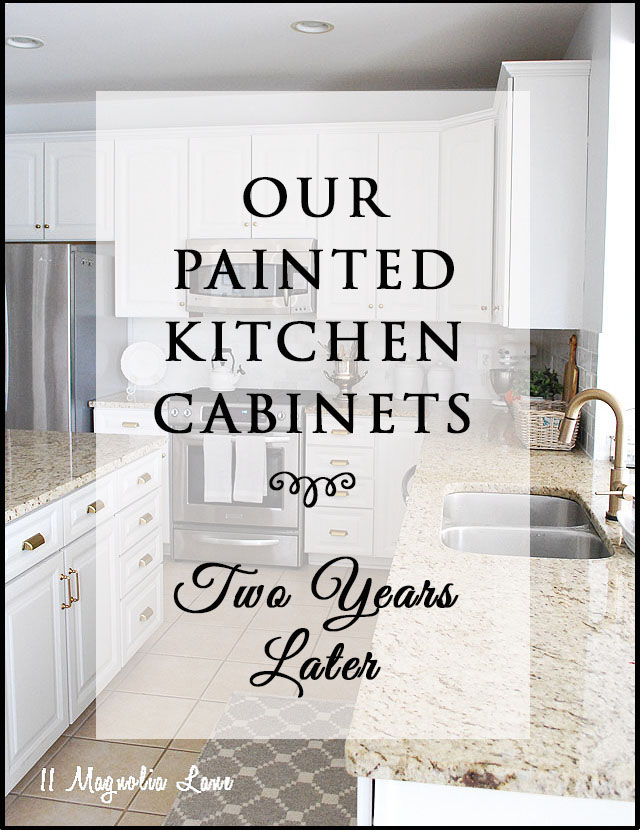
Also, be sure to check out this post with how the cabinets are holding up two years later.


Also, you might find this post to be helpful about the Do’s and Don’ts of Painting Kitchen Cabinets.


The Do's and Don'ts to easily paint your kitchen cabinets. A step by step guide how to paint kitchen cabinets as easily as possible.

XO,


small-amy-new-headshot-summer-2016-2 copy
icon-facebook-1icon-instagram-1icon-pinterest-1icon-twitter-1NEW Google+
 

We are pleased to work with HomeRight as an Ambassador, our opinions are our own. Our posts contain affiliate links.  If you make a purchase after clicking on these links, we will earn a small commission, which helps to keep our content free.  You don’t pay a cent more than you would otherwise, since that would be tacky! Please see our full disclosure policy here.

Click here to subscribe

SaveSave

SaveSave

SaveSave

SaveSave

SaveSave

SaveSave

SaveSave

SaveSave

YOU MIGHT ALSO LIKE THESE POSTS... :

Our New Remodeled Kitchen
The Story of Our New Kitchen Table + Chairs
How We Added Cabinets in our Breakfast Room
DIY Custom Plate Rack (For $40!)

Filed Under: giveaways, HomeRight Projects, Kitchens, PROJECTS Tagged With: homeright, kitchen, kitchen makeover, painted cabinets, white kitchen

Reader Interactions

Comments

  1. Holly says

    August 14, 2015 at 2:52 pm

    I love, love, love the new bright white cabinets! I continue to read fabulous things about the MaxPro Sprayer and I just used Sherwin Williams ProClassic to paint a dresser and I love it! It creates such a beautiful finish, but takes some finesse when using a brush. There are so many things I would love to paint – our cabinets, desk, 2 side tables…

    Reply
  2. Diana says

    August 14, 2015 at 3:04 pm

    I love your white cabinets!!

    Reply
  3. Carol says

    August 14, 2015 at 4:01 pm

    What an improvement to your cabinets! You have so many great ideas that I don’t know where to begin!

    Reply
  4. Andrea W says

    August 14, 2015 at 4:18 pm

    I need to paint my kitchen cabinets too.

    Reply
  5. Marty@A Stroll Thru Life says

    August 14, 2015 at 4:55 pm

    Wow, what a difference and your cabinets are looking amazing. Love them.

    Reply
  6. Cassie says

    August 14, 2015 at 5:47 pm

    i’d spray a sofa table that needs some bright color first! but now i’m thinking about doing our dark kitchen cabinets too 🙂

    Reply
  7. In Kinsey's Closet says

    August 14, 2015 at 6:20 pm

    I want to do this to my cabinets at home. I have heard a sprayer is best!

    Reply
  8. Karlyn lynch says

    August 14, 2015 at 6:43 pm

    Thanks for the great tutorial. Hoping to paint my cabinets soon! 🙂

    Reply
  9. SONJA HANSEN says

    August 14, 2015 at 7:33 pm

    I will start with the old oak dresser I want to repurpose into a dining room buffet. Then on to bedroom furniture and if I still have any drive, I will paint my kitchen cabinets.

    Reply
  10. janet says

    August 14, 2015 at 7:47 pm

    love the cabinets your kitchen is looking beautiful.

    Reply
  11. Paige.Rose says

    August 15, 2015 at 1:02 am

    Love the crisp white with the counters!! I’m partial to white & I too painted ours..although we hand painted each one..AHHHHHH { ripping hair out } haha! Love these tips & tricks for our soon next home!!

    Paige.Rose
    from
    http://www.TheQuaintSanctuary.blogspot.com

    Reply
  12. Heidi says

    August 15, 2015 at 7:25 am

    Your kitchen is looking great! I would also like to paint my kitchen cabinets white. We currently have light maple cabinets, very 90’s looking!

    Reply
  13. Caitlin @ The Delighted Dwelling says

    August 15, 2015 at 9:29 am

    Oh you know how badly I want white cabinets and maybe with this I could do it myself!! That is if I can’t pay you to come do mine!! Your s look amazing!! Great job!!

    Reply
  14. Sharlene Piscitelli says

    August 15, 2015 at 3:04 pm

    I have several doors and furniture pieces that need painting.

    Reply
  15. Betsy Lockman says

    August 15, 2015 at 3:41 pm

    I’ve always marveled at your HomeRite sprayer projects but was afraid to purchase one for fear of not getting it “right”!. I have bedroom furniture that is “brown” from the ’60s and my husband has been nagging me to replace it……but, I think that it would look great if painted and a sprayer might just convince him that I’m right!

    Reply
  16. Stephanie Lee says

    August 15, 2015 at 3:56 pm

    I would paint furniture, cabinets, anything I wanted with this tool. I think paint changes the look of everything, and it is affordable

    Reply
  17. Cindy Gough says

    August 15, 2015 at 5:05 pm

    I would love to win this sprayer to repaint our kitchen table!

    Reply
  18. Ann says

    August 15, 2015 at 6:05 pm

    Thanks for doing this post! I’ve been waiting to do this very same project and dreading it. Your tips are great and thanks for the opportunity to win the great FinishMax Pro! 🙂

    Reply
  19. Lynda Lamon says

    August 15, 2015 at 6:16 pm

    I would paint my kitchen cabinets and the exterior brick on my home. You did an impressive job on your kitchen cabinets! Can’t wait to see the full reveal! Thanks for the chance to win!!

    Reply
  20. Missy B says

    August 15, 2015 at 7:10 pm

    I soooooo want to win this! My kitchen needs to be painted.

    Reply
  21. Tammy says

    August 15, 2015 at 9:27 pm

    I have so many things I need to paint I wouldn’t know where to start!!! However, it would be nice to actually have the right tool for the job. I mostly just make do with what I have and often it just makes the job harder!!

    Reply
  22. Julie says

    August 15, 2015 at 9:50 pm

    Too many projects to name!!

    Reply
  23. Staci Torgerson says

    August 16, 2015 at 12:19 am

    Oh how would I use the Finish Max Pro Sprayer? Let me count the ways: 1st would be to paint my front door and garage doors, 2nd would be the laundry room cabinets, 3rd the kitchen cabinets, 4th guest bath vanity, I could go on and on. So much to paint!

    Reply
  24. Sondra says

    August 16, 2015 at 8:39 am

    The FinishMax sprayer is the exact wonder-tool I need to tackle our kitchen. The dated 80’s oak finish on our many kitchen cabinets would be the first (and most impactful) step to take our kitchen from “ugh” to “Wow!”. Thanks for your terrific reveal. It’s the motivation I need to jump-start this project!

    Reply
  25. Julie says

    August 16, 2015 at 9:03 am

    Wow what a difference! I have dreamed of painting our early 90s nondescript oak cabinets but wouldn’t know where to start.

    Reply
  26. Tara says

    August 16, 2015 at 9:24 am

    Amy, I have been waiting on pins and needles for your coverage of your kitchen cabinet makeover. The results are absolutely gorgeous. I’m so excited to see the video. I think it will give me the last bit of courage and motivation to do mine, if I have a video to watch and learn from. Always love when your newsletter arrives in my inbox.

    Reply
  27. Judy C in NC says

    August 16, 2015 at 10:11 am

    Your kitchen cabinets are fantastic – that in itself is a testament to the sprayer … Please enter me in to win … I really do want to change my cabinets. Thanks from Judy C

    Reply
  28. Judy C in NC says

    August 16, 2015 at 10:13 am

    I already subscribe to emails and love every one. Judy C

    Reply
  29. Caroline says

    August 16, 2015 at 11:03 am

    Love how you got a smooth finish on the cabinets!

    Reply
  30. Lisa says

    August 17, 2015 at 10:04 am

    I would love to paint my 80’s cabinets and wish I would have know how easy this was before I recently tackled a TV console with spray paint…UGH difficult!

    Reply
  31. Kevin says

    August 17, 2015 at 10:37 am

    I’d use this to paint the loft bed I’m working on for my son. I’ve been using foam rollers and it’s taking forever just to prime it all.

    Reply
  32. Melissa DC says

    August 17, 2015 at 10:44 am

    Just the motivation I needed to get busy on my den makeover! Looks FANTASTIC!

    Reply
  33. Kaye Newman says

    August 17, 2015 at 1:07 pm

    I would use this to paint my bathroom cabinets.

    Reply
  34. Angelia Vangiller says

    August 17, 2015 at 4:28 pm

    I have had big plans to paint my kitchen cabinets for quite a while now. Your post was very helpful. That is definitely the project I would start with if I had a sprayer. Your kitchen is gorgeous!!

    Reply
  35. Jill says

    August 18, 2015 at 12:06 pm

    Looks great!

    Reply
    • Kristy says

      January 29, 2020 at 5:59 pm

      How do you paint the sides of the cabinet doors?
      Thanks!

      Reply
      • Amy says

        January 30, 2020 at 2:16 pm

        Hi–for the side of the doors themselves I just used the sprayer, you can angle it slightly so the paint hits the sides and it worked perfectly. For the sides of the cabinets in the kitchen, those I used a roller on. Thanks, Amy

        Reply
  36. Lynda Lamon says

    August 18, 2015 at 2:47 pm

    I would paint my kitchen cabinets! Thanks for the chance to win!!!! Love your blog!!!

    Reply
  37. Ashleigh Hall says

    August 18, 2015 at 6:17 pm

    I would love to paint my kitchen cabinets. If I win, that’ll be the first thing I paint! 🙂

    Reply
  38. Hope Filson says

    August 19, 2015 at 2:38 pm

    Your cabinets time and time again turn out beautifully. I have beautiful solid wood cabinets in my new house but they are cherry and I would love to paint them white, it would look so much open and cleaner like yours do. This would be exactly what I would do if I win. As always, you guys always inspire me.

    Reply
  39. Colleen B says

    August 19, 2015 at 3:48 pm

    I have so many projects that I would use the sprayer on like my kitchen cabinets and bath vanity, small home décor items, furniture items I am refinishing and lots of items it would be working for a long time!!!

    Reply
  40. Cindy A. says

    August 19, 2015 at 8:09 pm

    This would be amazing to own! I would use it to paint our kitchen cabinets, bookshelves, and bedroom set. Thank you so much for the chance to win.

    Reply
  41. Gayle S says

    August 19, 2015 at 11:04 pm

    I have been wanting to paint my bedroom furniture for 2 years. This would make it so much quicker.

    Reply
  42. Karen U says

    August 20, 2015 at 5:25 am

    Oh my gosh, your cabinets came out fantastic! I totally want to get my kitchen cabinets painted! Thanks for the inspiration and the chance to win!
    Karen U

    Reply
  43. Susan S says

    August 20, 2015 at 3:09 pm

    I can’t believe how much the white updates the look of the room, and what a gorgeous finish! It definitely gives it a professional look that you just can’t get with a brush or roller, no matter how much you work with it. Amazing!

    Reply
  44. Stephanie Maupin says

    August 20, 2015 at 11:19 pm

    I foster newborn babies who are drug and/or alcohol addicted. My family also runs a foster care ministry called Faith 2 Foster (find us on Facebook!). The ministry has a cabinet for our clothes closet, but it is sorely in need of paint. That’s just the first project I would tackle!

    Reply
  45. mary ballerin says

    August 21, 2015 at 12:37 am

    Hi, I would use the Pro on my kitchen cabinets, they need painting so badly, the room would look so much better, they’re builder grade 1979 not even wood finish on the sides. I have a kit but would need to do a backsplash and counter, even if painted for now. Thanks!

    Reply
  46. Kelly | Typically Simple says

    September 12, 2015 at 2:10 pm

    I just saw your photo on Instagram sharing your cabinets and I had to come check them out on your blog! We have almost the same exact cherry colored cabinets and I’m not a fan.. I really want to paint them white. Are your cabinets solid wood?

    Reply
    • Amy says

      September 16, 2015 at 10:32 am

      Hi Kelly–yes they are solid wood. Kraftmaid. So far I have absolutely not regrets about painting them! So glad you came to check them out!
      Amy

      Reply
      • Kelly | Typically Simple says

        October 9, 2015 at 4:51 pm

        Thanks Amy! We have some sort of melamine type cabinets which makes me nervous that it won’t turn out as nicely. I’ll definitely be reading this post over a few times for tips before we take the plunge! 🙂

        Reply
  47. Vada Cobb says

    April 3, 2016 at 10:09 pm

    Love the cabinet doors as well as the back door. Am so going to do this! What colors did you use? Undercoat as well as the top coat? And is the “undercoat” simply one coat of latex? Thanks

    Reply
  48. Susan says

    January 9, 2017 at 4:27 pm

    Love the cabinets! You mention that you sprayed the doors and drawers, but what did you do about the bases-Use a brush or roller? Were you able to notice a differene between spray areas and brushed on areas? Still loving them?

    Reply
    • Amy says

      January 14, 2017 at 2:30 pm

      HI Susan–great question. I used a brush to paint the cabinet frames, I didn’t have any issues with marks and I can’t tell any difference between what was sprayed and not sprayed. Yes, totally still LOVE them! They are holding up great. Thanks,
      Amy

      Reply
  49. Richard Cook says

    April 19, 2017 at 3:14 pm

    Looks like I’m 2 years late to the party, but I’m wanting to paint our cabinets too and love how yours turned out! Thank you for putting together such an informative post. I do have two questions that hopefully somebody can answer: was there any issue with the woodgrain showing through the cabinets? Our cabinets appear to be solid oak and I think the grain will show through! Also with the pro paint is there any need to put on any kind of poly finish a protective coat? How has the finish held up for two years? Thanks again!

    Reply
    • Amy says

      April 19, 2017 at 4:10 pm

      Hi Richard, never too late 🙂

      I have not had any issues with wood grain showing through but my cabinets were cherry, not oak. I do think you may have some show through with oak if you get up very close? {My parents did paint oak cabinets in their kitchen and you can only tell if you look closely for what it is worth?} If that bothers you it might just call for more sanding and more coats of paint.

      I have not used a topcoat finish though I do think that is worth considering, there are some good clear coats out there. I wouldn’t want to recommend one though since I didn’t use one, I am sorry. My paint has held up really quite well over two years without one. I did recently do some touching up (mostly where I dinged the paint when I re-installed the cabinet doors} but the original paint is doing great even near the knobs. I clean them with a magic eraser and most of the scuffs come right off. I hope that is helpful!

      Good luck with your project if you decide to undertake it. I can promise you that the investment in a sprayer is key with this type of project. I recently tried to brush a smaller set of cabinets and gave up and went back to spraying–it went so much faster! I don’t know why I didn’t go that route from the beginning, ha! Let us know how they turn out 🙂 Amy

      Reply
  50. Andy Shepard says

    January 24, 2018 at 11:09 pm

    I will, definitely follow this instruction. I always wanted to change my cabinet color but, I always mess up so article really helps. Keep posting!

    Reply
  51. Diane says

    March 14, 2018 at 11:17 am

    I don’t understand why you didn’t remove the hinges before painting?

    Reply
    • Amy says

      March 14, 2018 at 11:23 am

      Great question–originally I thought I could leave them on to save time, so they were on for the sanding part. Then I realized that wasn’t going to work, and I removed them before I painted. Best, Amy

      Reply
      • Tara says

        June 28, 2018 at 3:41 pm

        Would you mind sharing which sheen of pro classic paint you chose? I’m torn between satin and semigloss

        Reply
  52. Reginne Kelly says

    July 2, 2018 at 12:19 am

    I will, definitely follow this instruction. I always wanted to change my cabinet color but, I always mess up so this article really helps.

    Reply

Leave a Reply to Kevin Cancel reply

Your email address will not be published. Required fields are marked *

Recipe Rating


This site uses Akismet to reduce spam. Learn how your comment data is processed.

Primary Sidebar

Lowest prices. Straight Teeth,

•Don’t Miss A Thing!!•

•Do You Know Jesus?•

•Featured In•

Holiday Gift Ideas

Footer

  • Email
  • Facebook
  • Instagram
  • Pinterest

Copyright © 2023 · 11 Magnolia Lane· Blog Design by Little Blue Deer
Privacy Policy

11 MAGNOLIA LANE IS A PARTICIPANT IN THE AMAZON SERVICES LLC ASSOCIATES PROGRAM, AN AFFILIATE ADVERTISING PROGRAM DESIGNED TO PROVIDE A MEANS FOR US TO EARN ADVERTISING FEES BY ADVERTISING AND LINKING TO AMAZON.COM AND AFFILIATED SITES. AS AN AMAZON ASSOCIATE, WE EARN FROM QUALIFYING PURCHASES. WE ALSO PARTICIPATE IN SEVERAL OTHER AFFILIATE PROGRAMS; THIS INCOME ALLOWS US TO MAINTAIN THE QUALITY OF YOUR USER EXPERIENCE AND KEEPS OUR CONTENT FREE. WHEN YOU PURCHASE THROUGH ANY OF OUR AFFILIATE LINKS, WE EARN A SMALL COMMISSION AND YOU DON’T PAY A CENT MORE THAN YOU WOULD OTHERWISE; THAT WOULD BE TACKY!   READ OUR FULL PRIVACY AND DISCLOSURE POLICY {HERE}.
  ©11 Magnolia Lane 2019. Unauthorized use and/or duplication of this material without express and written permission from this blog’s authors and/or owners is strictly prohibited. Please email us at admin@11magnolialane.com for more information.

  • MEET CHRISTY & AMY
    • IF YOU’RE NEW HERE…
    • WORK WITH US
    • 11 MAGNOLIA LANE 101
    • DISCLOSURE + PRIVACY (the fine print)
    • BEST OF 11 MAGNOLIA LANE
    • Back
  • TOUR OUR HOMES
    • TOUR OUR HOMES
    • CHRISTY’S MAGNOLIA COTTAGE
    • CHRISTY’S MCC HOUSE
    • AMY’S NEW HOME BUILD
    • HOLIDAY HOME TOUR SERIES
    • SPRING HOME TOUR SERIES
    • Back
  • CELEBRATIONS
    • EVENTS + ENTERTAINING
    • GIFTS
    • HOLIDAYS
    • RECIPES
    • Back
  • HOME
    • CLEANING
    • DECORATING
    • ORGANIZING
    • ROOM BY ROOM
      • BATHROOMS
      • BEDROOMS
      • CLOSETS
      • CRAFT ROOMS + OFFICES
      • DINING ROOMS
      • KIDS’ ROOMS
      • KITCHENS
      • LAUNDRY ROOMS
      • LIVING + GREAT ROOMS
      • OTHER SPACES
      • PANTRIES
      • PLAYROOMS + BONUS ROOMS
      • PORCHES + OUTDOOR SPACES
      • Back
    • TIPS
    • Back
  • SHOP
    • SHOP OUR INSTAGRAM
    • SHOP OUR AMAZON STORE
    • FRIDAY FAVORITE FINDS
    • 11 ML ETSY SHOP
    • 11ML ORGANIZING SHOP
    • Back
  • PROJECTS
    • CRAFTS
    • DIY PROJECTS + TUTORIALS
    • FURNITURE
    • PRINTABLES
    • WINDOWS, DOORS, + WALLS
    • Back
  • LIFE
    • FRIDAY FREE FOR ALL
    • HEALTH
    • SIMPLY ON SUNDAY
    • TRAVEL
    • Back
  • CONTACT
    • Email
    • Facebook
    • Instagram
    • Pinterest
2678 shares
  • 68