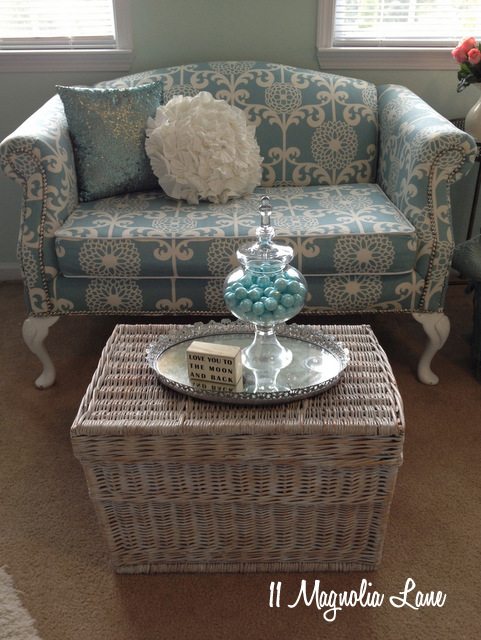
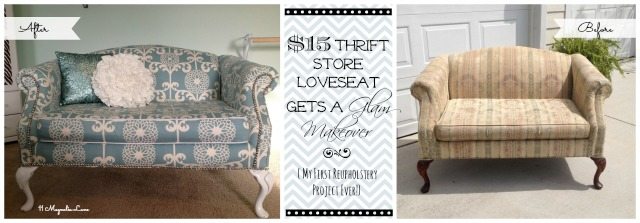
I was kind of surprised (but pleased) at the big response to my $15 loveseat redo. If you haven’t seen the original blog post yet, with all the “glamour shots” of the finished project, click {here} to read it.
Today I’m going to show you photos of what I did. Keep in mind that the reason I only spent $15 on the loveseat was because I wasn’t sure I’d be able to complete the project–I’ve never reupholstered before, after all. I have recovered dining room chairs like these, but that is nowhere near as challenging as a loveseat! I thought that if I wound up dragging it to the curb, at least I would only be out $15 and a few hours of my time. Yes, the fabric cost money, too, but I was hoping I’d be able to use that for something else eventually. Fortunately, it worked out great!

Before we get started, let me answer a few of the most common questions I fielded over on Hometalk:
1. No, I have never done this before. I didn’t take a class or even watch a video on YouTube.
2. I am a terrible sewer. I can sew straight lines and make ruffles. If I had to do it over again, I’d look for a piece that didn’t have any removable cushions at all. My next-door neighbor, Kelli, and her super-fancy sewing machine totally bailed me out on the seat cushion. She showed me how to line up the fabric and set the zipper, and that cushion is gorgeous! I now owe her several hours of decorating–we bartered. 🙂
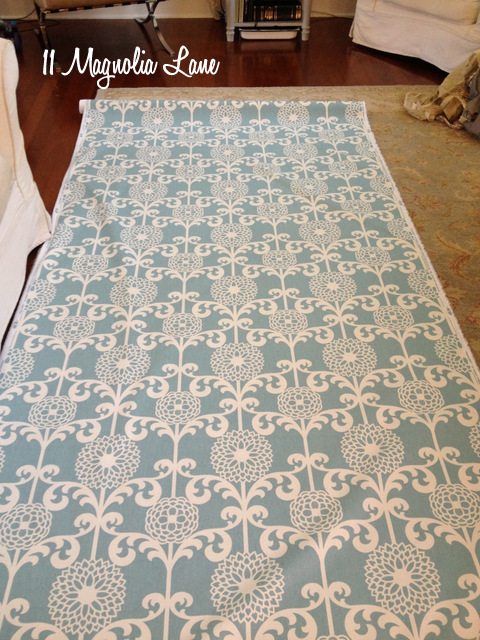
3. The fabric is drapery/upholstery fabric of medium weight. I didn’t care for any of the heavy weight upholstery fabric I looked at. I used Waverly’s Fun Floret pattern in Spa and I ordered 8 yards. I used this graphic that told me a loveseat like mine should take 6 yards, and then I added two for the cushion. I had plenty, but not too much more than I needed.
4. I Scotchguarded the fabric when I was done. This is in a ten-year-old’s room, after all! Don’t forget, if it gets horribly stained I know how to recover it now, or I can always paint it like my gray chair.
5. The nailhead trim is the kind that comes on a roll. I used 1-1/2 rolls and bought mine at JoAnn using a 40% off coupon (although if you need to buy it online, this is the exact product I used). I also had to purchase cording, white canvas (because I wanted white contrast piping), staples for my pneumatic staple gun, and batting to replace some that was yucky. My total cost for the entire project was just under $150.
6. Yes, I know that I picked a tricky fabric for my first attempt, but thanks to everyone who noticed how hard I worked to make sure it lined up correctly. The take-home point is that you should pick the fabric that you love. You can line it up correctly, even if it is your first try. You just have to take your time and think about your pattern before you cut.
7. I used a pneumatic staple gun that came with my amazing nail gun–the kind that uses a compressor (it’s this one). While you could do this sort of project with a regular heavy-duty nail gun, I was happy to have the pneumatic gun, because I probably used a thousand staples. Seriously.
8. My only tip for selecting a piece of furniture to reupholster is to smell it, thoroughly, before you buy it. You will want to reuse as much of the foam and batting as you can–foam in particular is quite expensive–so you will not be able to rehab a piece that was owned by a smoker, or just a smelly person. 🙂
I’ll also discuss along the way, and as always, you can leave me a comment with anything you want me to clarify.
This is going to be a long post, so bear with me!
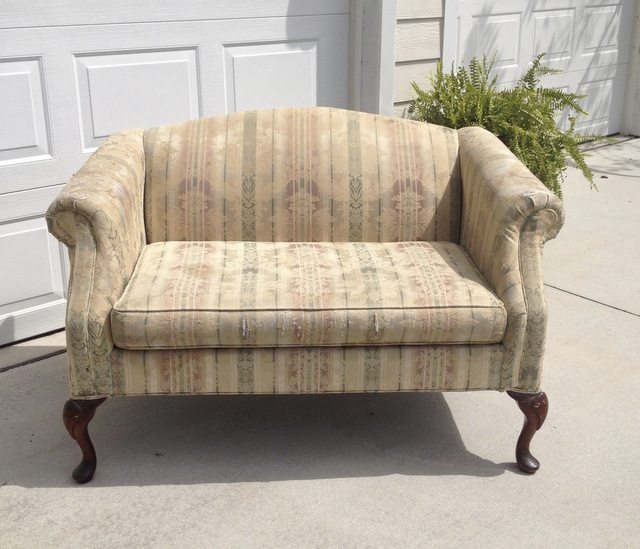
Here’s the loveseat when I brought it home. There were lots of rips and stains on the fabric, but I thought she had nice bones and lots of potential.
My son helped me drag it into the house (my husband was deployed), and I set it up on several dropcloths in the living room. I removed all the fabric and staples inside (it took forever) and then moved it outside to spray it down with Lysol and do the actual reupholstering. I set up in the garage since that’s where my air compressor lives.
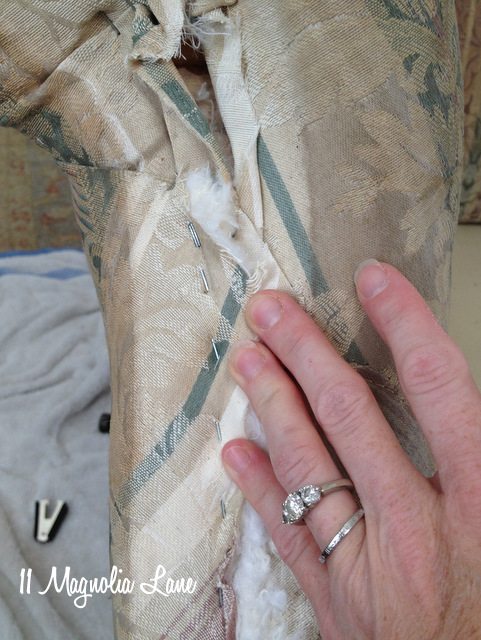
I removed thousands of staples, using several flat-tip screwdrivers, a staple remover (which succumbed quickly to the heavy duty staples they used), and a pair of needlenose pliers. Make sure your tetanus shot is up to date before starting this part of the project! I’m only half-kidding, by the way.
While every piece is different, furniture is put together in layers. Each layer hides the staples from the layer before. When you take a piece apart, I highly recommend that you both take pictures and notes (and lots of both) so you can then put your new fabric on in the reverse order. Try not to rip the fabric as you remove it because you want to use those pieces as patterns to cut the new fabric.
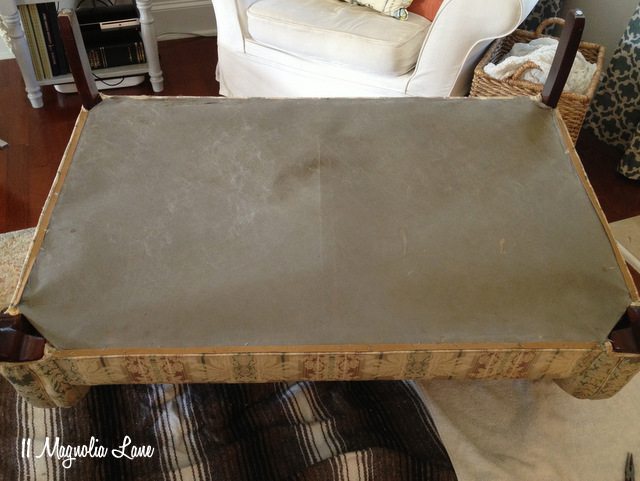
The first piece to come off is usually the bottom. This is upholstery mesh and it’s a very lightweight polyester that runs about $1 a yard. It will likely tear when you remove it, so hang onto it so you know how much to buy to replace it (I used a sheet, but I’ll show you that later).
See those cardboard strips? Try to save those if possible. If they tear, you can always cut more from an empty box.
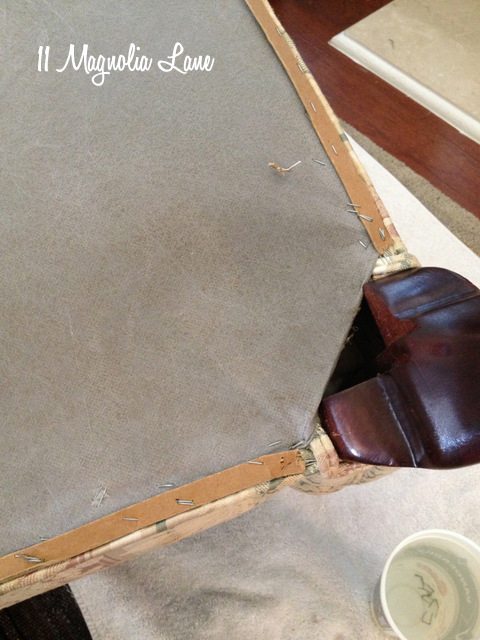
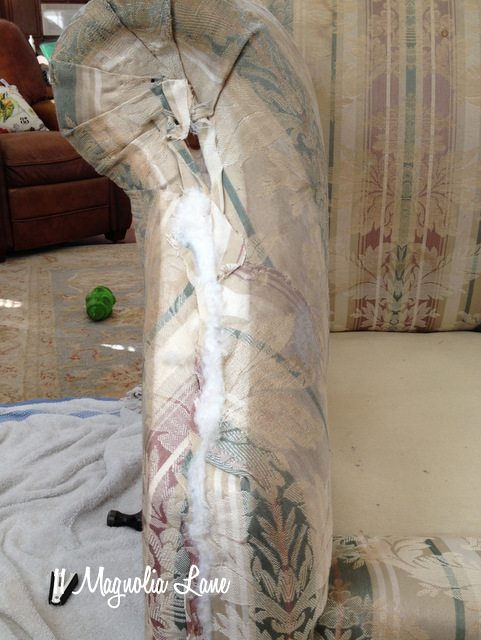
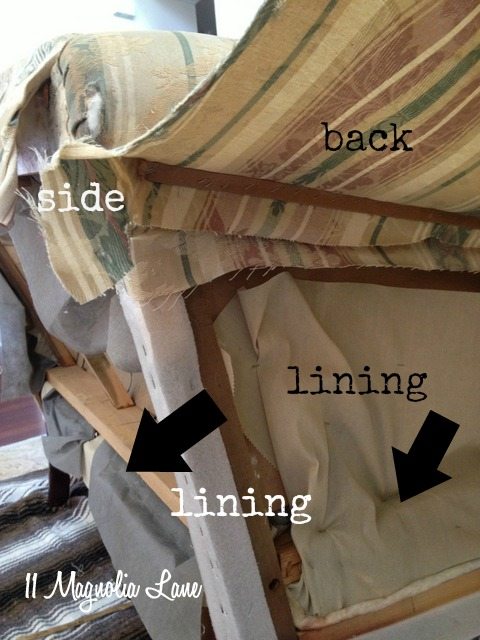
Once the bottom was off, I could tell that the back was the next piece to remove (this is common) because I could see all of the edges. Check out those springs!
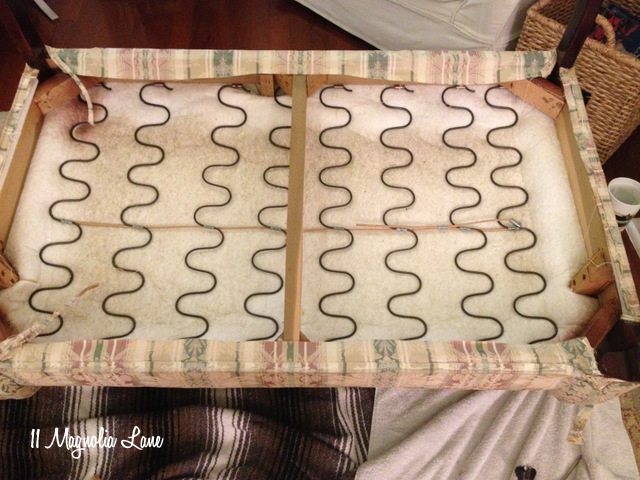
Here’s the back:
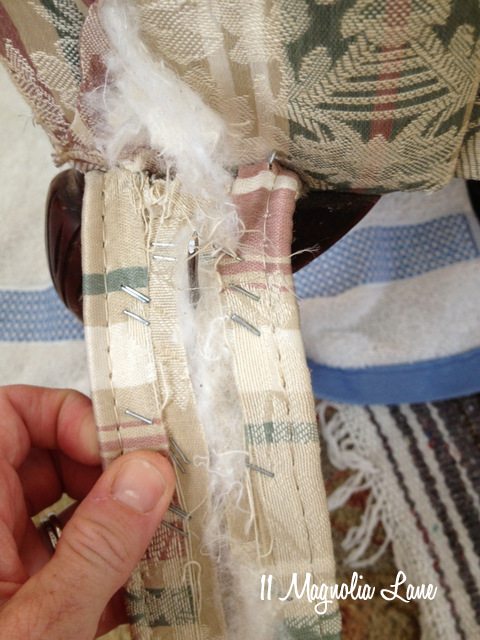
I inserted a flat tip screwdriver under the piping and gently pried it up. There are often metal teeth (VERY sharp metal teeth!) on the back section, so be careful. Try not to bend them as you remove the back as you will need to reuse them. I forgot to take a picture of them, but it’s a metal strip with sharp triangular teeth on it, and the back fabric is folded around it.
The cording/piping (I use those two terms interchangeably) is usually stapled on separately. Label the piping as you remove it so you know how much you need for the reupholstery job.
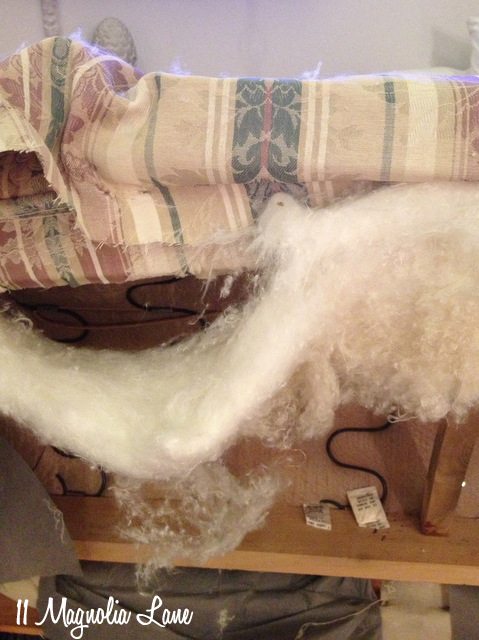
I also kept track of where I removed loose batting. I discarded it (it was yucky!) and replaced it later.
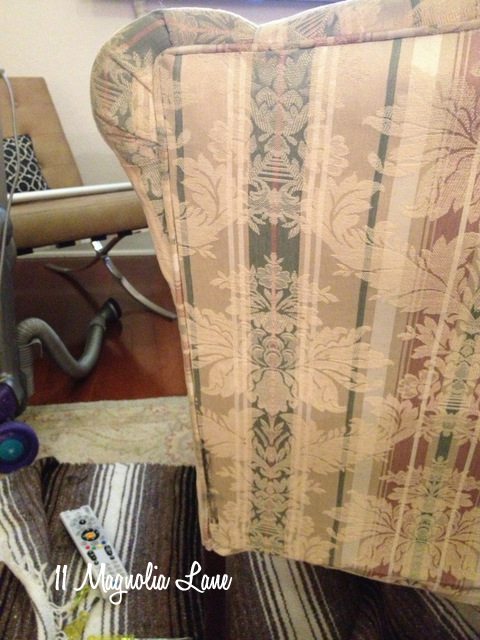
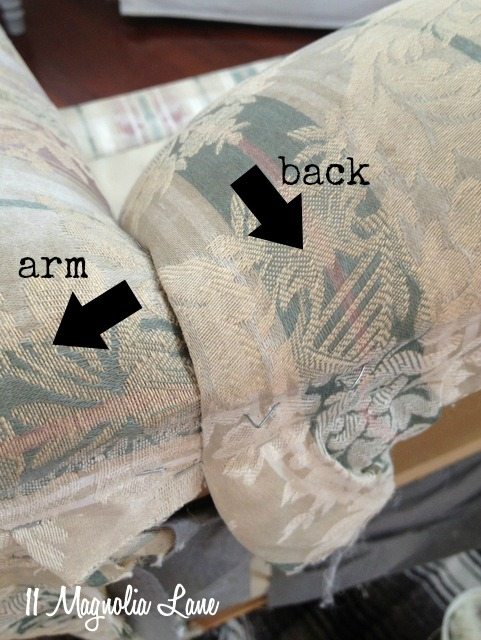
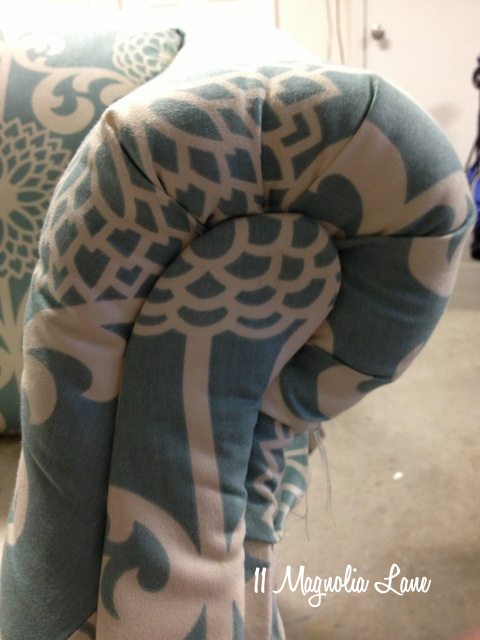
While we’re on the back, take a look at how the back of the arms is pleated here, because you’ll want to do the same thing when you’re redoing it. Sometimes it’s so helpful to see where the fabric is folded!
From this point on, you just remove fabric where you see that raw edges (staples!) are showing. The next piece I removed was the seat back, but only at the top edge. See how it’s wrapped over the arm in the photo below?
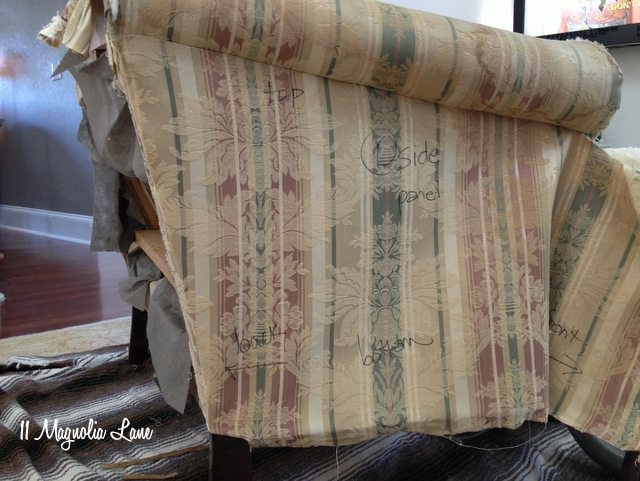
Grab a Sharpie and write on your fabric, so you know which piece goes where, and how it’s oriented. SO helpful!

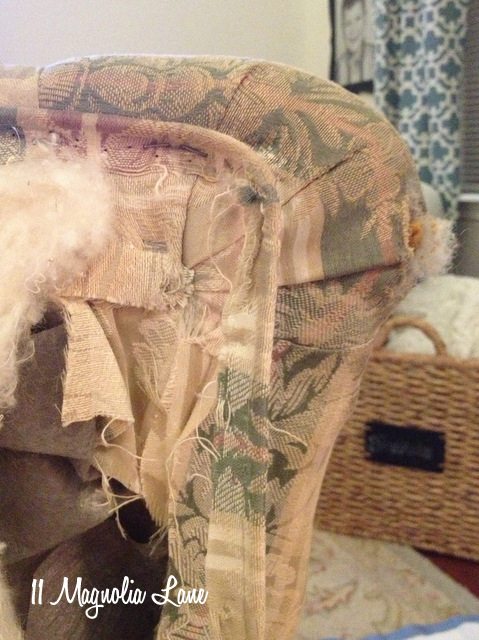
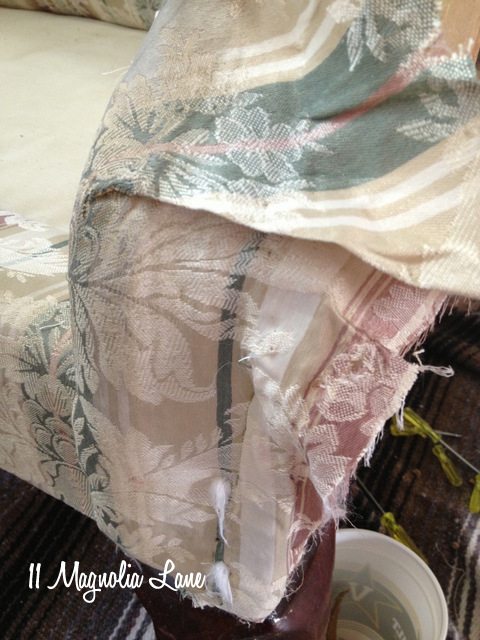
I then moved around to the front and removed the arm pieces. On this piece, they were secured to the frame by four nails (on each piece) and I simply pried them off with a flat tip screwdriver.
![]()
Be careful if you have this type of arm since these pieces are usually made of cardboard that’s wrapped in a layer of batting and then fabric. The cording is stapled around the back edges as in the picture below, and you can reuse the upholstery nails if you remove them carefully. You’ll also want to reuse the cardboard pieces, recovering them with batting and your new fabric. And yes, I have no fingernails. The price I pay for being a DIY’er!
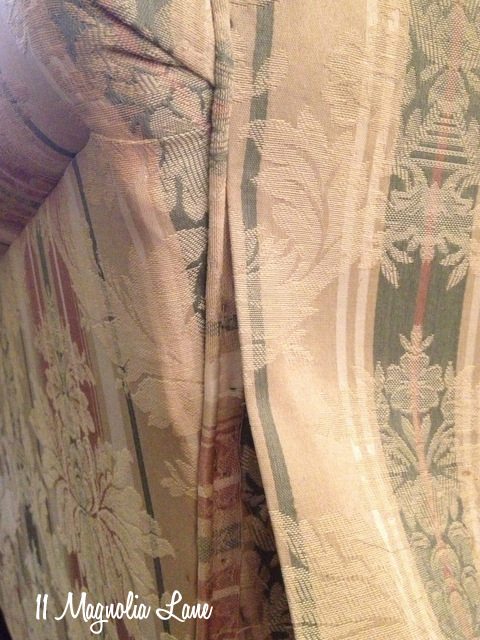
I had an “Ewww!” moment when I saw how incredibly dirty the fabric was, because it was a completely different color under the arm piece! But then I got over it and paid attention to how the fabric was pleated on the front of the arm roll (kind of like the back was, right?!) and attached on the front of the arm–raw edges that the front piece would cover. Layer upon layer upon layer…
You’re seeing about one photo out of every six or seven I took–lots of close-ups, lots of notes. It made it a snap when the time came to reverse the process!
Like I said before, each piece is different, but the next thing I did was remove the fabric from the sides:
and then the arms:
I could then finish removing the fabric from the backrest. Remember, I had pulled the staples out from the top when I was removing the fabric on the back.
One thing that made perfect sense when I studied the “guts” of the chair was how the fabric (or upholstery lining, in this case) was pulled through the sides and back and stapled to make certain sections, like the back and seat, lie flat. No need to try to wedge a stapler into those crevices between the seat back and arm–you just pull the fabric through and staple it on the outside of the arm. This is an area that will definitely vary from one piece of furniture to the next, but it will make sense when you see it!
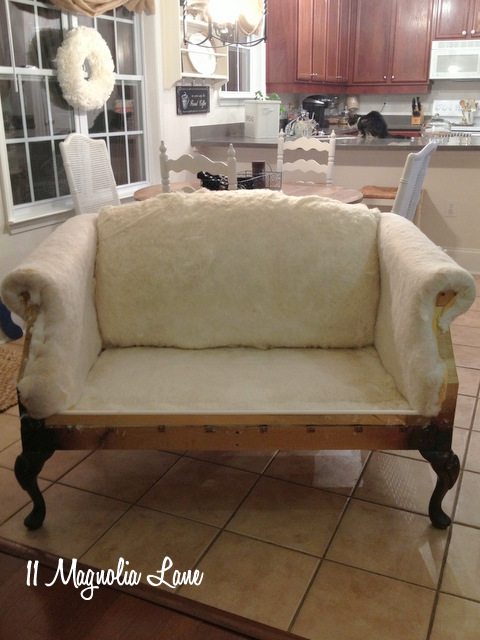
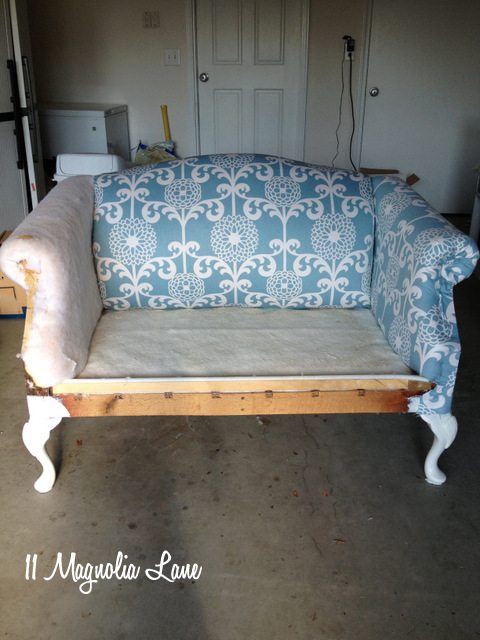
After a few hours of work, and several HGTV shows, my loveseat was buck naked!
I rolled out the fabric:
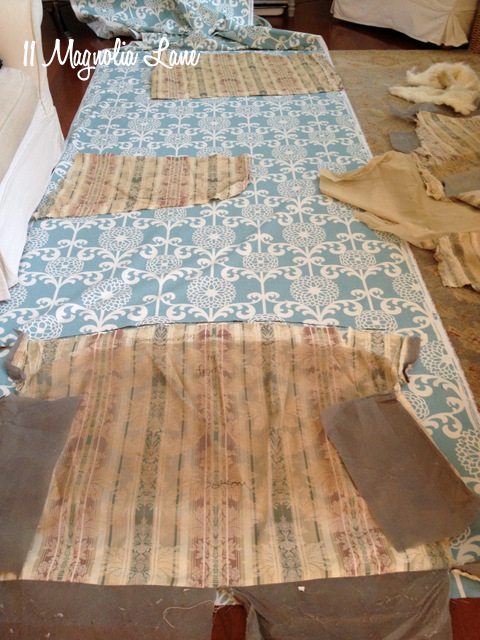
I laid out all the pieces on the fabric, being careful to orient them so that the large flowers (dahlias?) were centered where they needed to be centered. See the lining on the bottom piece of fabric in the photo below (that’s the seat back, by the way)? That’s what I was talking about earlier–the lining gets pulled through and stapled on the sides and the back.
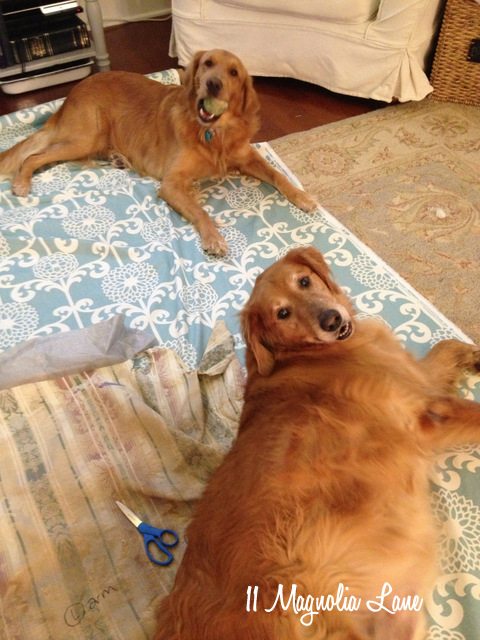
And then all progress stopped when Harley and Sunny moved in, thinking this was some kind of new dog bed. I retired for the evening with a glass of wine!
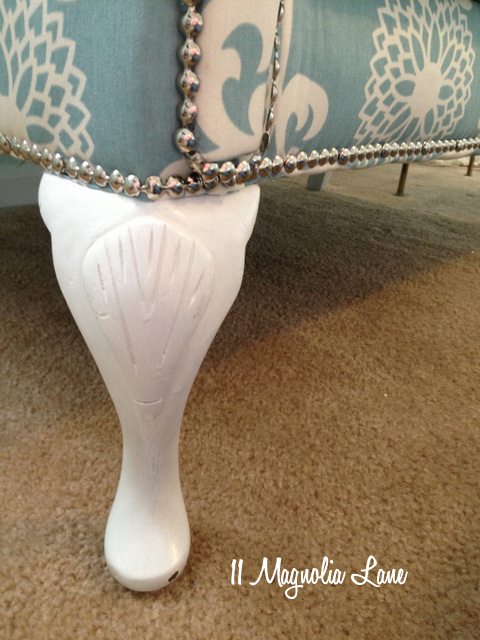
When I had a chance to work on the loveseat again, I moved to the garage. I sprayed the entire frame down with Lysol (I had already vacuumed everything I could) and painted the legs white. This is really where you want to paint the legs if you’re going to, although I had several folks on Hometalk tell me I should have left them brown. Everyone has an opinion! What do you think?
I then simply reassembled in the order I had removed things. I actually started with the back and sides as I didn’t have the upholstery liner for the seat fabric at that point. There is some flexibility in the order of reassembly. Where lining was sewed to fabric, I did the same thing.
Remember the way the arm fabric was pleated? It’s not exactly the same, but close for my first try.
There’s not much to tell about redoing things, but I went slowly, made sure my pattern lined up, and took my time to be sure that I was leaving as few wrinkles as possible. It’s far from perfect, but it was the best I could do on my first attempt!
As I mentioned earlier, I used a brown zebra patterned sheet (from the thrift store, of course) instead of using the upholstery lining. It was a poly/cotton blend and I figured it would have as much give as the traditional lining would.
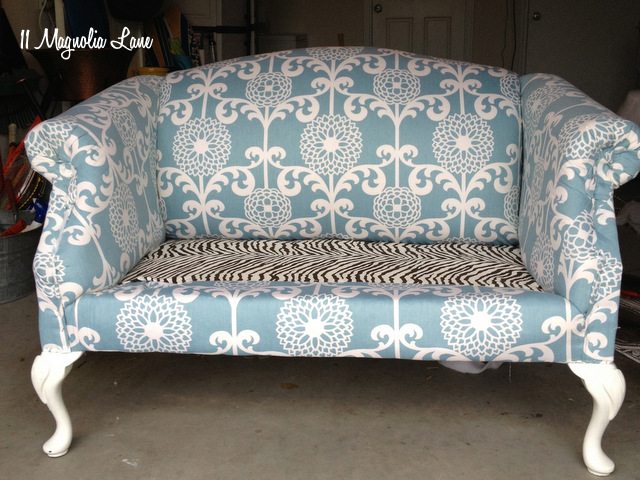
I used the same fabric on the bottom. This was the very last piece I replaced.
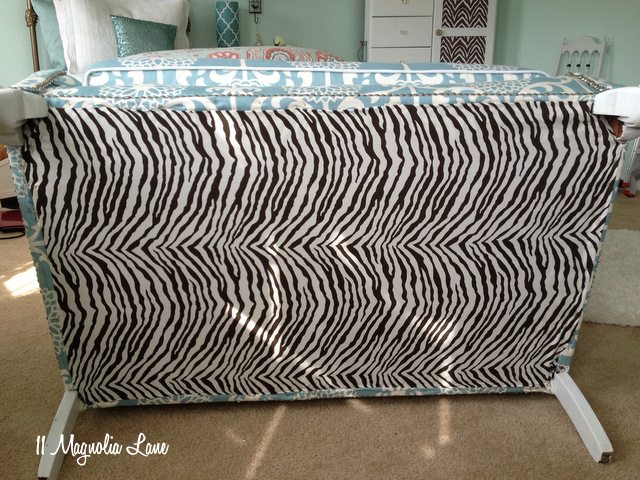
This picture didn’t turn out very well, but on my neighbor’s recommendation, I wrote the yardage along with the fabric details on the underside, in case I ever need to recover it again, although I sincerely hope I won’t!

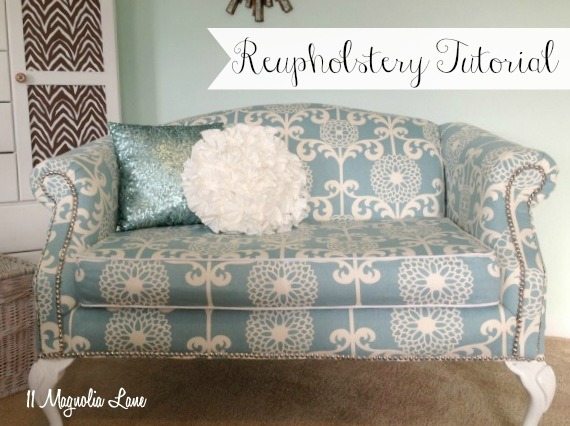
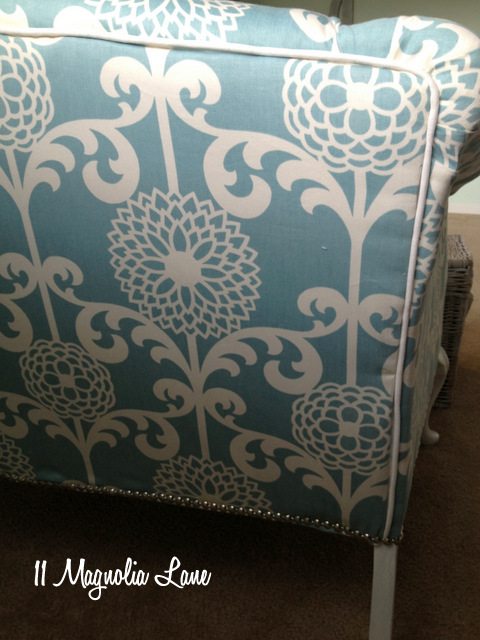
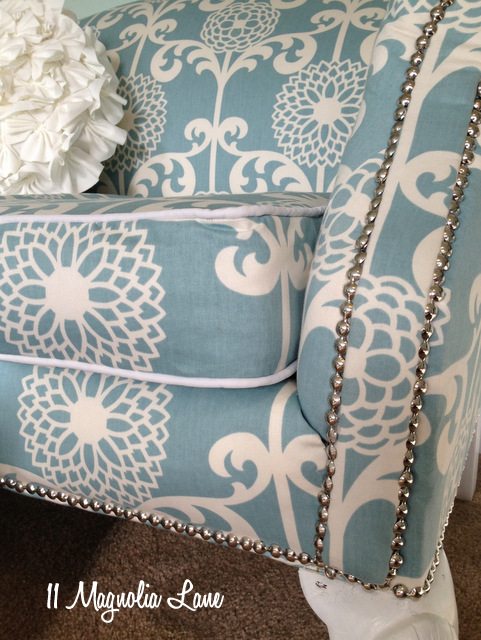
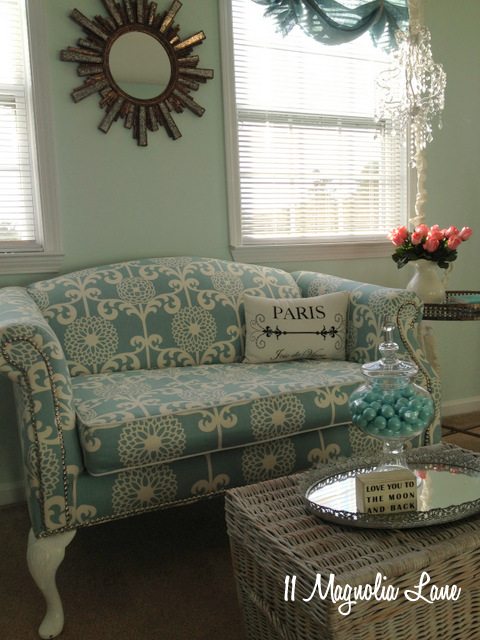
The loveseat originally had piping everywhere that you see nailhead trim on the finished product. I still used piping on the back and the seat cushion {Miss Mustard Seed’s video tutorial on sewing piping is excellent if you don’t know how}, but nailhead trim everywhere else. It was honestly just a guess at to what would look best, but not overdone. I used the nailhead around the arm pieces:
and the bottoms of the sides:
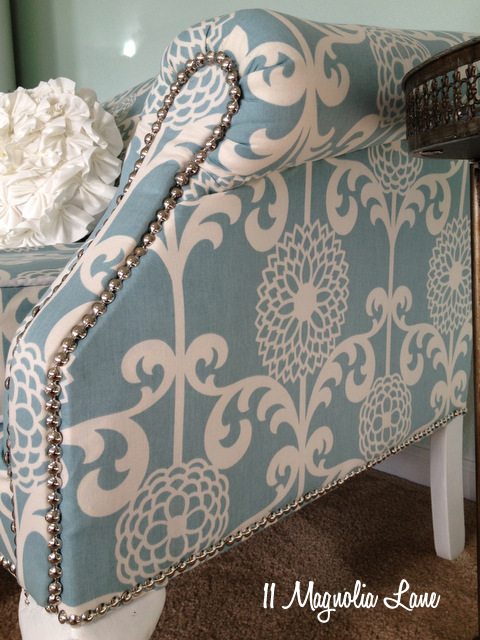
and around the bottom of the front:
and the bottom of the back:
This is the nailhead trim that I used (it’s less on Amazon than it was at Joann, even with the coupon–wish I’d known that a month ago!). We are affiliates for Amazon, but you pay the exact same price whether you order through this link or directly through Amazon.com, of course.
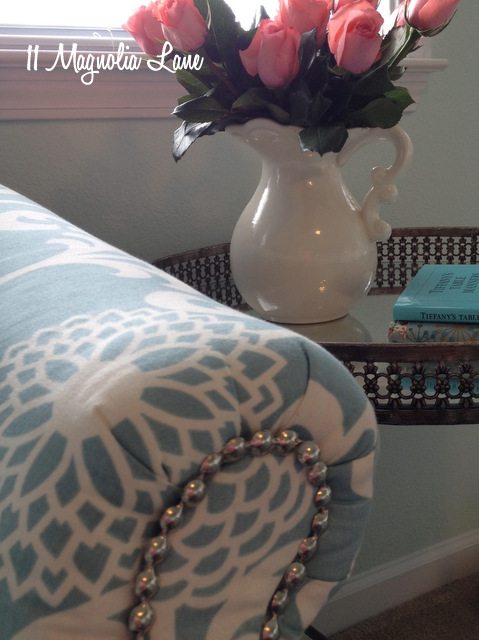
Around the top and sides of the back, I used white cording and I think it was a nice contrast against the aqua and white of the floral fabric.
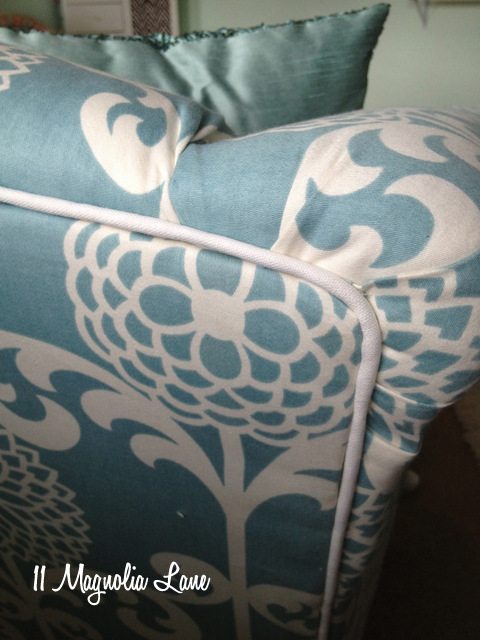
Kelli and I also used the white piping for the seat cushion. We reused the original foam for the cushion.
It’s not perfect, but it’s good enough for my first attempt, and now that I know I can do it, I can’t wait to try again. It wasn’t hard, but it was time-consuming and required a fair amount of patience. If you’re like me and it annoys you to pay hundreds of dollars for someone to do something that you’re pretty sure you could do yourself, then give it a shot. On the other hand, it takes quite a few hours to complete a project like this, so pretty much anything they charge is well worth your time! Your choice…
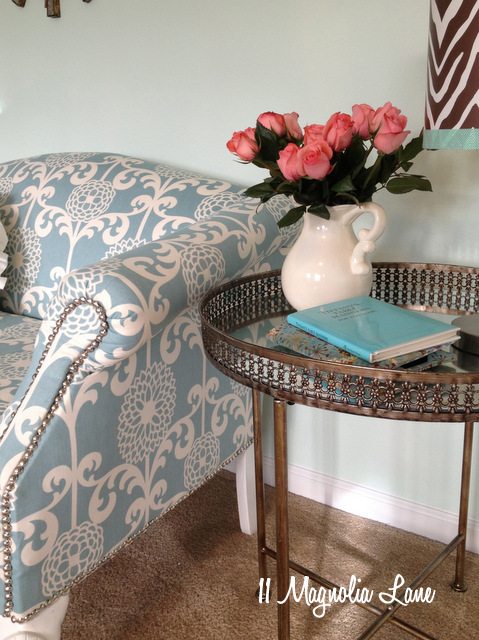
Here are a few “after” shots to finish things off…and please let me know if I can answer any questions.
Our posts contain affiliate links. If you make a purchase after clicking on these links, we will earn a small commission, which helps to keep our content free. You don’t pay a cent more than you would otherwise, since that would be tacky!
Thanks for stopping by!