I don’t know about you, but I have an almost pathological obsession with taking down my holiday decor. Today is February 15th, and the few red and pink Valentine’s Day items in my house go away TODAY! Yes, I have a hard time leaving my Christmas decorations up until New Year’s, but I force myself. 🙂
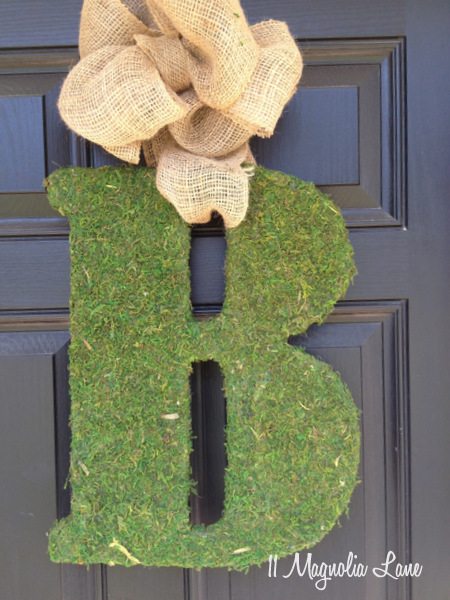
Since I’m taking down my decoupaged hugs and kisses XO wreath today (read about that HERE for next year), I needed something to replace it on my front door. And since it’s mid-February, for those of us here in Tennessee, it’s almost Spring. So, what better color than green for the front door?
Our posts contain affiliate links. If you make a purchase after clicking on these links, we will earn a small commission, which helps to keep our content free. You don’t pay a cent more than you would otherwise, since that would be tacky!
Pottery Barn sells their moss letters for $79 a pop {here}. Of course, theirs are LIVE moss, but even so, that’s a little steep for me. I completed this project for about $17, and that’s including the cost of a glue gun and hot glue sticks, which I already had on hand.
Here’s what I bought at Hobby Lobby:

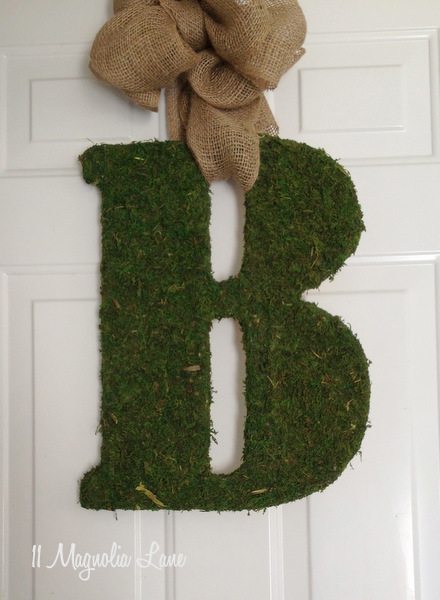
The big wood letters are $12.99 at Hobby Lobby; I bought mine on a 50% off week. It’s 18″ high. The sheets of moss are $7.99, and I used my 40% off coupon. I also bought a roll of burlap ribbon there for $2.50, since I had just cut up the last of my old grain sack from the flea market. (Don’t have a Hobby Lobby nearby? Buy the moss online here, the 18″ wood letter here, and the burlap ribbon here).
Amy talks about covering a sphere with moss HERE, and I just followed her directions, which are basically cut the moss to fit, glue it to the form, and cut slits to make it lay flat. I copy all of her ideas eventually, anyway. Did y’all know we were college roommates? Sometimes I think we’re twins separated at birth because our taste is pretty much identical, but I digress…back to the moss! I think the moss is very easy to work with–it’s so forgiving since it doesn’t show the seams when you glue in a small scrap to fill in a spot. However, mark my words, it makes an absolutely gigantic mess! Be prepared to vacuum your counter, your floor, and yourself when you’re done! I only had half a package of moss when I started this project, and I ran out part way through. I hate when that happens!

Um, yes, I covered a sphere with moss and stuck it in an urn. Amy told me to! 🙂 And doesn’t it look great?!
After an emergency stop at Hobby Lobby, where the manager knows me by name (it’s like when Norm used to walk into Cheers, if you’re old enough to remember that), I plugged in the glue gun again and finished up the project. Here’s what I wound up with:
Here are a couple of tips:
- Run the moss around the edges of the letter. Mine covered all the unfinished wood. I guess to save a little on moss/glue/work, you could also spray paint your edges dark green, but I think this looks better.
- Save all the tiny pieces you have left over from trimming the moss; you can glue that on your letter in any gaps you see and no one will be able to tell. Or, use it on the next project.
- I used the burlap ribbon to dress things up a bit; however, the letter is actually hanging on a metal wreath hanger. The burlap hides it, though. I formed a bow through trial and error (there is NO method to my madness when it comes to bow-making) and secured it with florist wire). As an aside, I really, really like the burlap ribbon I bought at HobLob!
That’s it–easy! I’m probably going to put this letter on the front door and take the moss sphere and the urn out there, too. I already have a big wooden “B” on the old window hanging on my porch, and that would be redundant, so that’s going to go on the screened porch for awhile, and I’m going to hang a grapevine wreath in its place. I’ll let you see a few pictures when I’m done, either in a post or on our Facebook page.
What do you guys have on your front porches these days?
Thanks for stopping by!