UPDATE: Read about the magazine feature for this kitchen HERE!
{Full source list at the end of this post}
Hi there, everyone–I’m laughing as I write this, because I know that if you’ve seen part 1 of my kitchen reveal on the DIY Showoff or Here on 11 Magnolia Lane, then it probably seems that not more than a few weeks have passed–and now I’m changing it again!
I know I’m not the only one constantly tweaking and updating things in my decor, and although I was thrilled with how my kitchen cabinets turned out, I didn’t like the paint color I put on the walls. I also wanted to tear down my tile backsplash and update my range hood. I lived with it for about three months, but Thanksgiving was drawing nearer, and I was hosting the holiday this year, so I had motivation to proceed quickly.
Here’s what I started out with when we bought the house in June (it’s more of a “during” than a “before” but you get the idea!):

Here’s my first reveal, in August:
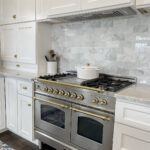
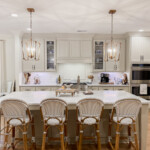
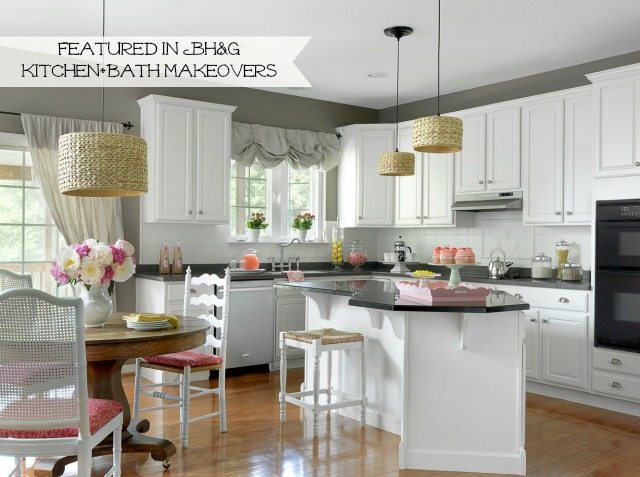
 Now, here’s reveal number two, after painting the walls, painting the tile backsplash, spray painting the exhaust hood with stainless steel paint, and adding window treatments (made with canvas drop cloths):

I normally choose lighter paint colors, but the Old Prairie by Benjamin Moore that I used first had some green undertones that just didn’t work with my White Dove cabinets. After trying three different paint samples on the wall for a few days (BM’s Camouflage, BM’s London Fog, and BM’s Waynesboro Taupe), Waynesboro Taupe–the darkest of the three colors–won.

Everyone should have three paint colors on their wall!
After I painted the walls, I turned to the backsplash. I read up on painting tile, and decided that I really had nothing to lose, because I was already planning on taking the backsplash down. Why not try to paint it first and see if I could save time and money? The brown of the tile really clashed with my countertops–they have some brown in them but they’re really more gray. The warm and the cool tones right next to each other really bothered me (my husband thought I was nuts about that, although he admits that he likes the result).
First, I scrubbed the tiles really well. TSP works great, and I also used rubbing alcohol to degrease the tiles. Next, I had to wait a day or two before priming to let the grout dry (I HATE to wait to start a project!). I tried to sand the tiles but they were too hard to really get roughed up by the sandpaper, so I was sure to use a primer for glossy surfaces that specifically mentioned ceramic tile (Zinsser Bulls-Eye 123; although sometimes I use their oil based primer in the gold can, too). I primed with one coat, and then applied two coats of oil-based paint. I bought a quart of Behr from Home Depot, tinted to match White Dove at half strength. I used a brush to prime and paint–you really have to work a bit to get the paint into the grout and a roller just wasn’t cutting it. Plus, I have some decorative tiles that needed extra attention. While I think I should add a clear coat at some point, I’m really happy with how it’s turned out, and I’ve been able to wipe splatters off without removing any paint. (UPDATE: Read how the painted tile backsplash is doing a year later HERE)
Here are a few before and after shots of the backsplash. Note the frozen pizza and the Sonic milkshake in the first shot. These are essentials for effectively tackling home improvement jobs!


The exhaust hood and fan were black, and while I’m dying to pull the old one out and do a nice, custom-built one, I decided that a $5 can of Epoxy appliance spray paint would be a worthwhile investment for a quick fix in the meantime (I used this paint). I did take the hood down to spray it, but that’s because I’m pretty comfortable working with electricity and didn’t mind rewiring it when I hung it back up. I think you could probably use tape and plastic to protect the cabinets enough to spray it in place, if you needed to. Love the appliance spray paint!


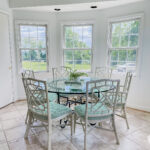
My last update was to add the window treatments around the sliding glass door, and this really made a huge difference in the room. I used canvas painter’s drop cloths (try these) and sewed them to the right length. Mine are tied with jute twine and swagged, but if I let them hang they would puddle on the floor (which was intentional). The balloon valance over the sink is completely no-sew. I just draped the dropcloth (another 6 ‘ x 9’) and tied three pieces of twine around it and adjusted it (click here to read that tutorial). Since we’re a military family and move frequently, I need as many no-sew options as possible, just to keep things versatile for the next house.


Someone always asks, so the faucet I purchased is here.
I think I might be done with the kitchen, at least for awhile, but I’ll be sure to let you know if I make any more changes. In the meantime, I’ll leave you with a few more pictures. Thanks for stopping by!


Sources:
Paint Colors: Benjamin Moore’s Waynesboro Taupe (wall), BM White Dove (cabinets),BM White Dove (half strength; tile backsplash), vent hood (Rust-Oleum)
Bridge Faucet: Amazon
Cup pulls and cabinet knobs: Amazon (and the best price by far that I’ve seen!)
Seagrass drum shades: Ballard Designs
Curtains and valance (DIY from canvas drop cloths, see the tutorial here); rods purchased from Hobby Lobby
Pedestal table and chairs: vintage
Canisters, teakettle, apothecary jars, pink trellis towel: HomeGoods
Our posts contain affiliate links. If you make a purchase after clicking on these links, we will earn a small commission, which helps to keep our content free. You don’t pay a cent more than you would otherwise, since that would be tacky!