{Full source list at the end of the post}
So, I finished this project in August, but I’m just now writing about it. I think it’s because the project itself wore me out so much that I didn’t even want to think about it anymore, much less write about it. It’s still not completely finished, either, and that’s probably part of my reluctance to reveal since I consider it a job undone. I’ll tell you all about what I still need to do at the end of the post…you’ll get full disclosure here! Prepare yourselves, though, because this is of necessity a long post, with lots of pictures.
The background info is that we moved in June, from North Carolina to Tennessee. My husband is in the military, so moving is something that we do often and well. However, since we were living in my *dream house* in North Carolina, this was a harder move than usual. (FYI: If you’ve been following us for any amount of time, all of my pre-June 2011 posts will feature the old house) In hindsight, I realize full well that I was completely spoiled and that all other houses will be second-rate from this point forward. My husband didn’t quite have to drag me out of there by my fingernails, but a few tears were shed!

I miss you, Old House!
Our new house is just fine. It’s about 90 years newer and while it’s not my “forever house,” I realize that we are incredibly fortunate and blessed to have such a lovely place to live. I’ve spent the last few months beginning to make it our own.

Our new house–slowly but surely we’re making it home.
OK, here’s where we get to the deal-breaker. Again, I was spoiled, but here are a couple of pictures of my OLD kitchen:

The kitchen in our old house was my dream kitchen.

We loved the built in banquette around the eating area.

The Sub-Zero fridge was kind of nice, too (sigh).
I’m missing the pictures of the beautiful French doors out onto the screened porch, but I have to stop here, or I’m going to get misty! Again, I was spoiled. This was NOT a contractor-grade kitchen, by any stretch of the imagination. Now, let me show you the photos of the kitchen in our NEW house, and you’ll understand why I had to take immediate action!

Forgive the mess on the island; the home inspector was here that day.

Dark, dreary, and dated–what else could you want? (this is the previous owner’s decor)

I liked the rest of the house, but I hated the kitchen. I like everything to be bright, white, and light-filled. I hated the dark cherry cabinets (I know, some people like them, but they’re just not my thing), the tons of potlights (not even a chandelier over the breakfast nook), the black appliances, and the backsplash. I did like the countertops (Corian and granite) and the hardwood floors, though.
{Our posts contain affiliate links. If you make a purchase after clicking on these links, we will earn a small commission, which helps to keep our content free. You don’t pay a cent more than you would otherwise, since that would be tacky!}
So, I knew that I was going to paint the kitchen cabinets, and I also knew it was going to be a really hard job. I didn’t give you a 360-degree view of the kitchen, but there are cabinets around the fridge area and in the island, as well as a built-in desk. All told, I have 27 cabinet doors and 20 drawers. I figured this wouldn’t be a weekend project, and wow, was I right. It took me five weeks! Oh, and Amy and her kids came to visit for a week and half in the middle. Only a very, very good friend would put up with the kind of mess we had around here, and she even helped me sand!

I am so Type A that even looking at this picture makes my teeth hurt!
There are tons of great tutorials out there on how to paint your kitchen cabinets, so I won’t go into great detail, other than to say that I read them all first and I didn’t cut any corners. I used Zinsser’s oil based primer (in the gold can) to prime and Benjamin Moore’s Satin Impervo oil paint in Dove White (two coats) for the cabinets, and I’m really pleased with those choices. I brushed the cabinets rather than spraying them since I don’t know how to use a sprayer and I was born holding a paintbrush, but in hindsight I’d probably pay someone to spray the doors. Mine look good, but it would have saved me days. I also thought about glazing them (and still might, one day, once I’ve recovered) but haven’t yet. (Update: I have since learned the ways of the paint sprayers, young Padawans, and I own THIS sprayer and would use it in a heartbeat to paint my cabinets, the next time I move into a house that needs to a paint job!)

Failure to plan is planning to fail! 🙂
I also came up with a plan ahead of time, since one thing I wanted to do was add trim, molding, and feet to make my cabinets look more custom and built in. I used my miter saw heavily for this project, and this blog post by Diane at In My Own Style was so helpful in my planning. I trimmed all around my island and at both end cabinets on my walls, and added feet under the sink and the cooktop.
")
")
I bought all of the trim at Home Depot, and the “feet” aren’t really feet. They’re in the no-miter molding section, which is funny because I cut miters all through this kitchen but still bought the no-trim pieces just because they’re decorative. I used Liquid Nails and finish nails to hold everything in place, and I painted the trim and feet before I put them into place.
Once all the hardware is off, you remove the cabinet doors (label them so you know which ones are which) and wash everything down. Then you sand, wipe down again, prime, sand, wipe down again, paint, sand, wipe down again, and finally–paint again! I put my doors on cans but obviously they took a LONG time, since they have to dry thoroughly before you can flip them and paint the other side. My family is so needy, too–they expected me to cook and feed them during the month that this was going on! 🙂 Once you’ve rehung the doors and drawers, you just have to put on the hardware and caulk (I used two tubes of caulk–you can see every gap when your cabinets are white!).
")
The dining room is a great workshop!
I ordered new hardware from Amazon (brushed nickel knobs and pin pulls) and sold the old ones on Craigslist. The hardware was incredibly reasonable on Amazon, plus I got free shipping, and no tax, which is a big deal in Tennessee where sales tax is 10%. I also bought a new bridge faucet on Amazon for under $200 and threw the old one away (contractor-grade with a nasty big water filter thing stuck on it). We had a devil of a time getting the old faucet off, for some reason, but once the new one was on, I was thrilled. Ignore the backsplash, it’s going away soon (Update: see my painted tile backsplash, and how it’s held up, HERE).
")
Brushed nickel bridge faucet

We also sprung for a new French-door stainless steel refrigerator and a new stainless steel dishwasher. We sold the old appliances on Craigslist and probably covered the cost of all that Satin Impervo paint I used! That stuff is expensive, by the way. Good, but expensive.
I also painted the walls. They were blue, and while I like the color and kept it in my laundry room, I wanted to continue to brighten up this room. The screened porch is right off the kitchen and blocks a lot of the light, so I wanted to help it along any way I could. I painted the walls Old Prairie by Benjamin Moore (I used their Aura paint and it gave me single-coat coverage over the blue without primer), but I think I’m going to repaint them in BM’s Camouflage when I have the time (see the update here).
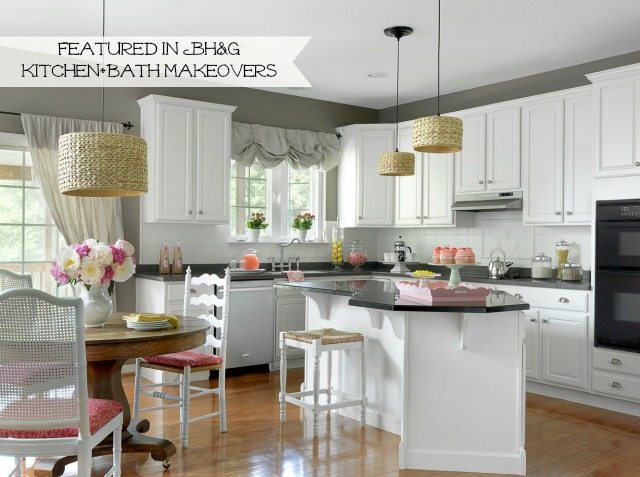
Last, but not least, I ordered three of the recessed-to-pendant light adapters to put over the island and the table to define those spaces. I chose the seagrass drum shades to add a little texture, plus I thought they’d coordinate with the rush seats on the counter stools. I also hung a balloon shade that I already had over the sink. So, drumroll please, here is the reveal:

Ahh, much better!
The counter stools are from Amazon, and were a little less than Ballard was charging for pretty much the exact same ones. My four mismatched kitchen chairs are from Goodwill; I painted them a few houses ago so they’d all “match.” The antique oak pedestal table is off Craigslist–my grandmother had one just like and it weighs a ton.

The hooks on the island are from Hobby Lobby. I was tempted to add beadboard around the island, but realized I’d probably have to buy a table saw to get that job done, so I bagged it (for now).

The island–topped with black granite.
You can see the completed trim work on the end cabinet below–not bad, if I do say so myself!


I added “feet” under the sink and the cooktop areas.


I decided to mix the hardware up a bit in the desk area, so I put up these “B” knobs that I found at Hobby Lobby a few years ago (but they still have them if you’re in the market). They move with us!

I’ve never met a “B” I didn’t like!


So there it is–my new kitchen, otherwise known as “what I did for my entire summer vacation.” I mentioned that I still have things to do, because of course, it’s never really done. Here’s the short (haha) list: get the pantry organized and awesome like in our old house (read about that here), repaint the walls in Benjamin Moore’s Camouflage, figure out a window treatment for the sliding doors that lead out to the screened porch, replace the black wall ovens with stainless (as soon as I find $2500 sitting around), run a gas line to the kitchen and change out the ceramic cooktop for a gas one, take down the ugly black exhaust hood (that isn’t even vented to the outside even though it’s on an exterior wall–grrr!) and replace it was a really cool custom one, put glass panels in a couple of cabinet doors, add under-cabinet lighting, find a wine fridge on Craigslist that fits next to the desk, and, last but not least, take down the backsplash and replace it with something white (subway tile? marble? pressed tin?). Do you see why I consider it only half done, with a to-do list that long?
Thanks for sticking with me through such a hideously long post. I feel much better now that I’ve gotten it all out, though, and I hope you’ll hang around through the rest of the updates. I have to hurry–we’ll be moving in another year and a half!

Thanks for stopping by!
{Edit: I have since painted the walls, the tile backsplash and the vent hood–read my PART 2 post to see my latest changes, and click {here} to read about the magazine feature for this kitchen}
Sources:
Paint Colors: Benjamin Moore’s Old Prairie (wall), BM White Dove (cabinets)
Stools: Amazon
Bridge Faucet: Amazon
Cup pulls and cabinet knobs: Amazon (and the best price by far that I’ve seen!)
Pedestal table and chairs: vintage